00 min read

Argo CD is a declarative, GitOps-based continuous delivery tool designed for Kubernetes. It allows you to manage and automate application deployment using Git as the single source of truth. Argo CD continuously monitors your Git repository and ensures the Kubernetes environment matches the desired state described in your manifest.
Step 1: Create and Connect to a Kubernetes Cluster
Steps to Create and Connect
Create a Kubernetes Cluster
If you’re using Google Kubernetes Engine (GKE), you can create a cluster using the following command:
gcloud container clusters create <cluster name> — zone <zone of cluster>
Replace <cluster name> with your desired cluster name and <zone of cluster> with your preferred zone.
Connect to the Cluster
Once the cluster is created, configure kubectl (the Kubernetes CLI) to interact with it:
gcloud container clusters get-credentials argo-test — zone us-central1-c
Verify the connection by listing the nodes in the cluster:
kubectl get nodes
Step 2: Install Argo CD
Installing Argo CD means deploying its server, UI, and supporting components as Kubernetes resources in a namespace.
Steps to Install
Create a Namespace for Argo CD
A namespace in Kubernetes is a logical partition to organize resources:
kubectl create namespace argocd
Install Argo CD Components
Use the official installation manifest to deploy all Argo CD components:
kubectl apply -n argocd -f https://raw.githubusercontent.com/argoproj/argo-cd/stable/manifests/install.yaml
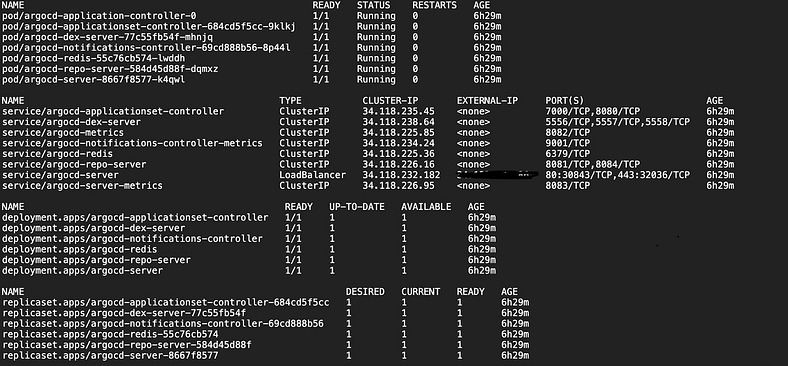
This deploys key components like the API server, repository server, application controller, and web UI.
Step 3: Expose Argo CD Publicly
By default, the argocd-server service is configured as a ClusterIP, making it accessible only within the cluster. You need to expose it for external access.
Options to Expose Argo CD
Option-1 LoadBalancer
Change the service type to LoadBalancer to get an external IP address:
kubectl patch svc argocd-server -n argocd -p ‘{“spec”: {“type”: “LoadBalancer”}}’
Ingress
For advanced routing and SSL support, create an Ingress resource. This approach is recommended if you want to add HTTPS to your setup.
Option-2 Port Forwarding
If you only need temporary access:
kubectl port-forward svc/argocd-server -n argocd 8080:80
Step 4: Access the Argo CD Dashboard
Retrieve the External IP
After exposing the service as a LoadBalancer, get the external IP address:
kubectl get svc argocd-server -n argocd
Login Credentials
Username: admin
Password: Retrieve it from the secret:
kubectl get secret argocd-initial-admin-secret -n argocd -o yaml
Decode the base64 password:
echo “<base64_encoded_password>” | base64 — decode
Access the dashboard by navigating to https://<external-ip> in your browser.
Step 5: Install the Argo CD CLI
The Argo CD CLI enables you to interact with the Argo CD server programmatically for managing clusters, applications, and configurations.
Steps to Install
Download the CLI
curl -sSL -o argocd-linux-amd64 https://github.com/argoproj/argo-cd/releases/latest/download/argocd-linux-amd64
Install the CLI
sudo install -m 555 argocd-linux-amd64 /usr/local/bin/argocd
rm argocd-linux-amd64
Verify Installation
argocd version

Step 6: Add a Kubernetes Cluster to Argo CD
Argo CD requires access to the Kubernetes cluster where it will deploy applications.
Steps to Add
Log in to Argo CD via CLI
argocd login <argocd-server-url>:<port> — username admin — password <password>
Get the Kubernetes Context
kubectl config get-contexts -o name
Add the Cluster
argocd cluster add <context-name>
This command creates a service account (argocd-manager) with cluster-wide permissions to deploy applications.
To Verify the added cluster via cli use below command else navigate to the ui dashboard setting -> cluster
argocd cluster list

Step 7: Add a Git Repository
The Git repository serves as the source of truth for application manifests.
Steps to Add
- Navigate to Repositories
Log in to the Argo CD dashboard, go to Settings -> Repositories, and click Connect Repo. - Enter Repository Details
- Choose a connection method (e.g., HTTPS or SSH).
- Provide the repository URL and credentials.
- Assign a project to organize repositories.
Step 8: Create an Application in Argo CD
An Argo CD application represents the Kubernetes resources defined in a Git repository.
Steps to Create
Click New App
Enter the application details:
- Application Name: e.g., hello-world
- Project: Assign the application to a project.
- Source: Select the Git repository and specify the manifest file path.
- Destination: Select the cluster and namespace for deployment.
- Enable Auto-Sync policy
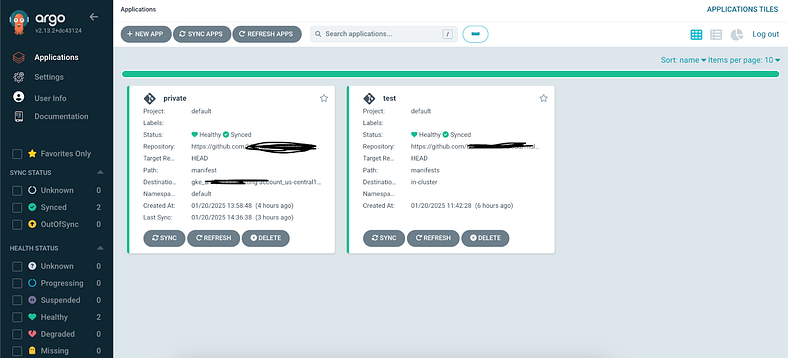
Enable this option for automated synchronization between the Git repository and the Kubernetes cluster. - Create the Application
Click Create. Argo CD will deploy the application and monitor its state.
Automating Kubernetes Deployments with Argo CD
.png)
Argo CD is a declarative, GitOps-based continuous delivery tool designed for Kubernetes. It allows you to manage and automate application deployment using Git as the single source of truth. Argo CD continuously monitors your Git repository and ensures the Kubernetes environment matches the desired state described in your manifest.
Step 1: Create and Connect to a Kubernetes Cluster
Steps to Create and Connect
Create a Kubernetes Cluster
If you’re using Google Kubernetes Engine (GKE), you can create a cluster using the following command:
gcloud container clusters create <cluster name> — zone <zone of cluster>
Replace <cluster name> with your desired cluster name and <zone of cluster> with your preferred zone.
Connect to the Cluster
Once the cluster is created, configure kubectl (the Kubernetes CLI) to interact with it:
gcloud container clusters get-credentials argo-test — zone us-central1-c
Verify the connection by listing the nodes in the cluster:
kubectl get nodes
Step 2: Install Argo CD
Installing Argo CD means deploying its server, UI, and supporting components as Kubernetes resources in a namespace.
Steps to Install
Create a Namespace for Argo CD
A namespace in Kubernetes is a logical partition to organize resources:
kubectl create namespace argocd
Install Argo CD Components
Use the official installation manifest to deploy all Argo CD components:
kubectl apply -n argocd -f https://raw.githubusercontent.com/argoproj/argo-cd/stable/manifests/install.yaml
This deploys key components like the API server, repository server, application controller, and web UI.
Step 3: Expose Argo CD Publicly
By default, the argocd-server service is configured as a ClusterIP, making it accessible only within the cluster. You need to expose it for external access.
Options to Expose Argo CD
Option-1 LoadBalancer
Change the service type to LoadBalancer to get an external IP address:
kubectl patch svc argocd-server -n argocd -p ‘{“spec”: {“type”: “LoadBalancer”}}’
Ingress
For advanced routing and SSL support, create an Ingress resource. This approach is recommended if you want to add HTTPS to your setup.
Option-2 Port Forwarding
If you only need temporary access:
kubectl port-forward svc/argocd-server -n argocd 8080:80
Step 4: Access the Argo CD Dashboard
Retrieve the External IP
After exposing the service as a LoadBalancer, get the external IP address:
kubectl get svc argocd-server -n argocd
Login Credentials
Username: admin
Password: Retrieve it from the secret:
kubectl get secret argocd-initial-admin-secret -n argocd -o yaml
Decode the base64 password:
echo “<base64_encoded_password>” | base64 — decode
Access the dashboard by navigating to https://<external-ip> in your browser.
Step 5: Install the Argo CD CLI
The Argo CD CLI enables you to interact with the Argo CD server programmatically for managing clusters, applications, and configurations.
Steps to Install
Download the CLI
curl -sSL -o argocd-linux-amd64 https://github.com/argoproj/argo-cd/releases/latest/download/argocd-linux-amd64
Install the CLI
sudo install -m 555 argocd-linux-amd64 /usr/local/bin/argocd
rm argocd-linux-amd64
Verify Installation
argocd version
Step 6: Add a Kubernetes Cluster to Argo CD
Argo CD requires access to the Kubernetes cluster where it will deploy applications.
Steps to Add
Log in to Argo CD via CLI
argocd login <argocd-server-url>:<port> — username admin — password <password>
Get the Kubernetes Context
kubectl config get-contexts -o name
Add the Cluster
argocd cluster add <context-name>
This command creates a service account (argocd-manager) with cluster-wide permissions to deploy applications.
To Verify the added cluster via cli use below command else navigate to the ui dashboard setting -> cluster
argocd cluster list
Step 7: Add a Git Repository
The Git repository serves as the source of truth for application manifests.
Steps to Add
- Navigate to Repositories
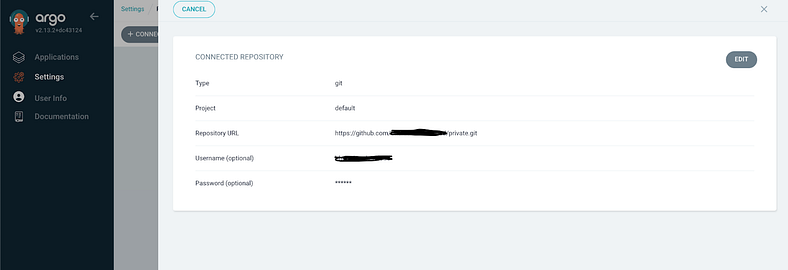
Log in to the Argo CD dashboard, go to Settings -> Repositories, and click Connect Repo. - Enter Repository Details
- Choose a connection method (e.g., HTTPS or SSH).
- Provide the repository URL and credentials.
- Assign a project to organize repositories.
Step 8: Create an Application in Argo CD
An Argo CD application represents the Kubernetes resources defined in a Git repository.
Steps to Create
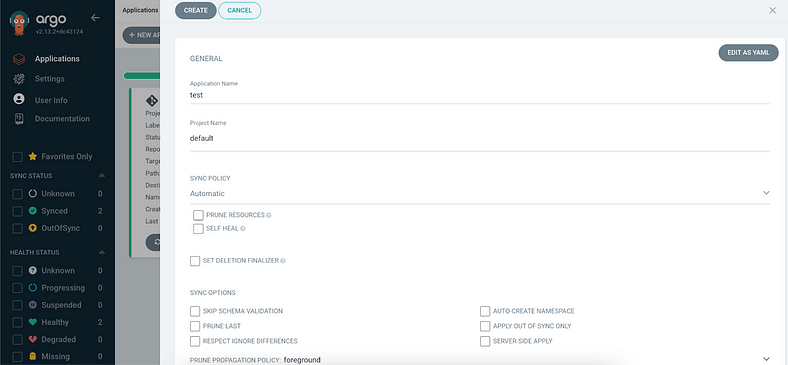
Click New App
Enter the application details:
- Application Name: e.g., hello-world
- Project: Assign the application to a project.
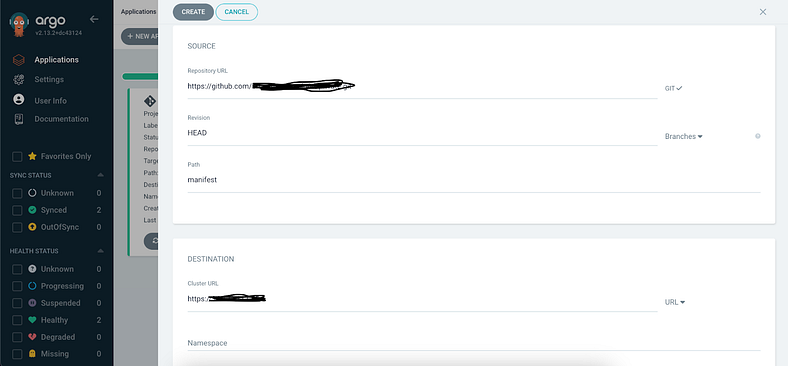
- Source: Select the Git repository and specify the manifest file path.
- Destination: Select the cluster and namespace for deployment.
- Enable Auto-Sync policy
Enable this option for automated synchronization between the Git repository and the Kubernetes cluster. - Create the Application
Click Create. Argo CD will deploy the application and monitor its state.