
From project-specific support to managed services, we help you accelerate time to market, maximise cost savings and realize your growth ambitions
Industry-Specific Cloud Solutions

Revolutionizing Mobility with Tailored Cloud Solutions

Revolutionizing Healthcare with Tailored Cloud Solutions

Revolutionizing Life Sciencewith Tailored Cloud Solutions

Revolutionizing Manufacturing with Tailored Cloud Solutions

Revolutionizing Financial Services with Tailored Cloud Solutions

Revolutionizing Process Automation with Tailored Cloud Solutions

Revolutionizing ISV / Technology with Tailored Cloud Solutions

Revolutionizing Public Sector/Non-Profit with Tailored Cloud Solutions
SUCCESS STORIES
Our Customers Stories

gocomo Migrates Social Data Platform to AWS for Performance & Scalability with Ankercloud


Migration a Saas platform from On-Prem to GCP


Benchmarking AWS performance to run environmental simulations over Belgium
.jpg)
Countless Happy Clients and Counting!

“Ankercloud has been very helpful and understanding. All interactions have been smooth and enjoyable.”
.png)
.png)
Awards and Recognition


Our Latest Achievement


.svg)

.svg)
Ankercloud: Partners with AWS, Google Cloud, Azure, STACKIT, and OpenAI
Through strategic partnerships with AWS, Google Cloud, Azure, STACKIT, and OpenAI, we enable enterprises with advanced AI, GenAI, Sovereign Cloud, and modern cloud technologies to drive innovation, security, and scalable growth.


Check out our blog

Moving Beyond Dots on a Map: The Power of Smart Geo-Location in IoT Fleet Operations
The "Tracking Trap": Why GPS Alone is Not Enough
For years, fleet management was synonymous with simple GPS tracking. If you could see a vehicle's position on a map, you felt in control. But in the age of high-velocity logistics and stringent SLAs, seeing a "dot on a map" is no longer sufficient.
Raw GPS data is noisy. It drifts, it creates false alarms, and most importantly, it requires a human to watch the screen to make sense of it. Without smart processing, you aren't managing a fleet, you’re just watching a screen.
At Ankercloud, we believe the true value of location data lies in Smart Geo-Location Handling, the process of transforming raw coordinates into meaningful operational events.
From Location Data to Location Intelligence
The challenge with modern fleets isn't a lack of data; it's the "signal-to-noise" ratio. Vehicles transmit latitude, speed, and ignition status every few seconds. Smart IoT platforms take this stream and apply rule-driven, context-aware logic to answer the questions that actually matter:
- Is the vehicle in a restricted zone?
- How long has it been idling at the loading dock?
- Did it arrive at the school zone exactly on time?
By moving from passive tracking to Smart Control, fleet operators can stop monitoring maps and start managing exceptions.
Five Capabilities Redefining Fleet Efficiency
How does smart geo-location transform your daily operations?
1. Automated Trip Lifecycle Management
By defining Route Start and End Zones, the system automatically triggers trip logs. When a vehicle exits the depot, the "Route Active" state begins; when it returns, the trip analytics are finalized and archived without a single manual entry.
2. High-Precision Pickup & Drop Zones
Using radius and polygon-based Geo-fencing, the platform detects the exact moment a vehicle enters a delivery site. This triggers "Arrival" notifications for the customer and can even initiate secondary validation, such as BLE beacon scanning, to ensure the right cargo is in the right place.
3. Safety & Compliance via "Speed Zones"
Not all miles are equal. Smart systems monitor speed thresholds relative to the specific zone. If a vehicle exceeds a safety limit in a school area or a high-security warehouse yard, the system triggers an instant alert and updates the driver’s safety score.
4. False-Alert Suppression (Buffer Logic)
GPS signals often "drift" or "bounce" near the edges of a zone, leading to a flood of false entry/exit alerts. Smart geo-location handling uses Buffer Zones and historical context to verify a state change, ensuring your operators only receive alerts that are real.
5. Proactive Idle Monitoring
Idling is a silent killer of fuel efficiency. By monitoring Dwell-Time in non-operational zones, the platform identifies potential breakdowns or unauthorized breaks, allowing you to intervene before a small delay becomes an SLA breach.
Architecture of a Smart Fleet
The flow of intelligence is seamless, moving from the edge to the dashboard:
- Vehicle GPS Device: Transmits raw telemetry via MQTT/HTTP.
- IoT Platform Layer: Ingests coordinates and validates state.
- Geo-Fencing Engine: Applies business rules (speed, zones, time).
- Event Engine: Generates actionable alerts and historical logs.
- Operational Dashboard: Displays insights, not just dots.
The Business Impact: Real-World ROI
Implementing smart geo-location logic delivers more than just visibility; it delivers a better bottom line:
- Reduced Fuel Consumption: Through aggressive idle and route monitoring.
- Improved SLA Compliance: With automated arrival/departure timestamps.
- Enhanced Safety: By enforcing speed-control zones and restricted area monitoring.
- Lower Operational Friction: Reducing the need for manual map monitoring by up to 70%.
The Ankercloud Edge
As an AWS and GCP Premier Tier Partner, Ankercloud understands the complexities of global fleet operations. We specialize in building the "intelligence layer" that turns raw sensor data into high-stakes business outcomes.
Geo-location is no longer just about where your vehicles are; it’s about what they are doing for your business. Let us help you move from tracking to control.
Ready to turn your fleet's GPS data into operational intelligence? Contact Ankercloud today for a 1-houry strategy session on Smart Geo-Location.
2
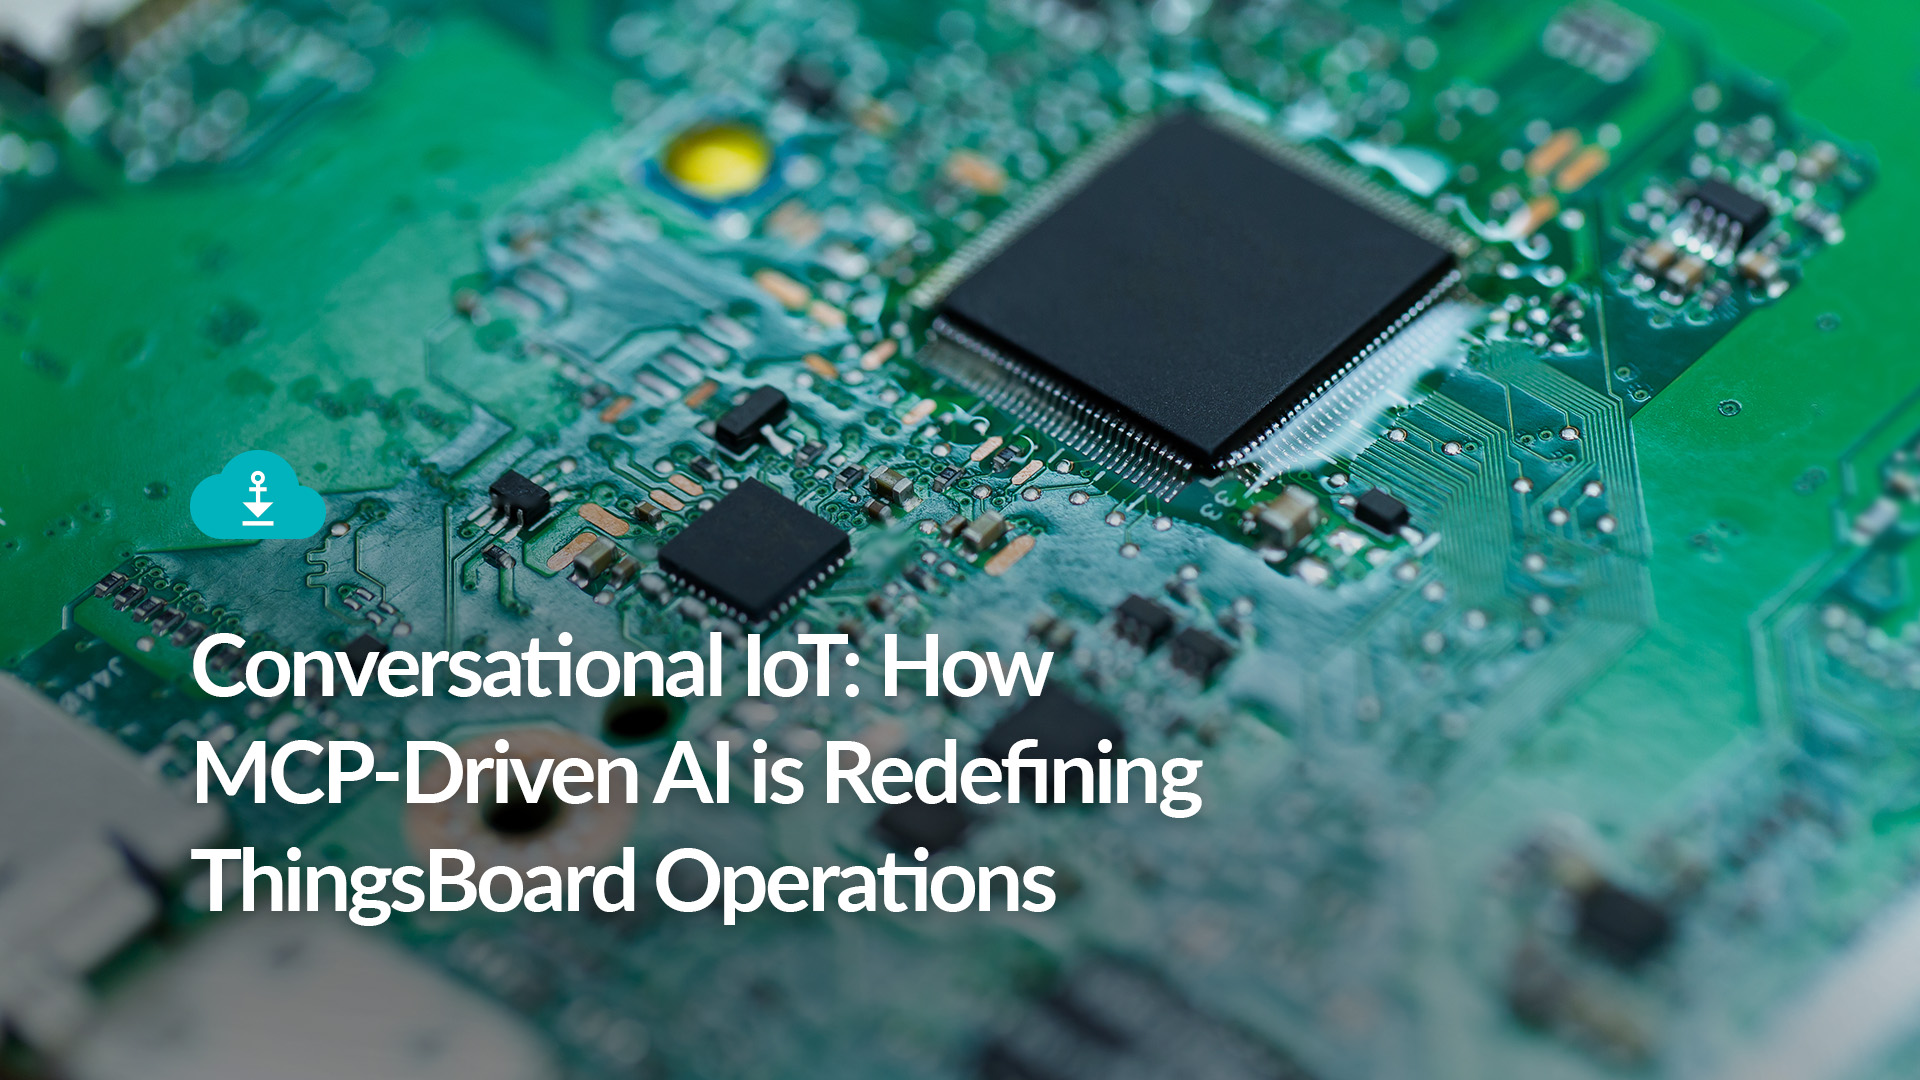
Conversational IoT: How MCP-Driven AI is Redefining ThingsBoard Operations
The "Dashboard Fatigue" in Modern IoT
Modern IoT environments are incredibly talkative. Every second, they generate a mountain of telemetry, alarms, and metadata. Platforms like ThingsBoard have done a brilliant job of collecting and visualizing this data, but there is a hidden cost: Access.
Historically, if you wanted to extract a specific contextual insight—like analyzing a temperature anomaly over a 7-day period, you needed one of three things: deep platform familiarity, REST API scripting skills, or a custom-built dashboard. This creates an "operational gate" where only technical users can truly "speak" to the machines.
At Ankercloud, we believe the next evolution of Industry 4.0 isn't just about more data, it’s about Conversational Intelligence.
Introducing the ThingsBoard MCP Server
The game-changer in this space is the Model Context Protocol (MCP). By implementing a dedicated ThingsBoard MCP Server, we are layering a secure intelligence interface over your existing deployment.
This allows Large Language Models (LLMs) and AI agents (like Claude or Gemini) to interact directly with your ThingsBoard environment. You no longer need to navigate three different nested dashboards to find a fault; you simply ask the AI to find it for you.
Architecture Overview: The Intelligence Layer
The ThingsBoard MCP Server acts as the secure translator between human intent and machine data. Instead of manual API calls, the system follows a seamless, automated flow:
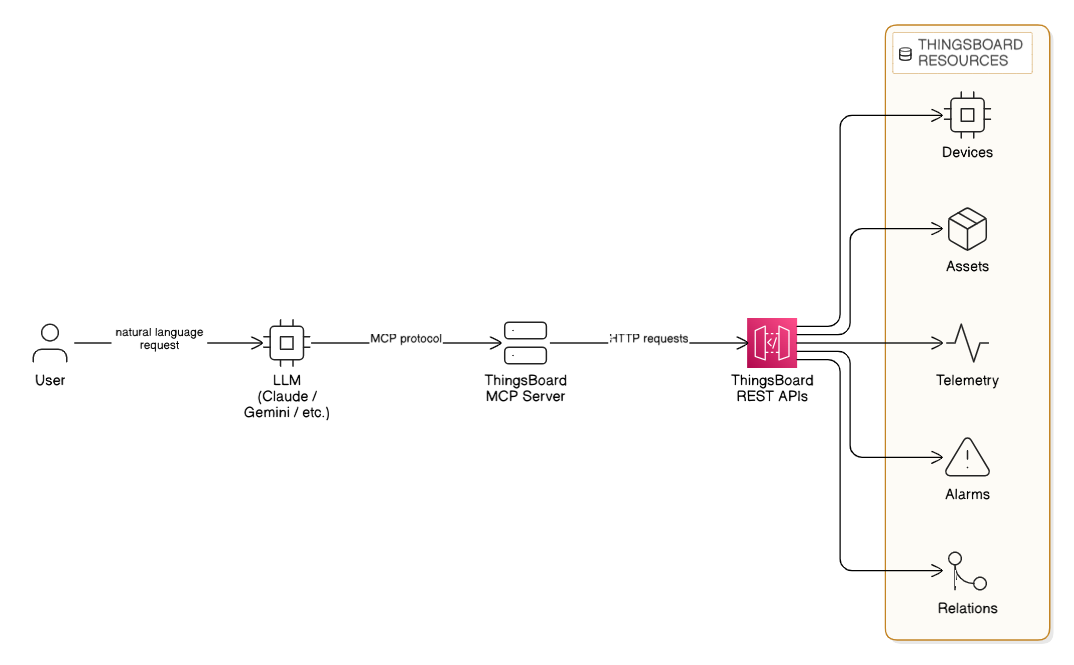
- User Request: A user makes a request in plain English (e.g., "Analyze Site-A telemetry").
- LLM Processing: An LLM (Claude, Gemini, etc.) interprets the intent.
- MCP Protocol: The LLM communicates with the ThingsBoard MCP Server via the MCP protocol.
- API Execution: The MCP server sends structured HTTP requests to the ThingsBoard REST APIs.
- Resource Retrieval: The system securely accesses specific ThingsBoard Resources including Devices, Assets, Telemetry, Alarms, and Entity Relations.
This architecture ensures that your data remains secure within your environment while becoming instantly accessible through conversation.
From "Scripting" to "Asking": A Paradigm Shift
Traditional IoT operations rely on manual exploration. The ThingsBoard MCP Server replaces that friction with natural language.
Imagine your operations team asking:
- "Analyze the vibration anomalies for Machine-12 over the last 48 hours."
- "Which Site-A sensors triggered critical alarms yesterday?"
- "Show me the relationship between this failed pump and its upstream power supply."
The MCP server translates these human requests into structured API calls, analyzes the results, and hands you back an actionable answer in seconds.
Four Core Capabilities of AI-Driven Operations
1. Intelligent Entity Management
AI agents can now navigate your assets, devices, and hierarchies through conversation. This makes administrative tasks like checking credentials or mapping new customers, faster and more intuitive for non-technical stakeholders.
2. Contextual Telemetry Interaction
Retrieving time-series data usually requires setting up specific widgets. With MCP, your AI agent can fetch aggregated data, compare latest values, and even update telemetry keys through a single chat interface. It turns "data points" into "data stories."
3. Rapid Alarm Intelligence
Root-cause analysis is often a race against the clock. AI agents can instantly filter alarms by severity, identify high-risk alert clusters, and cross-reference them with historical trends to tell you not just what happened, but why it might be happening again.
4. Navigating the Digital Twin
The true power of ThingsBoard lies in its entity relationships. The MCP server allows AI systems to traverse asset hierarchies and discover directional relations. This adds true contextual intelligence, understanding that a "High Heat" alarm on a motor is critical because that motor powers a "Priority-1" production line.
Why This Matters: The Business Impact
As an AWS and GCP Premier Tier Partner, Ankercloud sees a recurring theme among our global industrial clients: They want to move faster.
Introducing MCP-driven AI operations delivers measurable ROI by:
- Reducing Dashboard Dependency: Empowering managers to get insights without waiting for a technical report.
- Accelerating Root-Cause Analysis: Turning hours of manual data-combing into seconds of AI-assisted investigation.
- Improving Platform Adoption: Making advanced IoT data accessible to everyone in the organization, from the shop floor to the C-suite.
The Future is Autonomous
ThingsBoard has evolved from a monitoring platform into an Intelligent Operational Assistant. With the ThingsBoard MCP Server, your IoT platform is no longer just a collection of charts, it’s a conversational partner that understands your business rules and your machine data.
AI-driven IoT operations are no longer a future concept; they are a production-ready reality that simplifies the complex.
Ready to turn your IoT data into conversational intelligence? Contact Ankercloud today for a 1-hour strategy session on ThingsBoard MCP integration.
2
Beyond the Factory Floor: Why Your Smart Manufacturing Strategy Needs IoT and CRM Integration
The Intelligence Gap in Industry 4.0
For the past decade, the "Smart Factory" has been the holy grail of manufacturing. We have invested billions into automation, edge computing, and real-time monitoring. Our machines are talkative streaming runtime data, fault codes, and OEE metrics 24/7.
But here is the hard truth: If your factory floor doesn’t talk to your customer service team, your factory isn’t truly "smart."
A critical gap still exists in most industrial organizations. Operational data (OT) rarely connects directly to Customer Relationship Management (CRM) systems. This disconnect creates a "visibility wall" where the people responsible for the machines know exactly what’s happening, but the people responsible for the customers are left in the dark.
At Ankercloud, we believe the future of manufacturing isn't just defined by automation, it’s defined by connectivity and customer-centricity.
The High Cost of Siloed Systems
When factory operations and customer engagement live in separate silos, the business pays the price in friction:
- Service teams are reactive: They wait for a customer to call and complain about a breakdown that the machine reported hours ago.
- SLA risks are invisible: Production slowdowns go unnoticed by sales teams until a delivery is already late.
- Trust is eroded: Customers receive delayed information, leading to frustration and missed opportunities for proactive support.
A smart factory without a connected CRM is like a high-performance engine without a dashboard, it’s running fast, but you have no idea if you’re heading toward a breakdown or a finish line.
Closing the Loop: The IoT + CRM Architecture
Integrating an Industry 4.0 IoT platform with your CRM (like Salesforce, Dynamics 365, or HubSpot) creates a live reflection of your operations. Here is how we build that bridge:
- The Factory Layer: Sensors and PLCs collect machine telemetry (vibration, heat, cycles) in real-time via OPC-UA or MQTT gateways.
- The IoT Platform Layer: A platform like AWS IoT Core ingests this data, computes KPIs like OEE, and triggers alarms based on anomalies.
- The CRM Integration Layer: This is where the magic happens. Through secure APIs, factory events trigger automated workflows in your CRM.
Four Use Cases That Redefine the Customer Experience
How does this integration look in practice?
1. The "Self-Healing" Service Case
A machine on the floor throws a fault code. Instead of waiting for a manual check, the IoT platform automatically creates a service case in the CRM, assigns a technician, and orders the necessary replacement part before the production manager even finishes their coffee.
2. Proactive SLA Guardrails
If production throughput falls below a certain threshold on a custom order, the system detects a potential delay. The CRM instantly updates the account manager, allowing them to notify the customer proactively with a new timeline, preserving trust through transparency.
3. Predictive Maintenance as a Service
Using AI-driven analytics, we identify degradation trends. The CRM then automatically schedules preventive maintenance during a planned customer downtime window, ensuring the machine never reaches the point of actual failure.
4. Direct Customer Portals
Imagine a world where your customers don’t have to call for an update. They can log into a portal powered by your CRM and see the near real-time production status of their specific order, driven by live IoT data from the line.
The Business Impact: Turning Data into Revenue
Integrating IoT with CRM isn't just a technical upgrade; it's a financial one. Our clients see measurable ROI in:
- 80% faster issue response times: Moving from manual reporting to automated triggers.
- Higher Customer Lifetime Value (CLV): Transparency and proactivity build long-term loyalty.
- Optimized Service Revenue: Predictive maintenance allows you to sell "uptime" as a service rather than just parts and labor.
The Ankercloud Edge
As an AWS and GCP Premier Tier Partner, Ankercloud specializes in building the "connective tissue" of modern manufacturing. We don't just deploy sensors; we engineer end-to-end ecosystems where machine telemetry becomes a revenue-enabling asset.
Industry 4.0 is no longer just about making things better; it’s about serving people better. By making your factory "customer-aware," you aren't just building a smart factory, you’re building a connected, intelligent, and future-proof business.
Is your factory talking to your customers? Contact Ankercloud today for a 1-hour strategy session on IoT and CRM integration.
2
Moving Beyond Dots on a Map: The Power of Smart Geo-Location in IoT Fleet Operations
The "Tracking Trap": Why GPS Alone is Not Enough
For years, fleet management was synonymous with simple GPS tracking. If you could see a vehicle's position on a map, you felt in control. But in the age of high-velocity logistics and stringent SLAs, seeing a "dot on a map" is no longer sufficient.
Raw GPS data is noisy. It drifts, it creates false alarms, and most importantly, it requires a human to watch the screen to make sense of it. Without smart processing, you aren't managing a fleet, you’re just watching a screen.
At Ankercloud, we believe the true value of location data lies in Smart Geo-Location Handling, the process of transforming raw coordinates into meaningful operational events.
From Location Data to Location Intelligence
The challenge with modern fleets isn't a lack of data; it's the "signal-to-noise" ratio. Vehicles transmit latitude, speed, and ignition status every few seconds. Smart IoT platforms take this stream and apply rule-driven, context-aware logic to answer the questions that actually matter:
- Is the vehicle in a restricted zone?
- How long has it been idling at the loading dock?
- Did it arrive at the school zone exactly on time?
By moving from passive tracking to Smart Control, fleet operators can stop monitoring maps and start managing exceptions.
Five Capabilities Redefining Fleet Efficiency
How does smart geo-location transform your daily operations?
1. Automated Trip Lifecycle Management
By defining Route Start and End Zones, the system automatically triggers trip logs. When a vehicle exits the depot, the "Route Active" state begins; when it returns, the trip analytics are finalized and archived without a single manual entry.
2. High-Precision Pickup & Drop Zones
Using radius and polygon-based Geo-fencing, the platform detects the exact moment a vehicle enters a delivery site. This triggers "Arrival" notifications for the customer and can even initiate secondary validation, such as BLE beacon scanning, to ensure the right cargo is in the right place.
3. Safety & Compliance via "Speed Zones"
Not all miles are equal. Smart systems monitor speed thresholds relative to the specific zone. If a vehicle exceeds a safety limit in a school area or a high-security warehouse yard, the system triggers an instant alert and updates the driver’s safety score.
4. False-Alert Suppression (Buffer Logic)
GPS signals often "drift" or "bounce" near the edges of a zone, leading to a flood of false entry/exit alerts. Smart geo-location handling uses Buffer Zones and historical context to verify a state change, ensuring your operators only receive alerts that are real.
5. Proactive Idle Monitoring
Idling is a silent killer of fuel efficiency. By monitoring Dwell-Time in non-operational zones, the platform identifies potential breakdowns or unauthorized breaks, allowing you to intervene before a small delay becomes an SLA breach.
Architecture of a Smart Fleet
The flow of intelligence is seamless, moving from the edge to the dashboard:
- Vehicle GPS Device: Transmits raw telemetry via MQTT/HTTP.
- IoT Platform Layer: Ingests coordinates and validates state.
- Geo-Fencing Engine: Applies business rules (speed, zones, time).
- Event Engine: Generates actionable alerts and historical logs.
- Operational Dashboard: Displays insights, not just dots.
The Business Impact: Real-World ROI
Implementing smart geo-location logic delivers more than just visibility; it delivers a better bottom line:
- Reduced Fuel Consumption: Through aggressive idle and route monitoring.
- Improved SLA Compliance: With automated arrival/departure timestamps.
- Enhanced Safety: By enforcing speed-control zones and restricted area monitoring.
- Lower Operational Friction: Reducing the need for manual map monitoring by up to 70%.
The Ankercloud Edge
As an AWS and GCP Premier Tier Partner, Ankercloud understands the complexities of global fleet operations. We specialize in building the "intelligence layer" that turns raw sensor data into high-stakes business outcomes.
Geo-location is no longer just about where your vehicles are; it’s about what they are doing for your business. Let us help you move from tracking to control.
Ready to turn your fleet's GPS data into operational intelligence? Contact Ankercloud today for a 1-houry strategy session on Smart Geo-Location.
Conversational IoT: How MCP-Driven AI is Redefining ThingsBoard Operations
The "Dashboard Fatigue" in Modern IoT
Modern IoT environments are incredibly talkative. Every second, they generate a mountain of telemetry, alarms, and metadata. Platforms like ThingsBoard have done a brilliant job of collecting and visualizing this data, but there is a hidden cost: Access.
Historically, if you wanted to extract a specific contextual insight—like analyzing a temperature anomaly over a 7-day period, you needed one of three things: deep platform familiarity, REST API scripting skills, or a custom-built dashboard. This creates an "operational gate" where only technical users can truly "speak" to the machines.
At Ankercloud, we believe the next evolution of Industry 4.0 isn't just about more data, it’s about Conversational Intelligence.
Introducing the ThingsBoard MCP Server
The game-changer in this space is the Model Context Protocol (MCP). By implementing a dedicated ThingsBoard MCP Server, we are layering a secure intelligence interface over your existing deployment.
This allows Large Language Models (LLMs) and AI agents (like Claude or Gemini) to interact directly with your ThingsBoard environment. You no longer need to navigate three different nested dashboards to find a fault; you simply ask the AI to find it for you.
Architecture Overview: The Intelligence Layer
The ThingsBoard MCP Server acts as the secure translator between human intent and machine data. Instead of manual API calls, the system follows a seamless, automated flow:
- User Request: A user makes a request in plain English (e.g., "Analyze Site-A telemetry").
- LLM Processing: An LLM (Claude, Gemini, etc.) interprets the intent.
- MCP Protocol: The LLM communicates with the ThingsBoard MCP Server via the MCP protocol.
- API Execution: The MCP server sends structured HTTP requests to the ThingsBoard REST APIs.
- Resource Retrieval: The system securely accesses specific ThingsBoard Resources including Devices, Assets, Telemetry, Alarms, and Entity Relations.
This architecture ensures that your data remains secure within your environment while becoming instantly accessible through conversation.
From "Scripting" to "Asking": A Paradigm Shift
Traditional IoT operations rely on manual exploration. The ThingsBoard MCP Server replaces that friction with natural language.
Imagine your operations team asking:
- "Analyze the vibration anomalies for Machine-12 over the last 48 hours."
- "Which Site-A sensors triggered critical alarms yesterday?"
- "Show me the relationship between this failed pump and its upstream power supply."
The MCP server translates these human requests into structured API calls, analyzes the results, and hands you back an actionable answer in seconds.
Four Core Capabilities of AI-Driven Operations
1. Intelligent Entity Management
AI agents can now navigate your assets, devices, and hierarchies through conversation. This makes administrative tasks like checking credentials or mapping new customers, faster and more intuitive for non-technical stakeholders.
2. Contextual Telemetry Interaction
Retrieving time-series data usually requires setting up specific widgets. With MCP, your AI agent can fetch aggregated data, compare latest values, and even update telemetry keys through a single chat interface. It turns "data points" into "data stories."
3. Rapid Alarm Intelligence
Root-cause analysis is often a race against the clock. AI agents can instantly filter alarms by severity, identify high-risk alert clusters, and cross-reference them with historical trends to tell you not just what happened, but why it might be happening again.
4. Navigating the Digital Twin
The true power of ThingsBoard lies in its entity relationships. The MCP server allows AI systems to traverse asset hierarchies and discover directional relations. This adds true contextual intelligence, understanding that a "High Heat" alarm on a motor is critical because that motor powers a "Priority-1" production line.
Why This Matters: The Business Impact
As an AWS and GCP Premier Tier Partner, Ankercloud sees a recurring theme among our global industrial clients: They want to move faster.
Introducing MCP-driven AI operations delivers measurable ROI by:
- Reducing Dashboard Dependency: Empowering managers to get insights without waiting for a technical report.
- Accelerating Root-Cause Analysis: Turning hours of manual data-combing into seconds of AI-assisted investigation.
- Improving Platform Adoption: Making advanced IoT data accessible to everyone in the organization, from the shop floor to the C-suite.
The Future is Autonomous
ThingsBoard has evolved from a monitoring platform into an Intelligent Operational Assistant. With the ThingsBoard MCP Server, your IoT platform is no longer just a collection of charts, it’s a conversational partner that understands your business rules and your machine data.
AI-driven IoT operations are no longer a future concept; they are a production-ready reality that simplifies the complex.
Ready to turn your IoT data into conversational intelligence? Contact Ankercloud today for a 1-hour strategy session on ThingsBoard MCP integration.
Beyond the Factory Floor: Why Your Smart Manufacturing Strategy Needs IoT and CRM Integration
The Intelligence Gap in Industry 4.0
For the past decade, the "Smart Factory" has been the holy grail of manufacturing. We have invested billions into automation, edge computing, and real-time monitoring. Our machines are talkative streaming runtime data, fault codes, and OEE metrics 24/7.
But here is the hard truth: If your factory floor doesn’t talk to your customer service team, your factory isn’t truly "smart."
A critical gap still exists in most industrial organizations. Operational data (OT) rarely connects directly to Customer Relationship Management (CRM) systems. This disconnect creates a "visibility wall" where the people responsible for the machines know exactly what’s happening, but the people responsible for the customers are left in the dark.
At Ankercloud, we believe the future of manufacturing isn't just defined by automation, it’s defined by connectivity and customer-centricity.
The High Cost of Siloed Systems
When factory operations and customer engagement live in separate silos, the business pays the price in friction:
- Service teams are reactive: They wait for a customer to call and complain about a breakdown that the machine reported hours ago.
- SLA risks are invisible: Production slowdowns go unnoticed by sales teams until a delivery is already late.
- Trust is eroded: Customers receive delayed information, leading to frustration and missed opportunities for proactive support.
A smart factory without a connected CRM is like a high-performance engine without a dashboard, it’s running fast, but you have no idea if you’re heading toward a breakdown or a finish line.
Closing the Loop: The IoT + CRM Architecture
Integrating an Industry 4.0 IoT platform with your CRM (like Salesforce, Dynamics 365, or HubSpot) creates a live reflection of your operations. Here is how we build that bridge:
- The Factory Layer: Sensors and PLCs collect machine telemetry (vibration, heat, cycles) in real-time via OPC-UA or MQTT gateways.
- The IoT Platform Layer: A platform like AWS IoT Core ingests this data, computes KPIs like OEE, and triggers alarms based on anomalies.
- The CRM Integration Layer: This is where the magic happens. Through secure APIs, factory events trigger automated workflows in your CRM.
Four Use Cases That Redefine the Customer Experience
How does this integration look in practice?
1. The "Self-Healing" Service Case
A machine on the floor throws a fault code. Instead of waiting for a manual check, the IoT platform automatically creates a service case in the CRM, assigns a technician, and orders the necessary replacement part before the production manager even finishes their coffee.
2. Proactive SLA Guardrails
If production throughput falls below a certain threshold on a custom order, the system detects a potential delay. The CRM instantly updates the account manager, allowing them to notify the customer proactively with a new timeline, preserving trust through transparency.
3. Predictive Maintenance as a Service
Using AI-driven analytics, we identify degradation trends. The CRM then automatically schedules preventive maintenance during a planned customer downtime window, ensuring the machine never reaches the point of actual failure.
4. Direct Customer Portals
Imagine a world where your customers don’t have to call for an update. They can log into a portal powered by your CRM and see the near real-time production status of their specific order, driven by live IoT data from the line.
The Business Impact: Turning Data into Revenue
Integrating IoT with CRM isn't just a technical upgrade; it's a financial one. Our clients see measurable ROI in:
- 80% faster issue response times: Moving from manual reporting to automated triggers.
- Higher Customer Lifetime Value (CLV): Transparency and proactivity build long-term loyalty.
- Optimized Service Revenue: Predictive maintenance allows you to sell "uptime" as a service rather than just parts and labor.
The Ankercloud Edge
As an AWS and GCP Premier Tier Partner, Ankercloud specializes in building the "connective tissue" of modern manufacturing. We don't just deploy sensors; we engineer end-to-end ecosystems where machine telemetry becomes a revenue-enabling asset.
Industry 4.0 is no longer just about making things better; it’s about serving people better. By making your factory "customer-aware," you aren't just building a smart factory, you’re building a connected, intelligent, and future-proof business.
Is your factory talking to your customers? Contact Ankercloud today for a 1-hour strategy session on IoT and CRM integration.
The Ankercloud Team loves to listen