00 min read
In today's cloud-driven world, sensitive data should be kept as secure as possible. IP filtering allows you to control who accesses your storage by enabling it on your Google Cloud buckets so that only trusted networks are allowed to access. This guide will walk you through the step-by-step process for setting up IP filtering.
What is IP Filtering?
IP filtering limits access to a bucket by allowing access only from particular IP ranges or networks. It grants access to your data while blocking traffic requests from unknown or malicious sources.
Key Use Cases for Google Cloud Bucket IP Filtering
1. Compliance Requirements
- Description: Make sure only authorized users can access the bucket to meet legal or industry rules for protecting data.
- Key: Regulatory Adherence (Following Data Protection Rules)
2. Protect Public Buckets
- Description: Enhanced security prevents unauthorized access to publicly accessible buckets by limiting traffic to trusted IPs. This protects sensitive public resources from malicious activity.
- Key: Access Control for Public Data
3. VPC Integration
- Description: Private networking limits bucket access to specific Virtual Private Cloud (VPC) networks. This ensures secure interactions within a well-defined network boundary, enhancing data protection.
- Key: Network-Specific Access
4. Controlled Testing
- Description: Access restriction during testing phases ensures that bucket access is limited to only select IPs or systems. This maintains control over the testing environment and reduces unintended data exposure.
- Key: Testing Environment Control
5. Enhanced Monitoring
- Description: Simplifies audits by restricting access to known and trusted IPs. That is, by allowing access only from trusted IPs, you reduce the number of unknown or suspicious interactions. This makes it easier to track who accessed the bucket and when, simplifying audits and improving transparency.
- Key: Simplified Audit Trails
Supported locations
Bucket IP filtering is available in the following locations:
- asia-south1
- asia-south2
- asia-southeast1
- asia-southeast2
- asia-east1
- asia-east2
- europe-west1
- europe-west2
- us-central1
- us-east1
- us-east4
- us-west1
Limitations
Bucket IP filtering has the following limitations:
- Maximum number of IP CIDR blocks: You can specify a maximum of 200 IP CIDR blocks across public and VPC networks in the IP filter rule for a bucket.
- Maximum number of VPC networks: You can specify a maximum of 25 VPC networks in the IP filter rules for a bucket.
- Dual-region support: IP filtering is not supported for dual-regional buckets.
- Blocked Google Cloud services: Enabling IP filtering on Cloud Storage buckets restricts access for some Google Cloud services, regardless of whether they use a service agent to interact with Cloud Storage.
How to Enable Bucket IP Filtering
Step 1: Install the Google Cloud CLI (Command Line Interface) in the server
SSH into your instance and install the Google Cloud CLI using the following command:
sudo snap install google-cloud-cli --classic
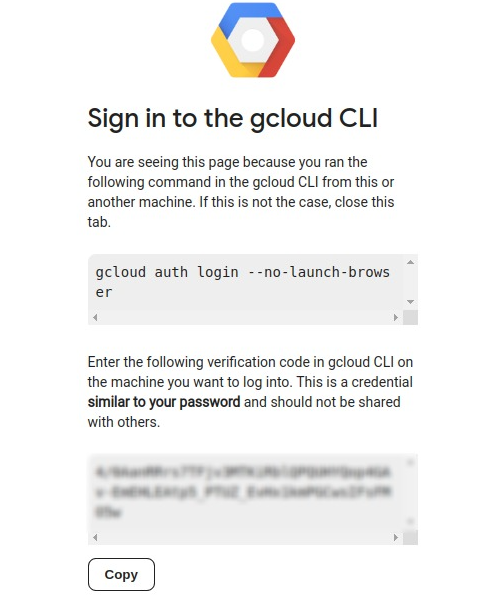
Authenticate with Google Cloud:
gcloud auth login
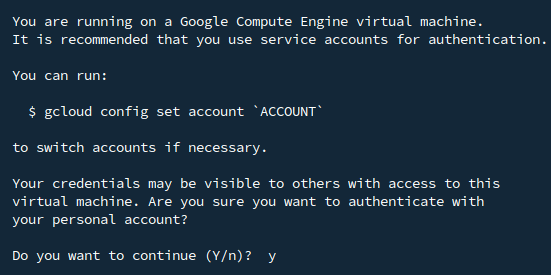
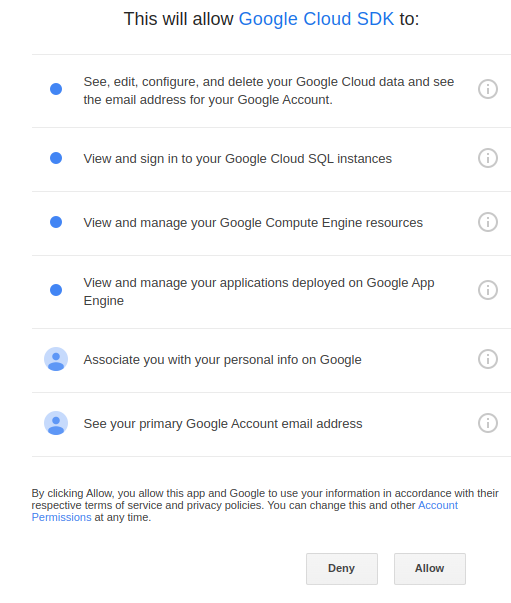
You will be prompted to grant access to your Google account.

Google Cloud SDK wants to access your Google Account


Set the desired project ID:
gcloud config set project [PROJECT_ID]
Step 2: Verify Your Bucket
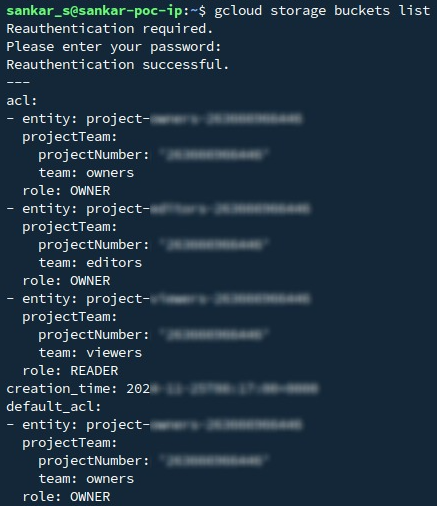
- List all the buckets in your project: gcloud storage buckets list
- Locate the bucket name you want to configure.
Step 3: Prepare the JSON Configuration
Create a JSON file to define your IP filtering rules:
- Open a text editor to create the file:
nano ip-filter-config.json or vim ip-filter-config.json
- Add the following configuration and save the file:
{
"mode": "Enabled",
"publicNetworkSource":
{
"allowedIpCidrRanges": ["RANGE_CIDR"]
},
"vpcNetworkSources":
[
{
"network": "projects/PROJECT_ID/global/networks/NETWORK_NAME",
"allowedIpCidrRanges": ["RANGE_CIDR"]
}
]
}
Replace the IP ranges and VPC network details with your specific requirements.
Step 4: Apply the Configuration
Run the following command to update your bucket with the IP filtering configuration:
gcloud alpha storage buckets update [BUCKET_NAME(gsutil URI)] --ip-filter-file=ip-filter-config.json

Step 5: Verify the Configuration
After applying the rules, describe the bucket to confirm the changes:
gcloud storage buckets describe [BUCKET_NAME(gsutil URI)]
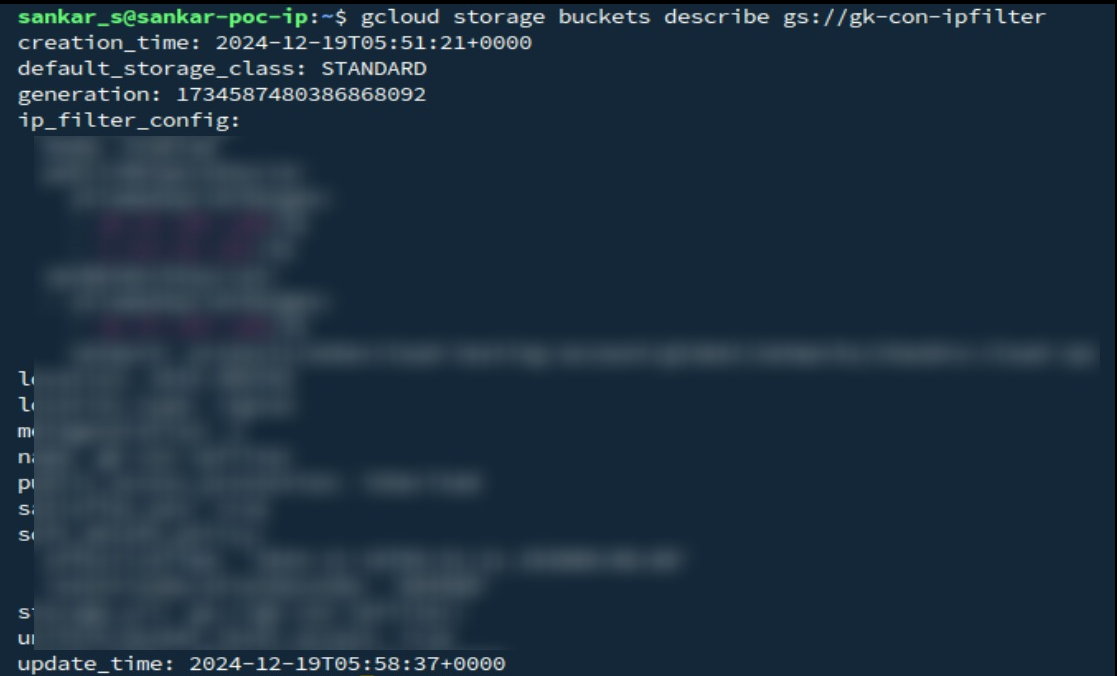
User can see the IP filter configuration in the bucket
Step 5: Test Access
- Ensure requests from allowed IPs can access the bucket.
- Verify that non-whitelisted IPs are denied access.
How to Disable or Remove IP Filtering Disabling IP Filtering
- If we want to disable the modify the json from “Enabled” to “Disabled” and update the bucket to apply the modify configuration.
{
"mode": "Disabled",
"publicNetworkSource":
{
"allowedIpCidrRanges": ["RANGE_CIDR"]
},
"vpcNetworkSources":
[
{
"network": "projects/PROJECT_ID/global/networks/NETWORK_NAME",
"allowedIpCidrRanges": ["RANGE_CIDR"]
}
]
}
Update the bucket with the modified configuration:
gcloud alpha storage buckets update [BUCKET_NAME(gsutil URI)] --ip-filter-file=ip-filter-config.json
Removing IP Filtering Configuration
- To remove any existing IP filtering configuration from the bucket:
gcloud alpha storage buckets update [BUCKET_NAME(gsutil URI)] --ipfiltering --clear-ip-filter
By enabling IP filtering, you can protect your Google Cloud buckets from unauthorized access and ensure compliance with organizational security policies. Whether you are securing sensitive data or limiting access during testing, these steps provide a robust framework for managing bucket security effectively.
Bypass bucket IP filtering rules:
Bypassing bucket IP filtering rules exempts users or service accounts from IP filtering restrictions for creating, deleting, or configuring buckets, while still enforcing rules for others. For more information about bucket IP filtering, see Bucket IP filtering(https://cloud.google.com/storage/docs/ip-filtering-overview).
It's crucial to have a way to regain access to your bucket if you inadvertently block your own IP address. This can happen due to the following reasons:
- Bucket lockout: When you accidentally add a rule that blocks your own IP address or the IP range of your entire network.
- Unexpected IP change: In some cases, your IP address might change unexpectedly due to network changes, and you might find yourself locked out.
To enable specific users or service accounts to bypass IP filtering restrictions on a bucket, grant them the storage.buckets.exemptFromIpFilter permission using a custom role. This permission exempts the user or service account from IP filtering rules for bucket-level operations such as creating, deleting, or configuring buckets. To do so, complete the following steps:
- Identify the user or service account that needs to bypass the IP filtering restrictions on specific buckets.
- Create a custom role.(https://cloud.google.com/iam/docs/creating-custom-roles)
- Add the storage.buckets.exemptFromIpFilter permission to the role.
- Grant the custom role to the identified user or service account at the project level.
For information about granting roles, see Grant a single role (https://cloud.google.com/iam/docs/manage-access-service-accounts#grant-single-role)
How to Secure Your Google Cloud Buckets with IP Filtering

.png)
.png)
In today's cloud-driven world, sensitive data should be kept as secure as possible. IP filtering allows you to control who accesses your storage by enabling it on your Google Cloud buckets so that only trusted networks are allowed to access. This guide will walk you through the step-by-step process for setting up IP filtering.
What is IP Filtering?
IP filtering limits access to a bucket by allowing access only from particular IP ranges or networks. It grants access to your data while blocking traffic requests from unknown or malicious sources.
Key Use Cases for Google Cloud Bucket IP Filtering
1. Compliance Requirements
- Description: Make sure only authorized users can access the bucket to meet legal or industry rules for protecting data.
- Key: Regulatory Adherence (Following Data Protection Rules)
2. Protect Public Buckets
- Description: Enhanced security prevents unauthorized access to publicly accessible buckets by limiting traffic to trusted IPs. This protects sensitive public resources from malicious activity.
- Key: Access Control for Public Data
3. VPC Integration
- Description: Private networking limits bucket access to specific Virtual Private Cloud (VPC) networks. This ensures secure interactions within a well-defined network boundary, enhancing data protection.
- Key: Network-Specific Access
4. Controlled Testing
- Description: Access restriction during testing phases ensures that bucket access is limited to only select IPs or systems. This maintains control over the testing environment and reduces unintended data exposure.
- Key: Testing Environment Control
5. Enhanced Monitoring
- Description: Simplifies audits by restricting access to known and trusted IPs. That is, by allowing access only from trusted IPs, you reduce the number of unknown or suspicious interactions. This makes it easier to track who accessed the bucket and when, simplifying audits and improving transparency.
- Key: Simplified Audit Trails
Supported locations
Bucket IP filtering is available in the following locations:
- asia-south1
- asia-south2
- asia-southeast1
- asia-southeast2
- asia-east1
- asia-east2
- europe-west1
- europe-west2
- us-central1
- us-east1
- us-east4
- us-west1
Limitations
Bucket IP filtering has the following limitations:
- Maximum number of IP CIDR blocks: You can specify a maximum of 200 IP CIDR blocks across public and VPC networks in the IP filter rule for a bucket.
- Maximum number of VPC networks: You can specify a maximum of 25 VPC networks in the IP filter rules for a bucket.
- Dual-region support: IP filtering is not supported for dual-regional buckets.
- Blocked Google Cloud services: Enabling IP filtering on Cloud Storage buckets restricts access for some Google Cloud services, regardless of whether they use a service agent to interact with Cloud Storage.
How to Enable Bucket IP Filtering
Step 1: Install the Google Cloud CLI (Command Line Interface) in the server
SSH into your instance and install the Google Cloud CLI using the following command:
sudo snap install google-cloud-cli --classic
Authenticate with Google Cloud:
gcloud auth login
You will be prompted to grant access to your Google account.
Google Cloud SDK wants to access your Google Account
Set the desired project ID:
gcloud config set project [PROJECT_ID]
Step 2: Verify Your Bucket
- List all the buckets in your project: gcloud storage buckets list
- Locate the bucket name you want to configure.
Step 3: Prepare the JSON Configuration
Create a JSON file to define your IP filtering rules:
- Open a text editor to create the file:
nano ip-filter-config.json or vim ip-filter-config.json
- Add the following configuration and save the file:
{
"mode": "Enabled",
"publicNetworkSource":
{
"allowedIpCidrRanges": ["RANGE_CIDR"]
},
"vpcNetworkSources":
[
{
"network": "projects/PROJECT_ID/global/networks/NETWORK_NAME",
"allowedIpCidrRanges": ["RANGE_CIDR"]
}
]
}
Replace the IP ranges and VPC network details with your specific requirements.
Step 4: Apply the Configuration
Run the following command to update your bucket with the IP filtering configuration:
gcloud alpha storage buckets update [BUCKET_NAME(gsutil URI)] --ip-filter-file=ip-filter-config.json
Step 5: Verify the Configuration
After applying the rules, describe the bucket to confirm the changes:
gcloud storage buckets describe [BUCKET_NAME(gsutil URI)]
User can see the IP filter configuration in the bucket
Step 5: Test Access
- Ensure requests from allowed IPs can access the bucket.
- Verify that non-whitelisted IPs are denied access.
How to Disable or Remove IP Filtering Disabling IP Filtering
- If we want to disable the modify the json from “Enabled” to “Disabled” and update the bucket to apply the modify configuration.
{
"mode": "Disabled",
"publicNetworkSource":
{
"allowedIpCidrRanges": ["RANGE_CIDR"]
},
"vpcNetworkSources":
[
{
"network": "projects/PROJECT_ID/global/networks/NETWORK_NAME",
"allowedIpCidrRanges": ["RANGE_CIDR"]
}
]
}
Update the bucket with the modified configuration:
gcloud alpha storage buckets update [BUCKET_NAME(gsutil URI)] --ip-filter-file=ip-filter-config.json
Removing IP Filtering Configuration
- To remove any existing IP filtering configuration from the bucket:
gcloud alpha storage buckets update [BUCKET_NAME(gsutil URI)] --ipfiltering --clear-ip-filter
By enabling IP filtering, you can protect your Google Cloud buckets from unauthorized access and ensure compliance with organizational security policies. Whether you are securing sensitive data or limiting access during testing, these steps provide a robust framework for managing bucket security effectively.
Bypass bucket IP filtering rules:
Bypassing bucket IP filtering rules exempts users or service accounts from IP filtering restrictions for creating, deleting, or configuring buckets, while still enforcing rules for others. For more information about bucket IP filtering, see Bucket IP filtering(https://cloud.google.com/storage/docs/ip-filtering-overview).
It's crucial to have a way to regain access to your bucket if you inadvertently block your own IP address. This can happen due to the following reasons:
- Bucket lockout: When you accidentally add a rule that blocks your own IP address or the IP range of your entire network.
- Unexpected IP change: In some cases, your IP address might change unexpectedly due to network changes, and you might find yourself locked out.
To enable specific users or service accounts to bypass IP filtering restrictions on a bucket, grant them the storage.buckets.exemptFromIpFilter permission using a custom role. This permission exempts the user or service account from IP filtering rules for bucket-level operations such as creating, deleting, or configuring buckets. To do so, complete the following steps:
- Identify the user or service account that needs to bypass the IP filtering restrictions on specific buckets.
- Create a custom role.(https://cloud.google.com/iam/docs/creating-custom-roles)
- Add the storage.buckets.exemptFromIpFilter permission to the role.
- Grant the custom role to the identified user or service account at the project level.
For information about granting roles, see Grant a single role (https://cloud.google.com/iam/docs/manage-access-service-accounts#grant-single-role)