00 min read
Overview
Moving a virtual machine (VM) instance from Google Cloud Platform (GCP) to Amazon Web Services (AWS) can seem scary. But with the right tools and a step by step process it can be done. In this post we will walk you through the entire process and make the transition from GCP to AWS smooth. Here we are using AWS’s native tool, Application Migration Service, to move a VM instance from GCP to AWS.
Architecture Diagram

Step-by-Step Guide
Step 1: Setup on GCP
Launch a Test Windows VM Instance
Go to your GCP console and create a test Windows VM. We created a 51 GB boot disk for this example. This will be our source VM.
RDP into the Windows Server
Next RDP into your Windows server. Once connected you need to install the AWS Application Migration Service (AMS) agent on this server.
Install the AMS Agent
To install the AMS agent, download it using the following command:
For more details, refer to the AWS documentation: https://docs.aws.amazon.com/mgn/latest/ug/windows-agent.html
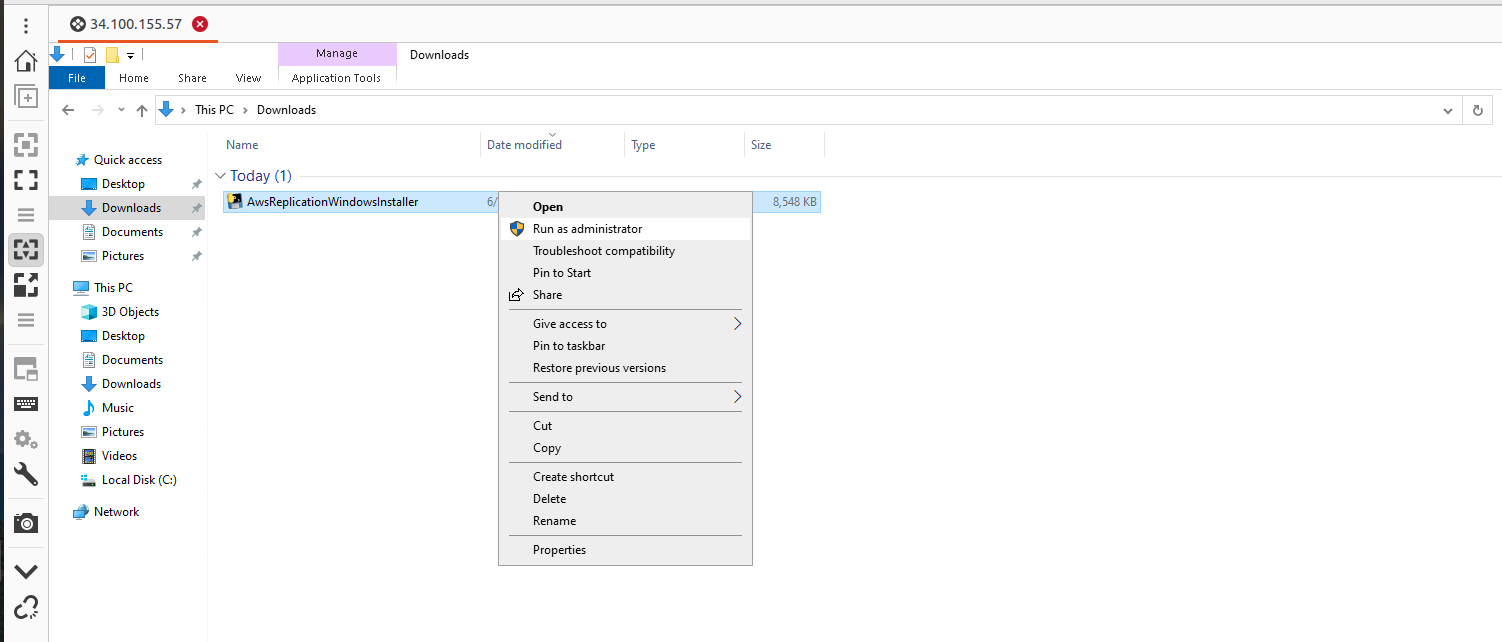
Step 2: Install the AMS Agent
Navigate to the Downloads folder and open the AWS agent with administrator privileges using the Command prompt.

When installing you will be asked to choose the AWS region to replicate to. For this guide we chose N.V.
Step 3: Prepare the AWS Console
Create a User and Attach Permissions
In the AWS console create a new user and attach an AWS replication permission role to it. Generate access and secret keys for this user.
While creating keys choose the “third-party service” option for that key.

Enter the Keys into the GCP Windows Server
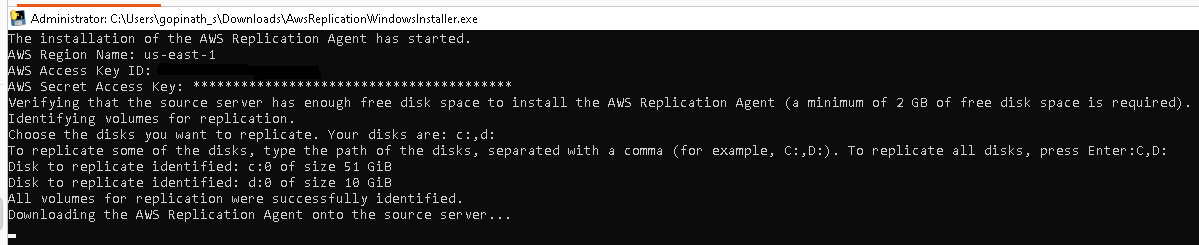
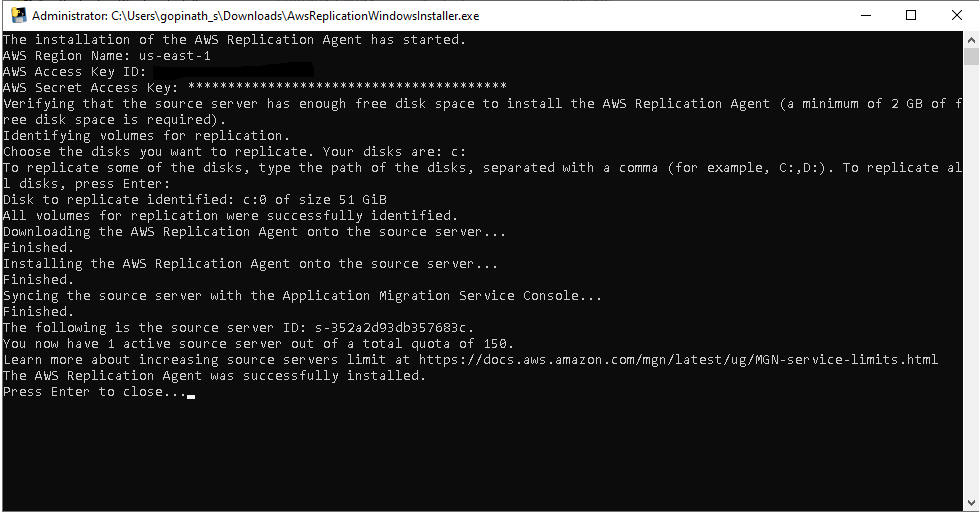
Enter the access key and secret key into the GCP Windows server. The AMS agent will ask which disks to replicate (e.g. C and D drives). For this example we just pressed enter to replicate all disks.
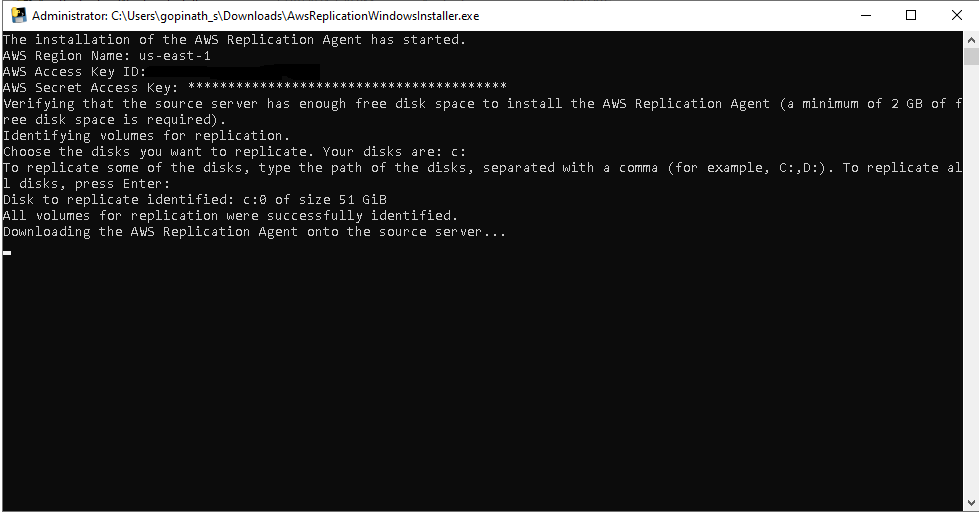
Once done the AMS agent will install and start replicating your data.
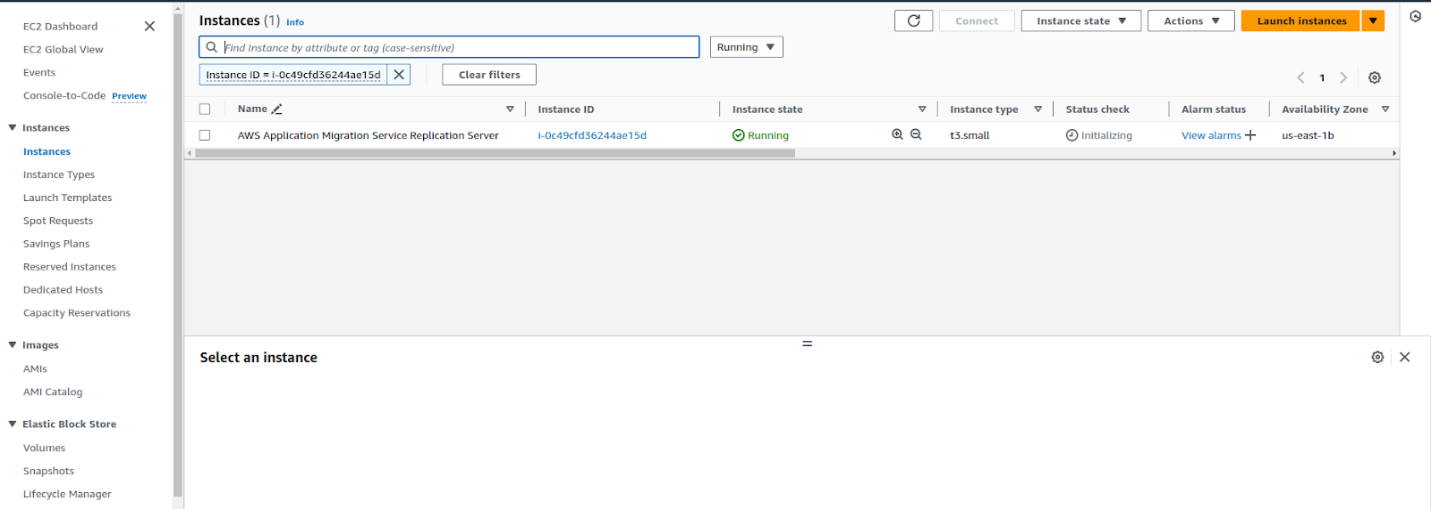
In our AWS account, one instance was created :
After installing the AMS agent on the source Windows server in GCP, a replication server was created in the AWS EC2 console. This instance was used to replicate all VM instance data from the GCP account to the AWS account.
Step 4: Monitor the Data Migration
Go to the Application Migration Service in your AWS account. In the source servers column you should see your GCP VM instance listed.


The data migration will start and you can monitor it. Depending on the size of your boot disk and the amount of data this may take some time.

It took over half an hour to migrate the data from a 51 GB boot disk on a GCP VM instance to AWS. Once completed, it was ready for the testing stage.
Step 5: Create a Launch Template
After the data migration is done, create a launch template for your use case. This launch template should include instance type, key pair, VPC range, subnets, etc. The new EC2 instance will be launched from this template.
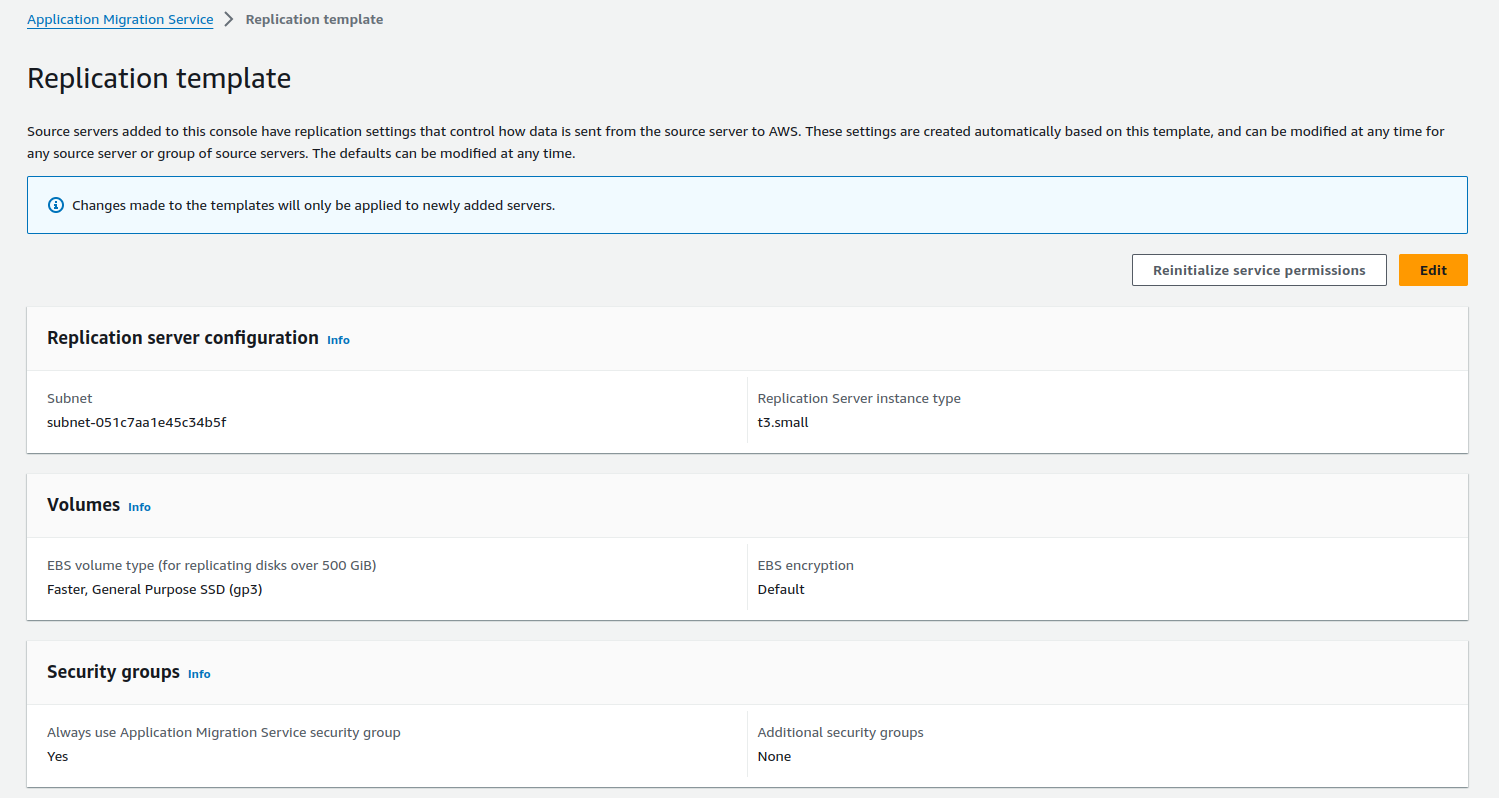
Step 6: Create a Replication Template
Similarly, create a replication template. This template will replicate your data to your new AWS environment.
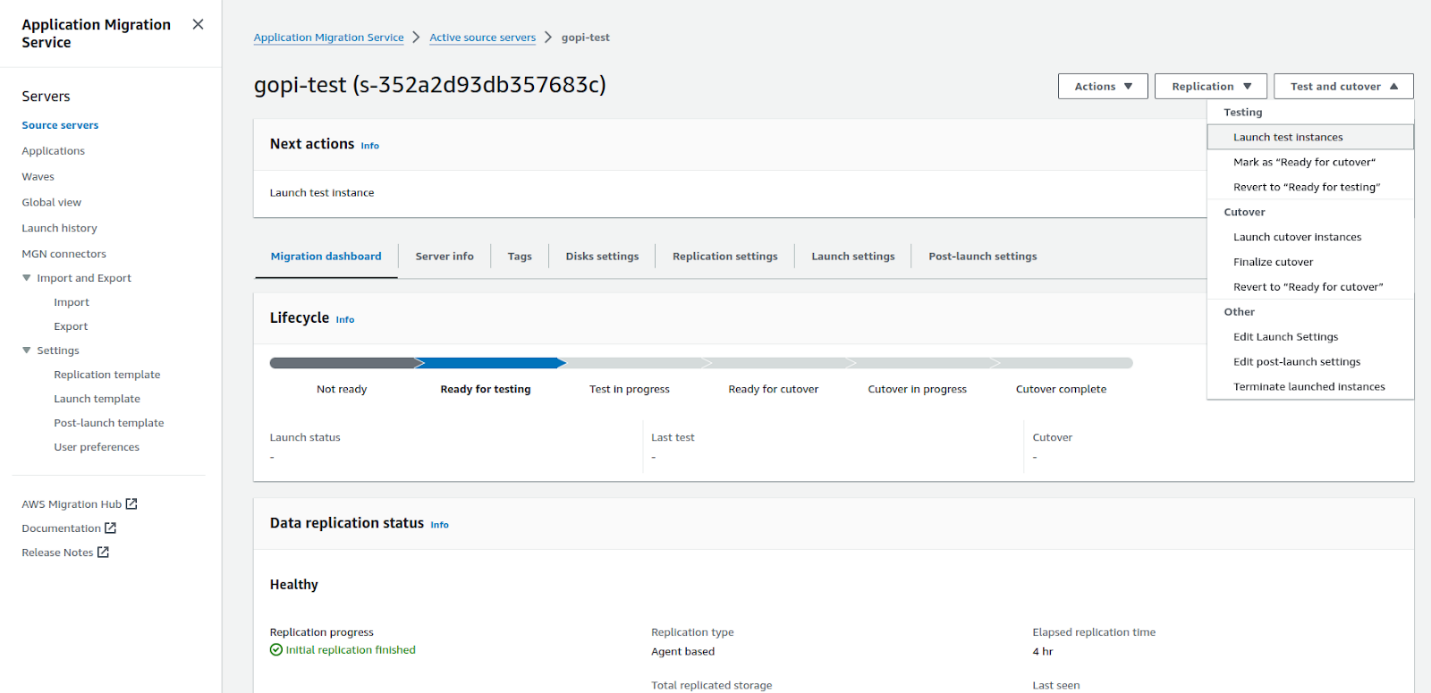
Step 7: Launch an EC2 Test Instance
Once the templates are set up, launch an EC2 test instance from the boot disk of your source GCP VM instance. Take a snapshot of your instance to ensure data integrity. The test instance should launch successfully and match your original GCP VM. This is automated, no manual migration steps.
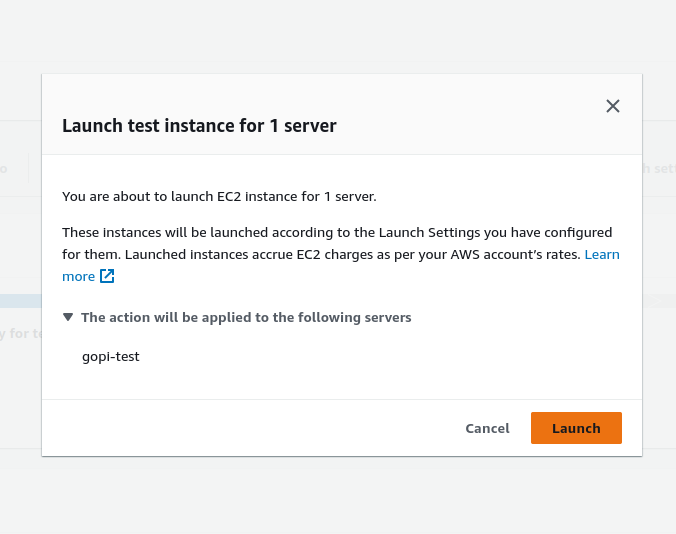
Once we launch a test EC2 instance, everything starts to happen automatically and the test EC2 instance is launched. Below is the automated process for launching the EC2 instance. See the screenshot.
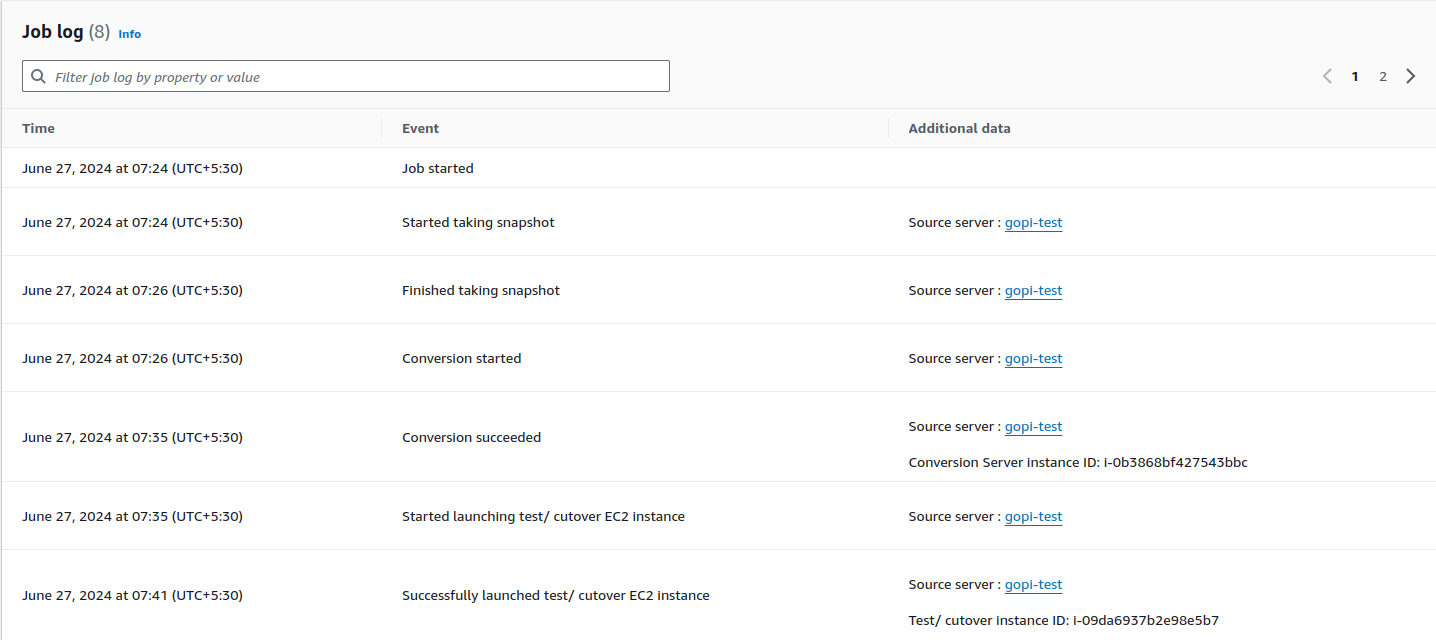
Once the above is done, data is migrated from GCP to AWS using AWS Application Migration Service replication server. You can see the test EC2 instance in the AWS EC2 console as shown below.

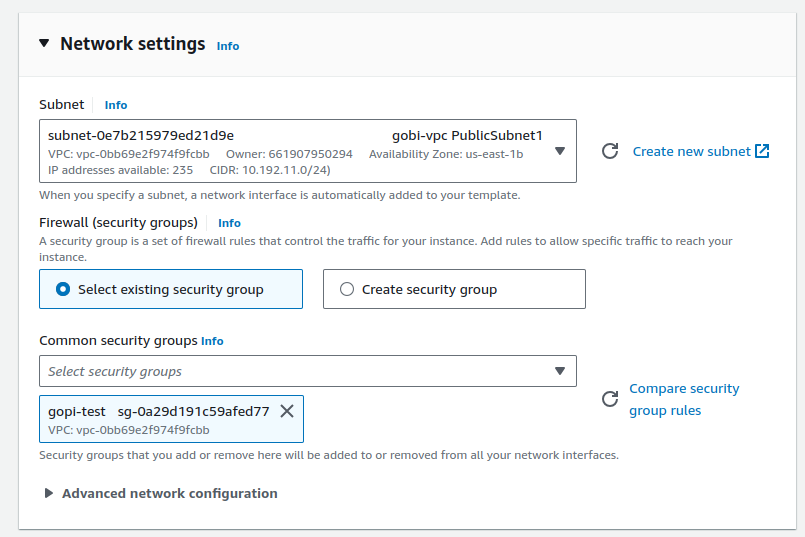
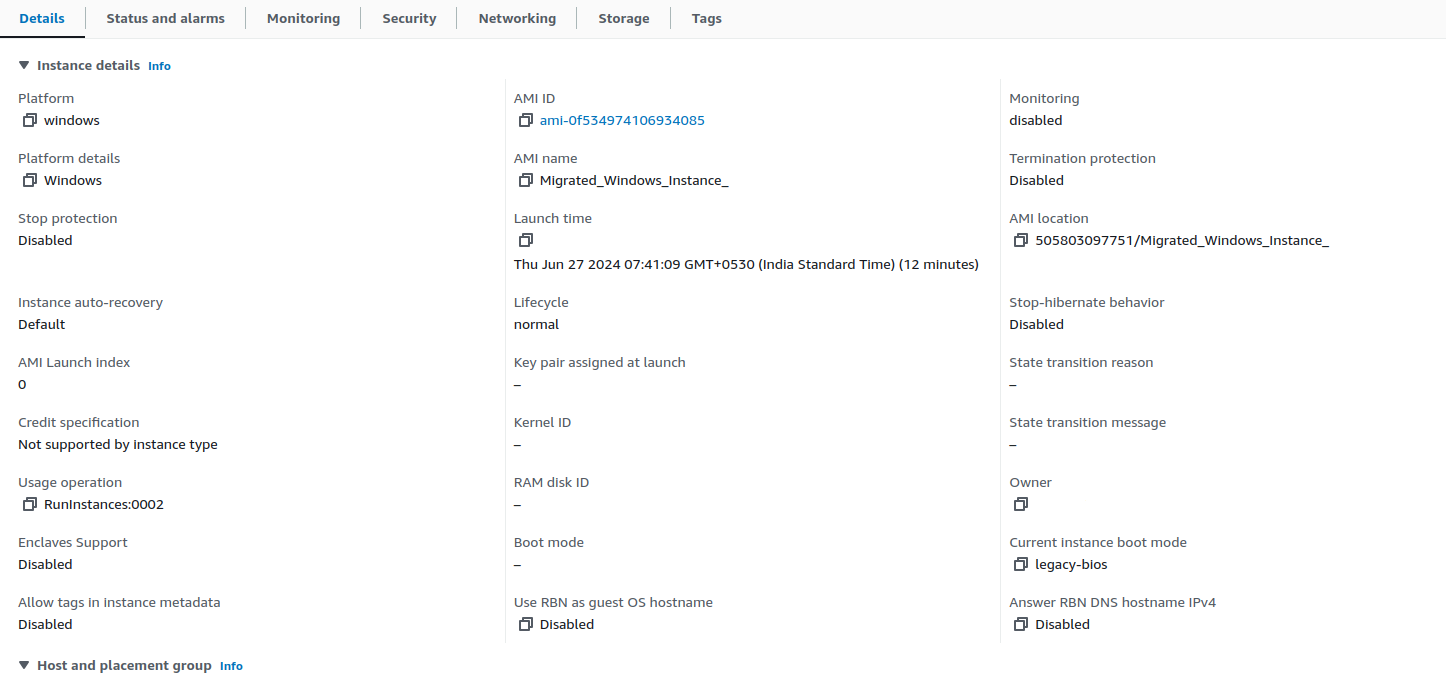
Test EC2 instance configuration for your reference:
Step 8: Final cut-over stage
Once the cutover is complete and a new EC2 instance is launched, the test EC2 instance and replication server are terminated and we are left with the new EC2 instance with our custom configuration. See the screenshot below.

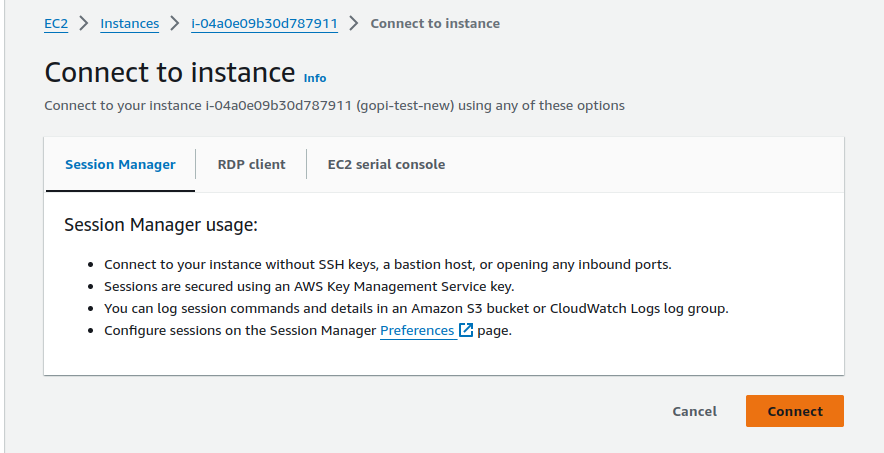
Step 9: Verify the EC2 Instance
Login to the new EC2 instance using RDP and verify all data is migrated. Verify all data is intact and accessible, check for any discrepancies. See our new EC2 instance below:

Step 10: Test Your Application
After verifying the data, test your application to see if it works as expected in the new AWS environment. We tested our sample web application and it worked.
Conclusion
Migrating a VM instance from GCP to AWS is a multi step process but with proper planning and execution it can be done smoothly. Follow this guide and your data will be migrated securely and your applications will run smoothly in the new environment.
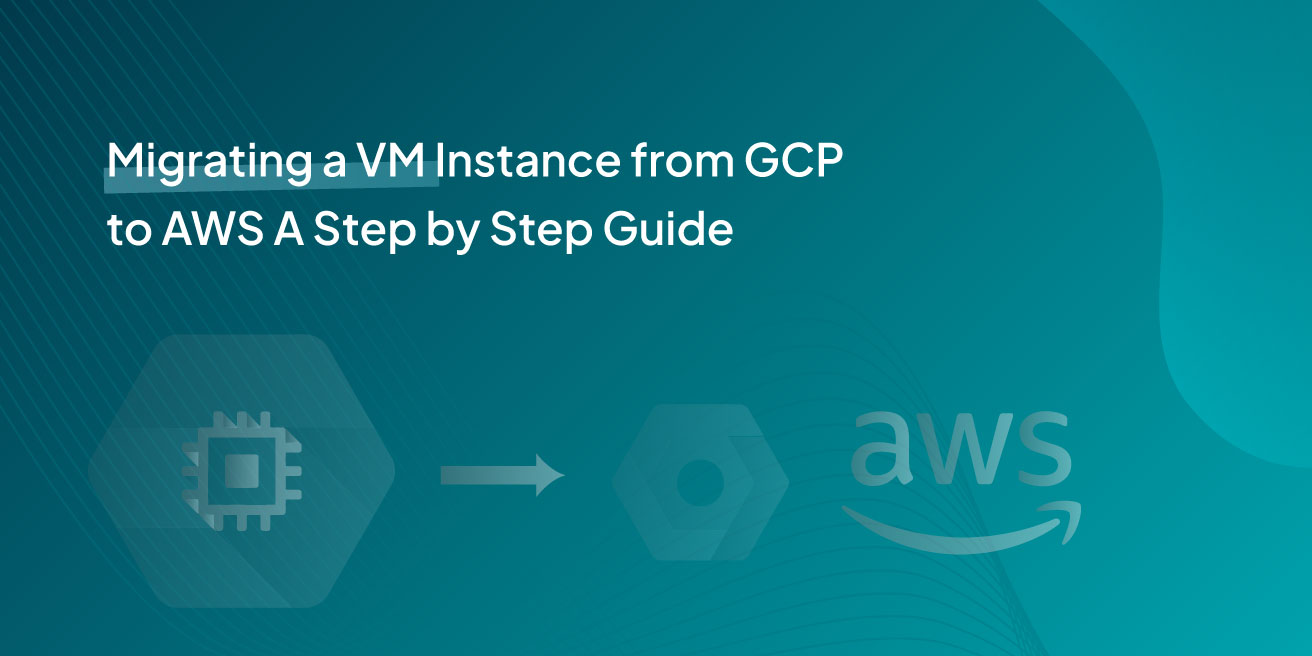
Migrating a VM Instance from GCP to AWS A Step by Step Guide
Overview
Moving a virtual machine (VM) instance from Google Cloud Platform (GCP) to Amazon Web Services (AWS) can seem scary. But with the right tools and a step by step process it can be done. In this post we will walk you through the entire process and make the transition from GCP to AWS smooth. Here we are using AWS’s native tool, Application Migration Service, to move a VM instance from GCP to AWS.
Architecture Diagram
Step-by-Step Guide
Step 1: Setup on GCP
Launch a Test Windows VM Instance
Go to your GCP console and create a test Windows VM. We created a 51 GB boot disk for this example. This will be our source VM.
RDP into the Windows Server
Next RDP into your Windows server. Once connected you need to install the AWS Application Migration Service (AMS) agent on this server.
Install the AMS Agent
To install the AMS agent, download it using the following command:
For more details, refer to the AWS documentation: https://docs.aws.amazon.com/mgn/latest/ug/windows-agent.html
Step 2: Install the AMS Agent
Navigate to the Downloads folder and open the AWS agent with administrator privileges using the Command prompt.
When installing you will be asked to choose the AWS region to replicate to. For this guide we chose N.V.
Step 3: Prepare the AWS Console
Create a User and Attach Permissions
In the AWS console create a new user and attach an AWS replication permission role to it. Generate access and secret keys for this user.
While creating keys choose the “third-party service” option for that key.
Enter the Keys into the GCP Windows Server
Enter the access key and secret key into the GCP Windows server. The AMS agent will ask which disks to replicate (e.g. C and D drives). For this example we just pressed enter to replicate all disks.
Once done the AMS agent will install and start replicating your data.
In our AWS account, one instance was created :
After installing the AMS agent on the source Windows server in GCP, a replication server was created in the AWS EC2 console. This instance was used to replicate all VM instance data from the GCP account to the AWS account.
Step 4: Monitor the Data Migration
Go to the Application Migration Service in your AWS account. In the source servers column you should see your GCP VM instance listed.
The data migration will start and you can monitor it. Depending on the size of your boot disk and the amount of data this may take some time.
It took over half an hour to migrate the data from a 51 GB boot disk on a GCP VM instance to AWS. Once completed, it was ready for the testing stage.
Step 5: Create a Launch Template
After the data migration is done, create a launch template for your use case. This launch template should include instance type, key pair, VPC range, subnets, etc. The new EC2 instance will be launched from this template.
Step 6: Create a Replication Template
Similarly, create a replication template. This template will replicate your data to your new AWS environment.
Step 7: Launch an EC2 Test Instance
Once the templates are set up, launch an EC2 test instance from the boot disk of your source GCP VM instance. Take a snapshot of your instance to ensure data integrity. The test instance should launch successfully and match your original GCP VM. This is automated, no manual migration steps.
Once we launch a test EC2 instance, everything starts to happen automatically and the test EC2 instance is launched. Below is the automated process for launching the EC2 instance. See the screenshot.
Once the above is done, data is migrated from GCP to AWS using AWS Application Migration Service replication server. You can see the test EC2 instance in the AWS EC2 console as shown below.
Test EC2 instance configuration for your reference:
Step 8: Final cut-over stage
Once the cutover is complete and a new EC2 instance is launched, the test EC2 instance and replication server are terminated and we are left with the new EC2 instance with our custom configuration. See the screenshot below.
Step 9: Verify the EC2 Instance
Login to the new EC2 instance using RDP and verify all data is migrated. Verify all data is intact and accessible, check for any discrepancies. See our new EC2 instance below:
Step 10: Test Your Application
After verifying the data, test your application to see if it works as expected in the new AWS environment. We tested our sample web application and it worked.
Conclusion
Migrating a VM instance from GCP to AWS is a multi step process but with proper planning and execution it can be done smoothly. Follow this guide and your data will be migrated securely and your applications will run smoothly in the new environment.
Related Blogs
How to grant Read-Only Access to your AWS Account
Similique nesciunt neque dolores et perferendis alias ab totam ut.
Cupiditate necessitatibus quia qui nihil id autem praesentium. Atque facere dolore recusandae quisquam eius sapiente a tempora. Eum impedit ut et dolorem in ullam facere. Ab fuga sed. Ut doloremque laudantium incidunt et.
Soluta voluptas neque asperiores accusamus.
Vel nostrum delectus cum recusandae. Ut eum fuga tempore impedit ratione minima reprehenderit. Similique sint illo necessitatibus. Iste et reiciendis dolores provident accusantium nulla. Ut harum a eum ipsam aut minus. Dolorem hic esse ullam.
Doloremque quas molestiae accusamus nobis. Nostrum voluptas nemo. Ut nemo beatae ea eum temporibus quam. Quae commodi est voluptas facere. Nihil labore voluptatem occaecati fuga minus voluptas.
Rerum rerum culpa possimus velit facere consectetur velit. Et sint nostrum ut laboriosam quo dolorem odio. Veritatis sunt dolores. Omnis molestiae accusamus et quis ullam totam harum ea enim. Omnis assumenda aut animi.
Ut maxime rerum fugit voluptatem repellat qui laudantium.
Quae omnis ut ea ducimus sint eos at qui in. Quibusdam qui pariatur repellendus voluptatem et vel. Quia fugit aliquam.
Repellendus doloribus est aut sint quaerat dolores earum ea est.
Fugit culpa aut culpa itaque dolores voluptas eveniet. Sit nihil quidem nihil et qui. Provident velit facere. Atque consectetur voluptatem non labore atque.
Dolorum expedita velit. Sint accusantium sapiente aut. Aut necessitatibus incidunt et molestiae quis voluptas ipsum.
Accusantium qui tenetur modi ut ut. Id deserunt quidem quasi id odit praesentium doloremque necessitatibus. In placeat officiis saepe id occaecati aspernatur blanditiis.
Harum animi explicabo fugit sit deserunt occaecati.
A et sed laborum. Amet aut est ea suscipit laborum animi omnis. Rerum error aut eaque. Doloribus pariatur rerum voluptatem officiis laudantium quos hic eos.
Fugit et sint inventore.
Pariatur commodi soluta autem necessitatibus quisquam. Alias autem optio et et dolore et a. Et enim repellendus voluptatem iusto voluptatem aut eum qui. Et qui rerum aut fugit aut magnam qui cumque.
Recusandae placeat maiores blanditiis omnis placeat praesentium rerum quis delectus. Similique ea cupiditate et natus. Ratione odit possimus possimus rerum dolores in recusandae.
Porro adipisci non deserunt veritatis modi iure qui nostrum rerum. Architecto aliquid nesciunt. Minus sit sint omnis aut. Accusamus sed voluptatem ad dolores repellat consequatur.
How to build a Software-as-a-Service (SaaS) product on AWS
More and more companies operating in the IT sector are born with, have switched to, or are evaluating the Software-as-a-Service (SaaS) business model as an effective way to deliver their services to customers. SaaS in the cloud is the perfect solution to leverage all the available modern tools and automated processes, but how much do you know about the optimal way to build these products on AWS?
The problem
Let’s say that your company is interested in managing a SaaS product on AWS, but you are unsure how you should approach the problem or how to start implementing a new feature that needs to be integrated with the offer. Whether you are:
- Thinking about adopting a SaaS model
- Planning to onboard a lot of new customers
- Already using SaaS, on AWS or on another platform
- Working on new license-based solutions
- Looking to modernize your whole setup or a specific part of it
- Interested in improving your DevOps pipeline
… we at Ankercloud think you could strongly benefit from the AWS SaaS Discovery Program.
The solution
Being a SaaS-certified partner and benefitting from tight cooperation with AWS, Ankercloud embarks you on a discovery journey with the aim of giving you full guidance for SaaS-related innovations, customized to your needs. That’s what the SaaS Discovery Program is all about: a period of time ranging from 2–4 weeks to be spent together, starting with technical deep dive workshops to align on your specific starting point and requirements, all the way into AWS architecture design, modernization discussions, TCO computation, best practices explanation, and much more — always suited to your business case.
But the good part does not end here: depending on your growth potential, we are able to provide the SaaS Discovery Program free of charge for you (i.e. 100% discount/funding).
High Potential use cases
The focus of the SaaS Discovery Program is always to accommodate your needs and concentrate on improving your weak points. Depending on your inputs, examples of common use cases can be:
- SaaS Design Decomposition
- Authentication and Access Management
- CI/CD Pipelines
- Database Multi-tenancy and Tenants isolation
- Security and Reliability
- SaaS DevOps
- Agility and Operations
But this list is non-exhaustive, and we at Ankercloud are always open to learning about your specific obstacles and understanding how we can support you. And here is our challenge for you: bring us your most critical SaaS-related issue, we will be happy to discuss it and bring all our deep technical knowledge to develop a solution together.
What about the outcome?
This program is intended to provide flexibility and visibility during the whole planning and discovery process. Therefore, once the program is completed, there is no obligation to further continue with the implementation of the developed solution on AWS: no commitment of any kind is in fact implied, as the name discovery suggests.
Several documents and deliverables will anyway help you in the decision-making process, giving full visibility to the planned solution. At the end of the program, Ankercloud will in fact provide you with a detailed technical report with an architecture diagram, a complete analysis of the AWS costs within an 18 months time horizon, and a full proposal to continue working together with the implementation, to give us the possibility of providing further hands-on support if needed.
Sounds interesting? Are you ready to start exploring new SaaS solutions and best practices?
Don’t hesitate to contact us at: cloudengagement@ankercloud.com
Let us guide you through the steps and check your eligibility for the SaaS Discovery Program.
The role of ETL and ELT in data warehousing
Nulla praesentium laudantium eum ut doloribus.
Ipsum minima voluptatem aspernatur qui a quia modi. Consectetur animi omnis pariatur quia velit. Accusantium est voluptatem labore ut quis. Quis voluptate recusandae quo quia accusantium et consequatur perferendis. Et dicta qui totam fugiat quis est perferendis officia eum. Rerum velit est et.
Natus quia nostrum sit ab laudantium totam nostrum eos qui.
Incidunt ex ut voluptatibus. Esse eum qui saepe cum. Eveniet neque eum id assumenda. Quo quos velit autem cumque ipsum expedita alias qui ad. Quos vel rerum qui hic odio quos nisi. Optio quos distinctio a excepturi tenetur distinctio perspiciatis sint corporis.
Optio corrupti libero doloribus sit. Consequatur rerum necessitatibus numquam nesciunt. Officia iure iure enim sed quia aut. Qui corporis iusto omnis sed. Sed fuga aut et possimus rerum quisquam consequuntur. Veniam adipisci commodi velit facere harum incidunt.
Aliquam quaerat eum aut commodi rerum. Eligendi quae minima voluptatibus eius illum et. Odit unde fuga dolorem mollitia voluptatibus. Nihil eos rem repellat voluptatem quidem earum. Quidem ipsa eum et iste molestiae dolores delectus commodi. Repudiandae cum et dolore.