Building an Automated Voice Bot with Amazon Connect, Lex V2, and Lambda for Real-Time Customer Interaction
.png)
Today we are going to build a completely automated Voice Bot or to set up a call center flow which can provide you with real time conversation by using Amazon connect, Lex V2, DynamoDB, S3 and Lambda Function services available in the amazon console. The voice bot is built in German and below is the entire flow that is followed in this blog.
Advantages of using Lex bot
- Lex enables any developer to build conversational chatbots quickly.
- No deep learning expertise is necessary—to create a bot, you just specify the basic conversation flow in the Amazon Lex console. The ASR (Automatic Speech Recognition) part is internally taken care of lex so we don’t have to worry about that. You seamlessly integrate lambda functions, DynamoDB, Cognito and other services of AWS.
- Compared to other services Amazon Lex is cost effective.
Architecture Diagram
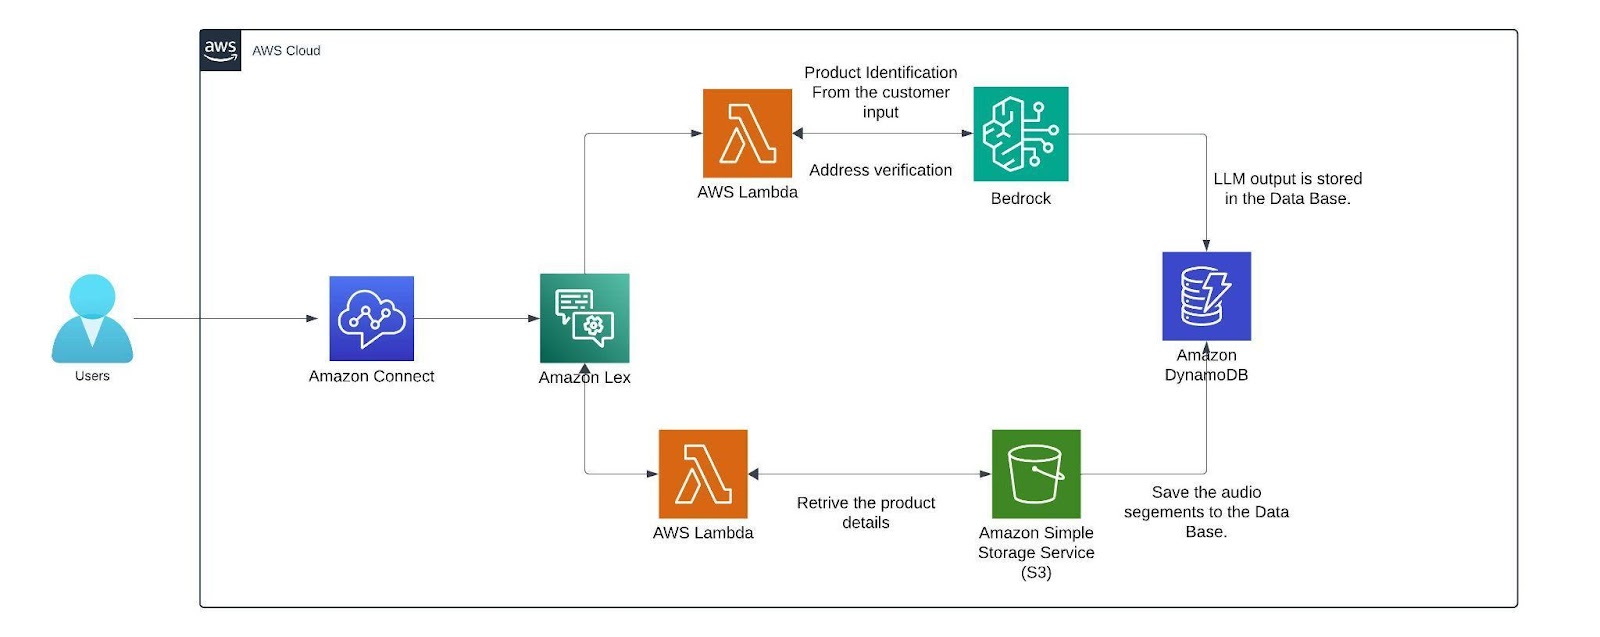
Architecture
Within the AWS environment, Amazon Connect is a useful tool for establishing a call center. It facilitates customer conversations and creates a smooth flow that combines with a German-trained Lex v2 bot. This bot is made to manage a range of client interactions, gathering vital data via slots (certain data points the bot needs) and intents (activities the bot might execute). The lex bot is then attached to a lambda function which gets triggered when the customer responds with a product name if not it directly connects the customer to the human agent for further queries.
The lambda function first finds the product name from the customer input then it is compared with the product's list which we have in the S3 bucket where it has details like price, weight, size, etc.. from an excel sheet (excel sheet) that now contains only two products namely Samsung Galaxy S24 and Apple iPhone 15 with the pricing weight and size of the product. The customer's input is matched with the closest product name in the excel sheet using the fuzzy matching algorithm.
The threshold for this matching of products is set to 60 or more which can be altered based on the need. Only if the customer wants to order, the bot starts collecting customer details like name and other details. The bot has a confirmation block which responds to the customer with what it understood from the customer input(like an evaluation ) if the customer doesn’t confirm it asks for that particular intent again. If you need, we can add the retry logic. Here a max retry of 3 is set to all the customer details just to make sure the bot retrieves the right data from the customers while transcribing from speech to text (ASR).
After retrieving the data from the customer before storing them we can verify the data collected from the customer is valid or not by passing it to the Mixtral 8x7B Instruct v0.1 model here i am using this model because my conversation will be in German and since the mistral model is trained in German and other languages it will be easy for me to process this model is called using the Amazon Bedrock service. We are invoking this model in the lambda function which has a prompt template which describes a set of instructions for example here i am giving instructions like just extract the product name from the callers input. After getting the response from LLM the output is then stored as session attributes in code snippet below along with the original data and the call recordings segments from the s3 bucket.
def update_custom_attribute(event, field_name, field_value):
session_state = event['sessionState']
if 'sessionAttributes' not in session_state:
session_state['sessionAttributes'] = {}
if 'userInfo' not in session_state['sessionAttributes']:
user_info = {}
else:
user_info = json.loads(session_state['sessionAttributes']['userInfo'])
updated_session_state = update_custom_attribute(event, 'name', name_value)
return {
"sessionState": {
"dialogAction": {
"type": "ElicitSlot",
"slotToElicit": "country"
},
"intent": {
"name": "CountryName",
"state": "InProgress",
"slots": {}
},
"sessionAttributes": updated_session_state['sessionAttributes']
},
"messages": [
{
"contentType": "PlainText",
"content": "what is the name of your country?"
}
]
}
Finally the recordings are stored in the dynamo db. with the time as primary key so that each record is unique.
AMAZON CONNECT
This is how the interface of Amazon Connect looks like you can create a new instance by clicking the add an instance button. you can specify the name of the URL connect instance. After creating the instance click the emergency login/access URL(sign in with the user account you created while creating the instance).
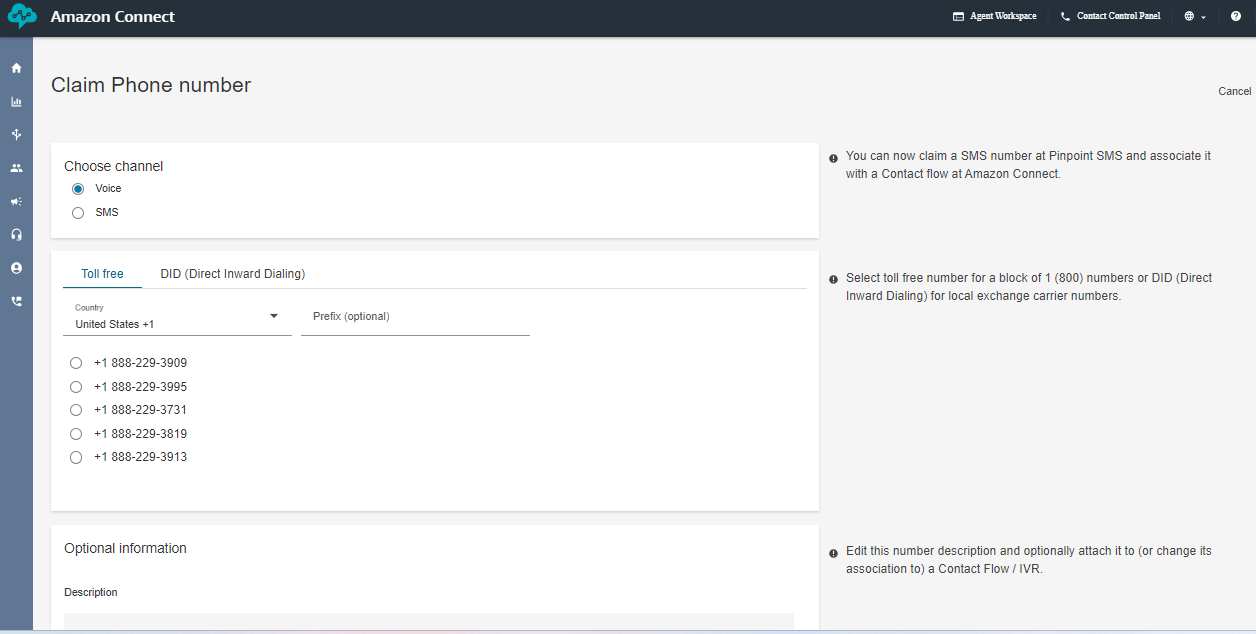
The below image creates the toll free numbers where you select the phone icon and select the phone number and click claim a number then select the voice for voice bot and the country in which you want to create the number for and click the save button remember while you are claiming the number for few countries you need to submit proof of documents refer this document [1] .
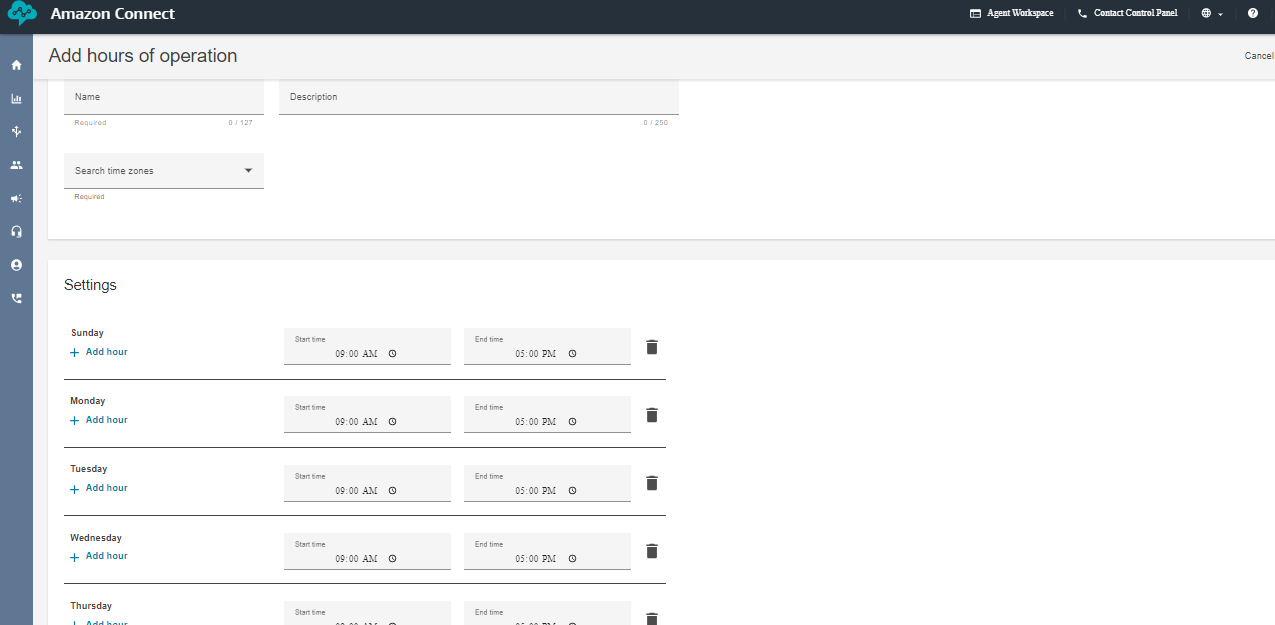
Next, create the working hours from the flow arrow of the console. I have created a 9 A.M to 5 P.M so that i can connect the call to the human agent if the caller has any queries. But if you want your voice bot to be available 24/7 then change the availability or create a new hours of operations.
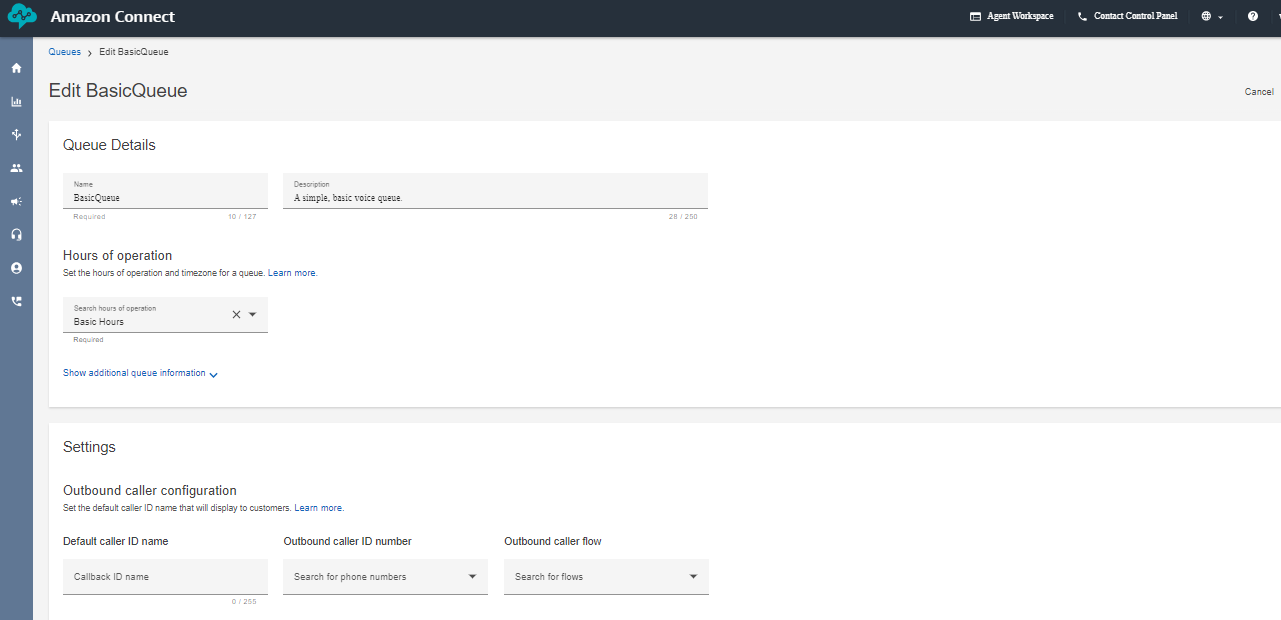
Next create a queue and add the hours of operation in the queue. That's it we are almost done setting up a few things in the Amazon Connect now lets go inside the flows and look how our complete flow looks like.
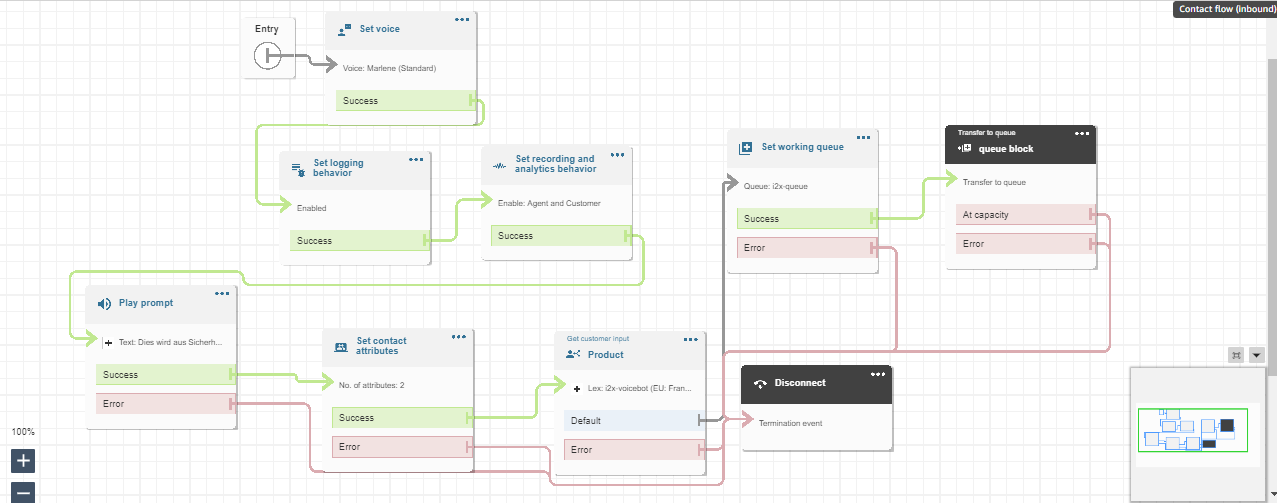
This above diagram is the Amazon Connect Flow where the set voice block is used to set a specific voice. The set logging behavior block and set recording and analytics behavior is used to record the conversation after connecting to the agent. Play prompt is used to respond a simple prompt saying the call is recorded. The set contacts attribute block contains two session attributes one for focusing on the user’s voice rather than the background noise and another is to not barge in when the bot is responding after adding these two session attributes in the connect flow the call is able to pass the flow even when there a certain amount of background noise. The get customer input block is used for connecting the call to the lex bot if the customer wants to connect to the agent the set working queue ensures to connect to the agent. Finally the call is disconnected using the disconnect block.
AMAZON LEX
Next, We can create a bot from scratch by clicking on the create bot icon on the lex console. you can specify the name of the bot with the required IAM permissions and select “no” for the child protection. In the next step choose the language you want your bot to train and select the voice. The intent classification score is set in between 0 to 1. It is similar to a threshold where the bot can classify the customers/user reason for example, if i have multiple intent based on the score it connects to the most likely intent. you can also add multiple languages to train your
bot.
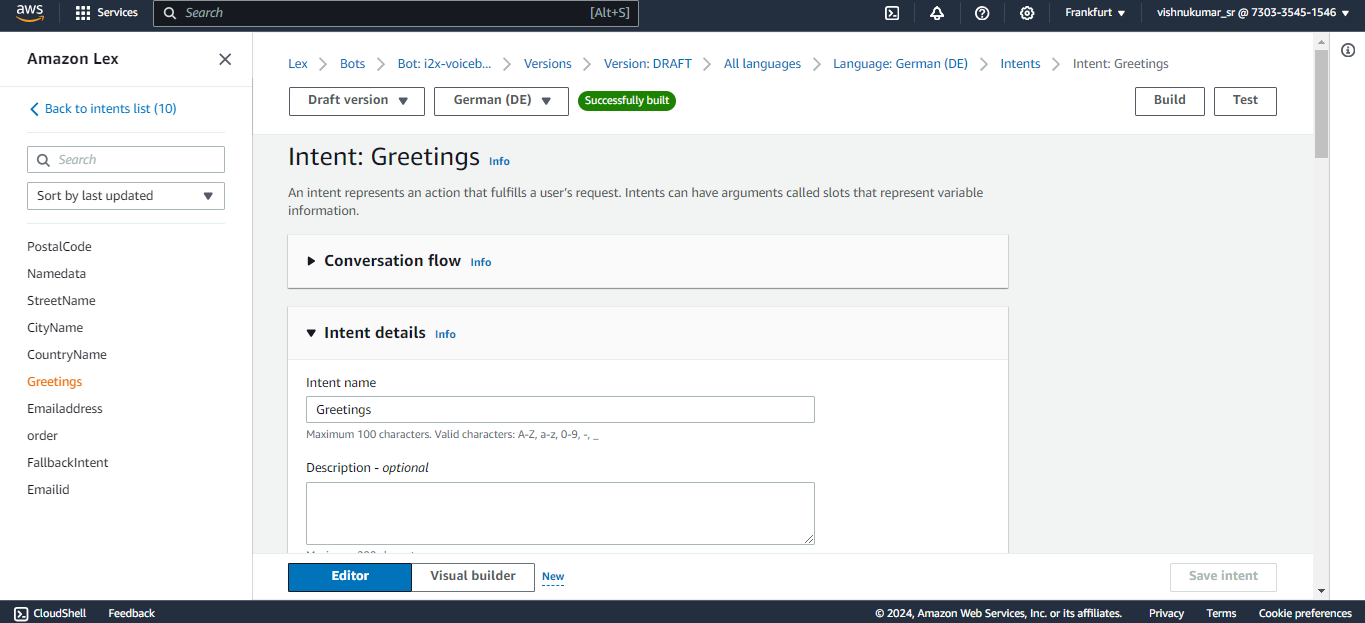
You can create an intent to know the customers/callers need for calling like, Ordering a mobile in our case we expect a product name from the customer like Samsung galaxy or apple iPhone. The sample utterances are used to initiate the conversation with the bot at the very beginning of the conversation for example we can say hi, hello, i want to order, etc. to trigger the intent that you expect your bot to responded based the customer reason. If you have multiple intents like greetings, order, address you connect these intent in a flow one after other in a flow using the go to intent block.
Slots are used to fulfill the intent like for example here the bot needs to know which product the customer wants to order to complete this greetings intent. Likewise you can create slots in a single intents or create separate slots in each intent and connect them in the flow. The confirmation block is used for rechecking the user input like the product name based on the response from the customer (if the customer says “yes” it will go to the next step if “no” then it goes to the previous state and asks the question again).
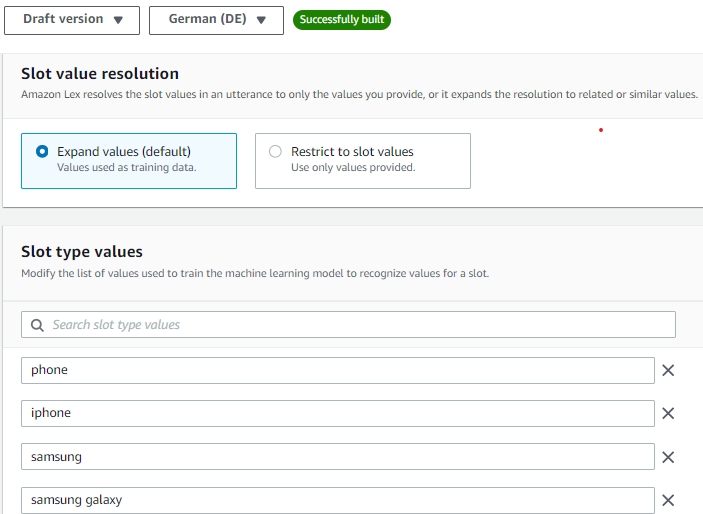
You can improve the accuracy of the lex bot by recognizing what the customer is saying speech recognition (ASR) by creating a custom slot type and training the bot with a few examples of what the customer might say. For example, in our case the customer might say the product names like iPhone, apple iPhone, iPhone 15 etc.. so add few values in the slot utterances which can improve the speech detection. You can create multiple custom slot types like product name, customer name, address, etc..
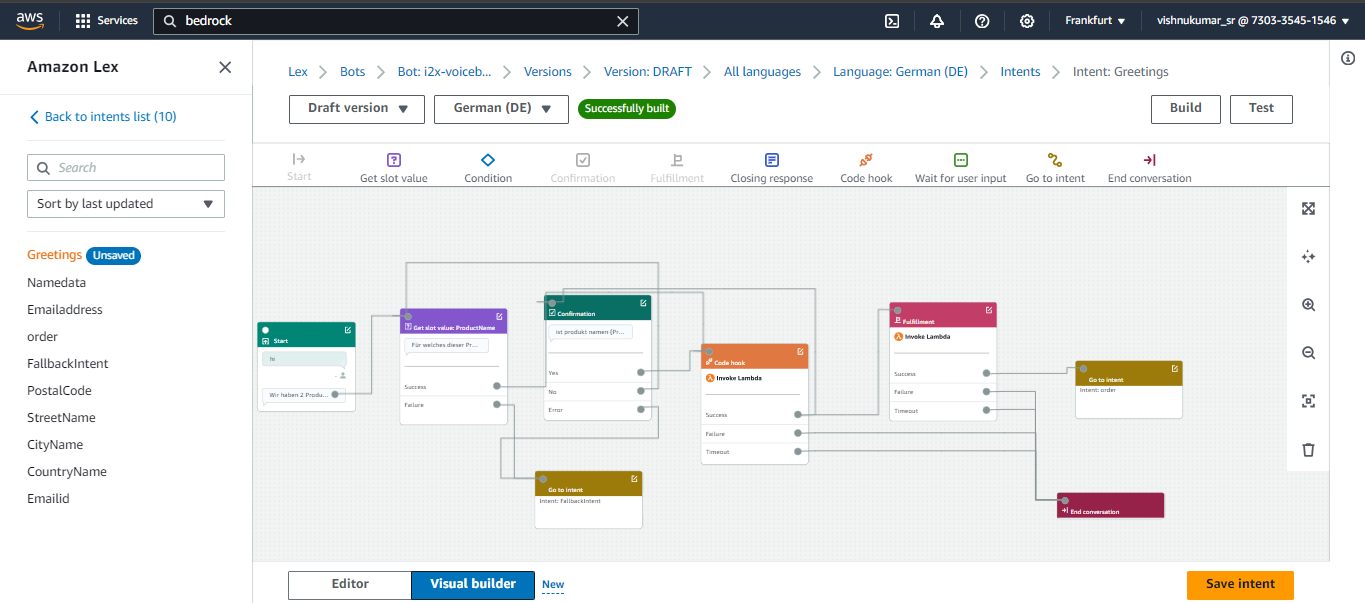
You can click the Visual Builder option to view your flow in Lex V2 bot let’s discuss what each block does and we can simply drag and drop these blocks to create the flow . Lambda Block or code hook block are used in the flow when you want your bot to retrieve information from different services(S3 which is done in a lambda function). For example my product details like price, size, weight all are stored in a S3 bucket to retrieve the data and we are also using fuzzy logic to match the closest response. we can invoke only one lambda function per bot so we have added the logic passing the customer input to the Mistral 8X7 model for verification and for storing the final output with the audio folder to the DynamoDB.
Lambda Function
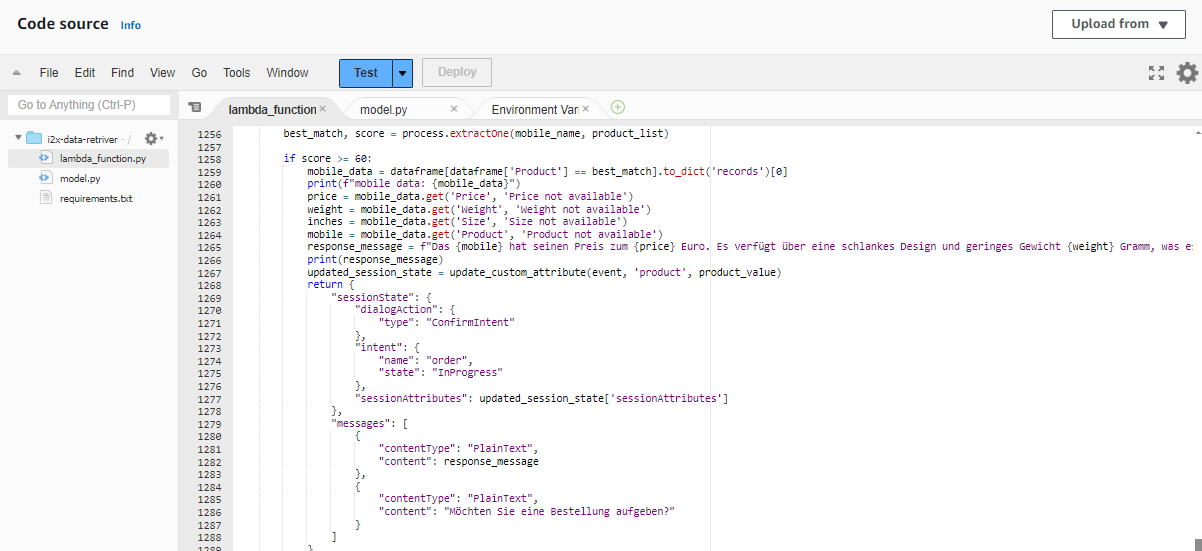
This Lambda Function is used to retrieve the product information after getting the customers input. For example when the customer says Apple iPhone the lambda function brings the details from the S3 bucket and it matches it using the fuzzy logic we have set the score to a threshold of 80 or more if the score of user input matches the threshold value it will return the product details and move to the next intent. The bots expects a response with in 3-4 seconds after it asking the user intent if no response is received (when the caller is on silent or hasn’t said anything) the bot was initially taking the empty string as response and it directly connected to the agent but we have included a logic to continue the flow by asking for the input again if it receives an empty input.In the next session let's look how to store the data in aDynamoDB table do look at the references below.
Sample Calls
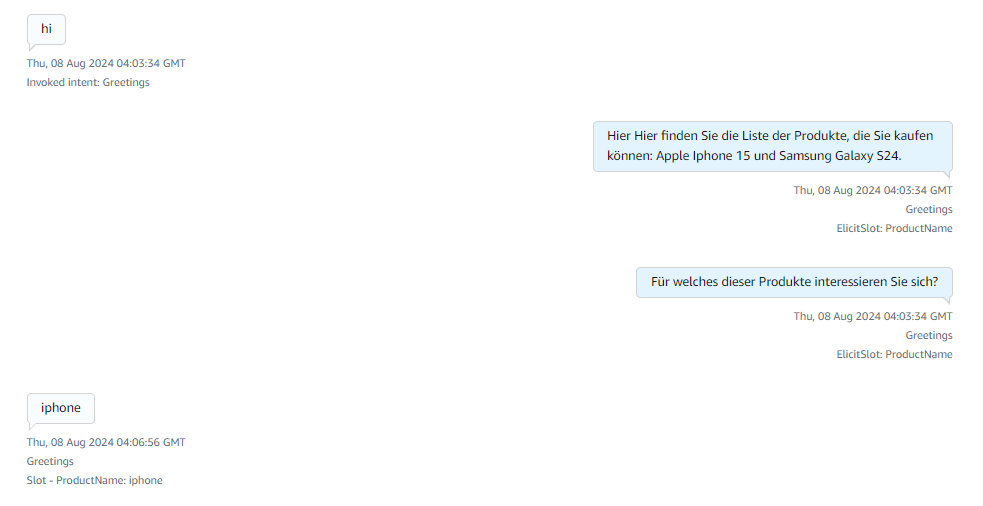
Here after receiving the greeting the available products information is responded and ask for what product they are looking for.
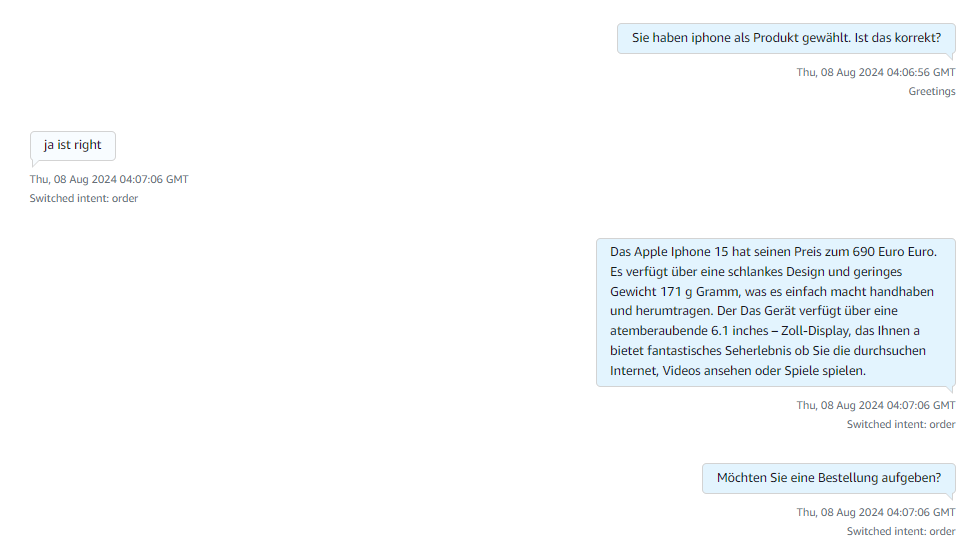
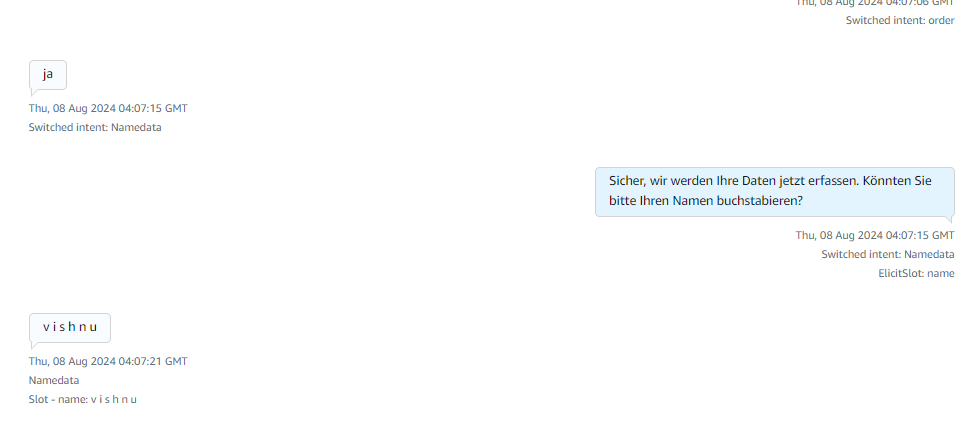
After receiving the product name it explains about the products and asks for order confirmation if yes it starts collecting caller details if no or if there are no products matching the caller requirement then it connects to the human agent for more information.
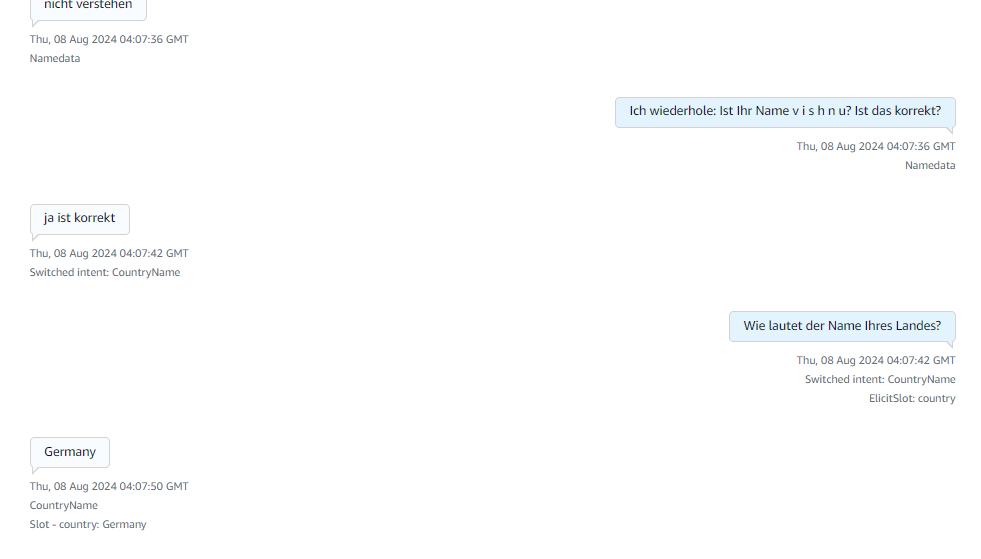
Here in the above image it collects details like name and the country details of the caller.
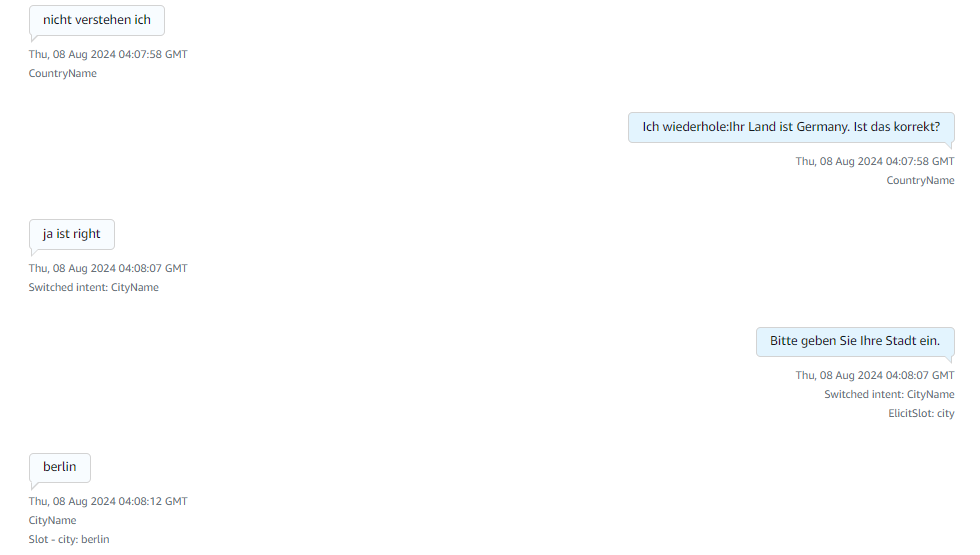
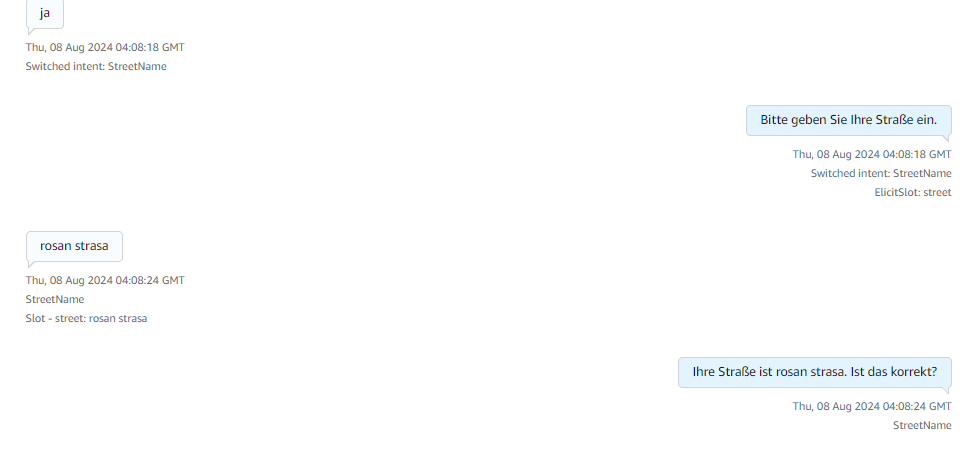
Then it starts collecting the city name and the street name of the caller.
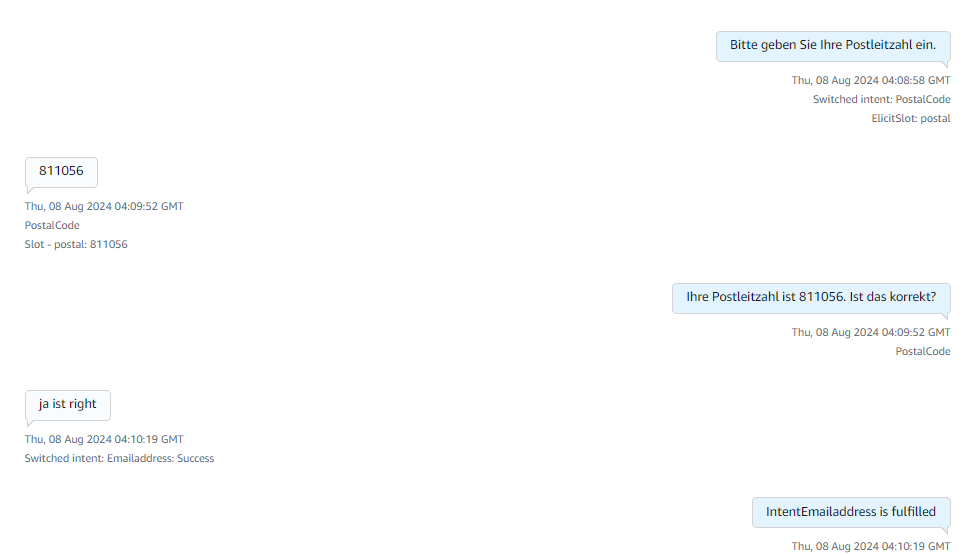
Finally it collects the zip code/postal code and replies to a thankyou message with an order confirmation message from the lex. These images describe the complete flow of how Amazon Lex responds to the customer. It has incorporated a retry logic of max 3 times where the bot asks the customer if it is not able to understand the customer intent. The bot has been trained to connect to a human agent if it is not able to respond or if the customer directly says that they wanted to talk to an agent. After reaching the Email Address intent Fallback it will give a thankyou message and will connect to the agent if the customer has any doubts.
References
Region requirements for ordering and porting phone numbers - Amazon Connect
Related Blogs
Beyond Chatbots: Redefining Customer Service with GenAI
In the fast-paced world of technology, customer service has evolved from simple phone calls and email responses to sophisticated chatbots. However, we are now standing at the threshold of a new era in customer service, marked by the emergence of Generative Artificial Intelligence (GenAI). This cutting-edge technology goes beyond the capabilities of traditional chatbots, promising a revolution in the way businesses interact with their customers. In this article, we will delve into the depths of GenAI, exploring its features, applications, and the transformative impact it is set to have on customer service.
Understanding GenAI:
Generative Artificial Intelligence, or GenAI, represents a significant leap forward from conventional chatbots. While chatbots rely on pre-programmed responses to specific queries, GenAI is built on advanced machine learning algorithms, enabling it to generate human-like responses in real-time. This means that GenAI can comprehend and respond to natural language, making customer interactions more fluid, dynamic, and, most importantly, authentic.
Real-World Applications:
1. Natural Language Understanding:
GenAI excels in understanding the intricacies of human language. It can interpret context, emotions, and nuances in a conversation, enabling businesses to provide more personalized and empathetic responses to customer queries. This enhances the overall customer experience, fostering a deeper connection between the brand and its customers.

2. Dynamic Problem-Solving:
Unlike traditional chatbots that follow predetermined scripts, GenAI has the ability to adapt and learn from each interaction. This enables it to handle complex issues and provide dynamic solutions, ensuring that customer queries are resolved with efficiency and accuracy. Businesses can benefit from a more agile and responsive customer service system.

3. Multilingual Support:
GenAI's language capabilities extend beyond geographical boundaries. It can seamlessly communicate in multiple languages, breaking down language barriers and opening up new avenues for businesses to engage with a diverse customer base. This is especially crucial in today's globalized marketplace.

4. Predictive Analytics:
Leveraging the power of data, GenAI can analyze customer interactions to predict future needs and preferences. This proactive approach allows businesses to anticipate customer requirements, offering personalized recommendations and services. As a result, customer satisfaction and loyalty are significantly enhanced.

The Transformative Impact:
The adoption of GenAI in customer service represents a paradigm shift, offering a host of benefits for businesses:
1. Enhanced Customer Satisfaction:
GenAI's ability to provide personalized, context-aware responses leads to higher customer satisfaction. Customers feel understood and valued, fostering a positive relationship with the brand.
2. Operational Efficiency:
With GenAI handling routine and complex queries alike, human agents can focus on more strategic and intricate tasks. This improves overall operational efficiency, allowing businesses to allocate resources more effectively.
3. Brand Differentiation:
Businesses that embrace GenAI set themselves apart in a competitive landscape. The technology not only improves customer service but also becomes a unique selling point that attracts tech-savvy consumers.
4. Scalability:
GenAI is designed to handle a high volume of interactions simultaneously. This scalability ensures that businesses can cater to a growing customer base without compromising on the quality of service.
Ankercloud's Role in the GenAI Revolution:
As pioneers in harnessing the power of GenAI, Ankercloud is at the forefront of redefining customer service. Our innovative solutions seamlessly integrate GenAI into various aspects of customer interactions, ensuring a holistic and intelligent approach. Ankercloud's platform goes beyond mere automation; it enhances the entire customer journey by providing a human-like touch to virtual interactions.
As we step into the era of GenAI-powered customer service, the possibilities seem limitless. The ability to understand, anticipate, and respond to customer needs in a highly personalized manner is reshaping the way businesses engage with their audience. Ankercloud's commitment to providing effective and scalable GenAI solutions positions it as a catalyst in this transformative journey. Embracing GenAI is not just a step beyond chatbots; it's a leap towards a new paradigm of customer service excellence.
How to migrate an EC2 instance from AWS to GCP: step by step explanation
Why are we adopting this approach
We needed to migrate an entire EC2 instance from AWS to GCP, including all data and the application hosted on the AWS EC2 instance. To achieve this, we chose the "Migrate to Virtual Machines" option under the Compute Engine service in GCP. Other options are available that migrate the EC2 instance’s AMI, where additional data should be transferred is a significant challenge.
The EC2 instance migration was accomplished successfully by using the method described below, which streamlined the entire GCP migration procedure.
A detailed, step-by-step explanation is documented below.
Pre-Requirements on AWS console
We created a user in the AWS console, generated an access key and secret key for the user, and assigned them Administrator permissions. These keys were used to migrate an EC2 instance to a GCP VM instance.
Below are our EC2 instances listed in the AWS console. We are migrating these instances to the GCP console.

In this EC2 instance, we have a static web application as shown in the screenshot below.

STEP: 01
Open the GCP console, navigate to Compute Engine, and go to the "Migrate to Virtual Machines" service.
Migrate to Virtual Machines
Using the "Virtual Machines" option under the Compute Engine service, we successfully migrated the EC2 instance.
STEP: 02
Add the source from which we need to migrate the EC2 instance, such as AWS or Azure. Here, we are migrating an EC2 instance from AWS to GCP.

Choose an AWS source.
To create the AWS source, please provide the necessary details as shown in the screenshot below.
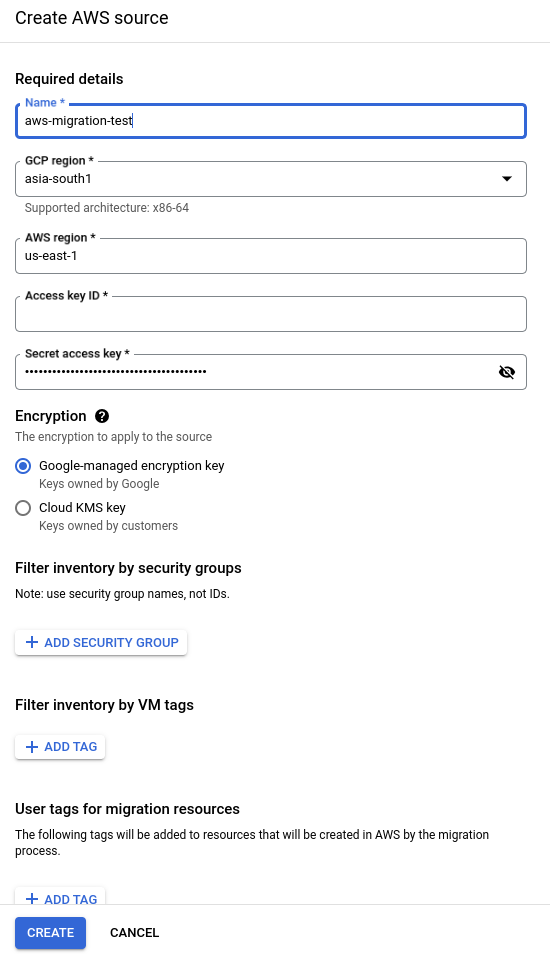
Verify all the details and create the AWS source. Once an AWS source is created, all AWS EC2 instances from that source will be visible in our GCP console, as shown in the screenshot below.
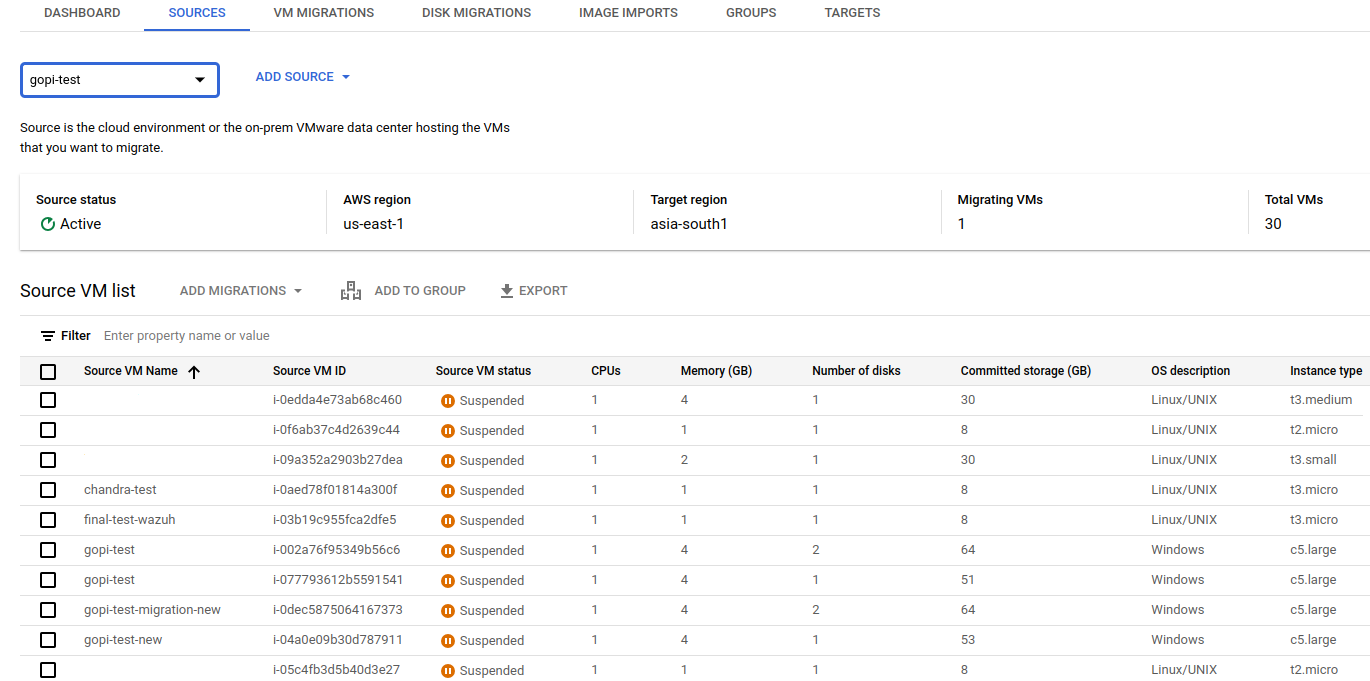
Select the instance from the list above that should be migrated to a GCP VM instance.

STEP: 03
I have selected an AWS EC2 instance and want to migrate it to Google Cloud by clicking "Add VM Migration" and confirming, as shown below.

Navigate to VM migration and start the replication.
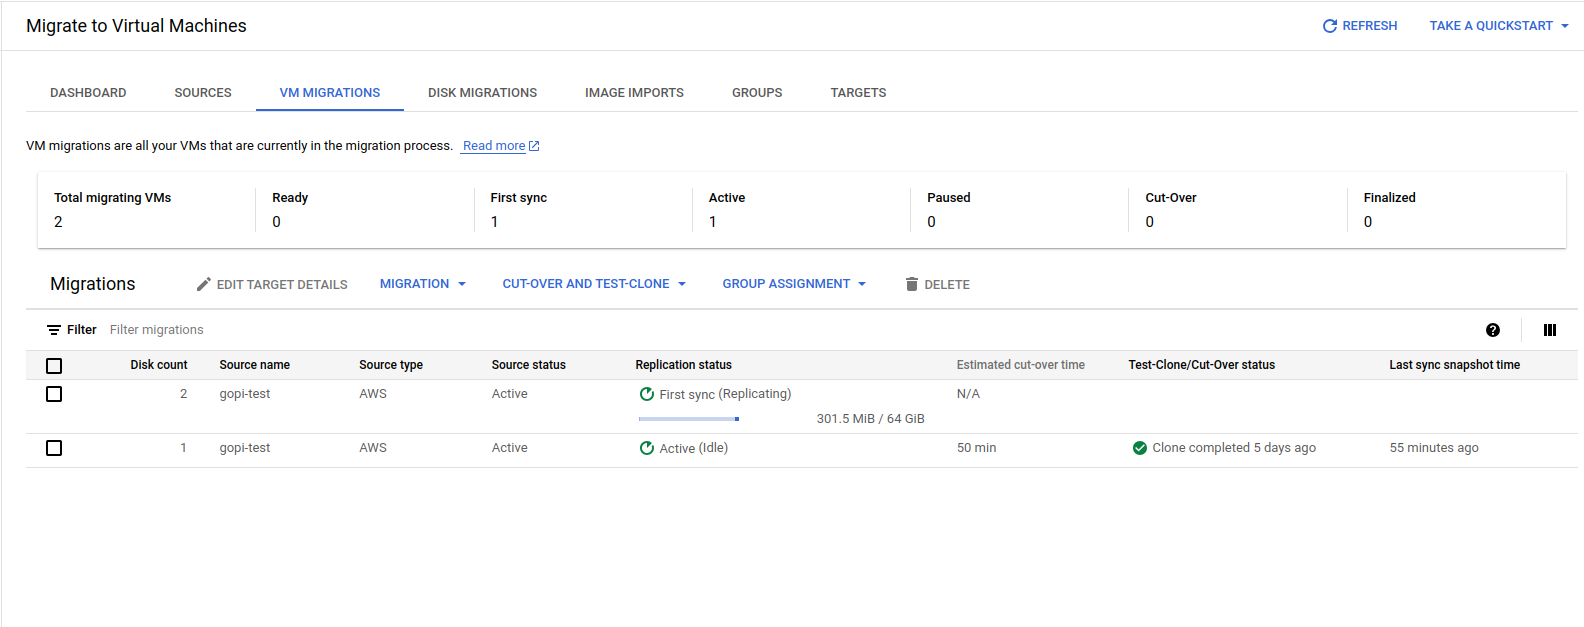

Migrating all the data from AWS to GCP, as shown in the screenshot, takes some time.
STEP: 04
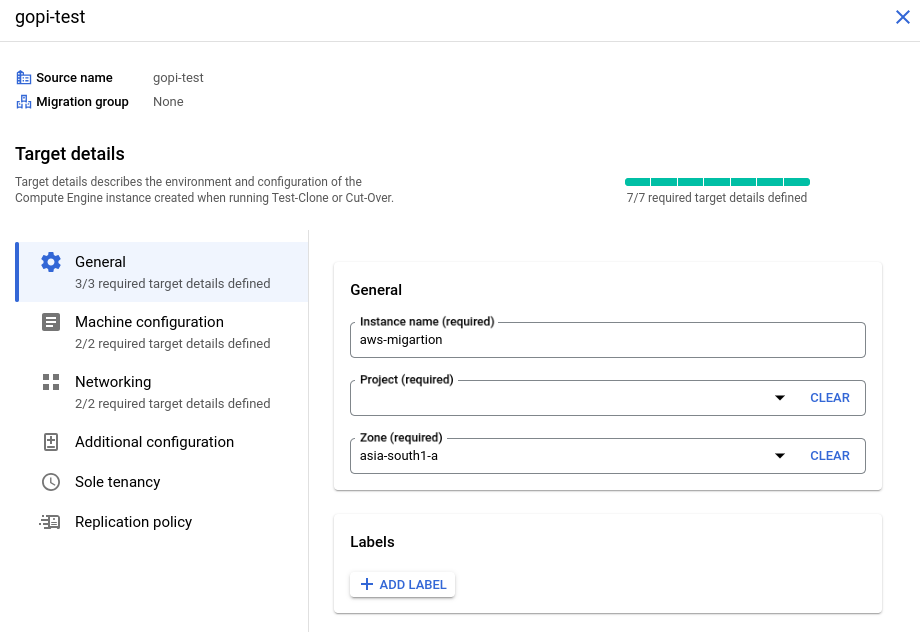
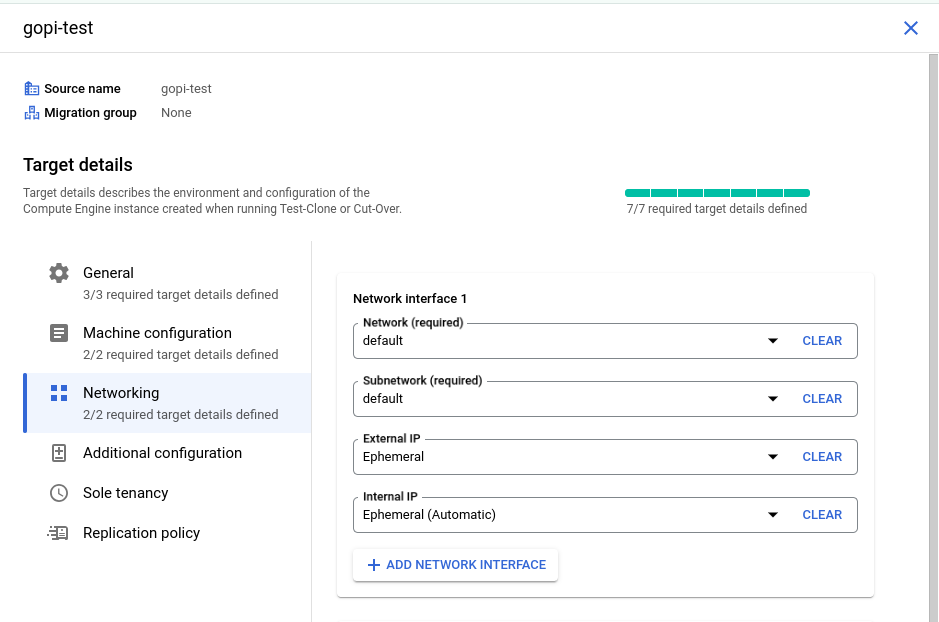
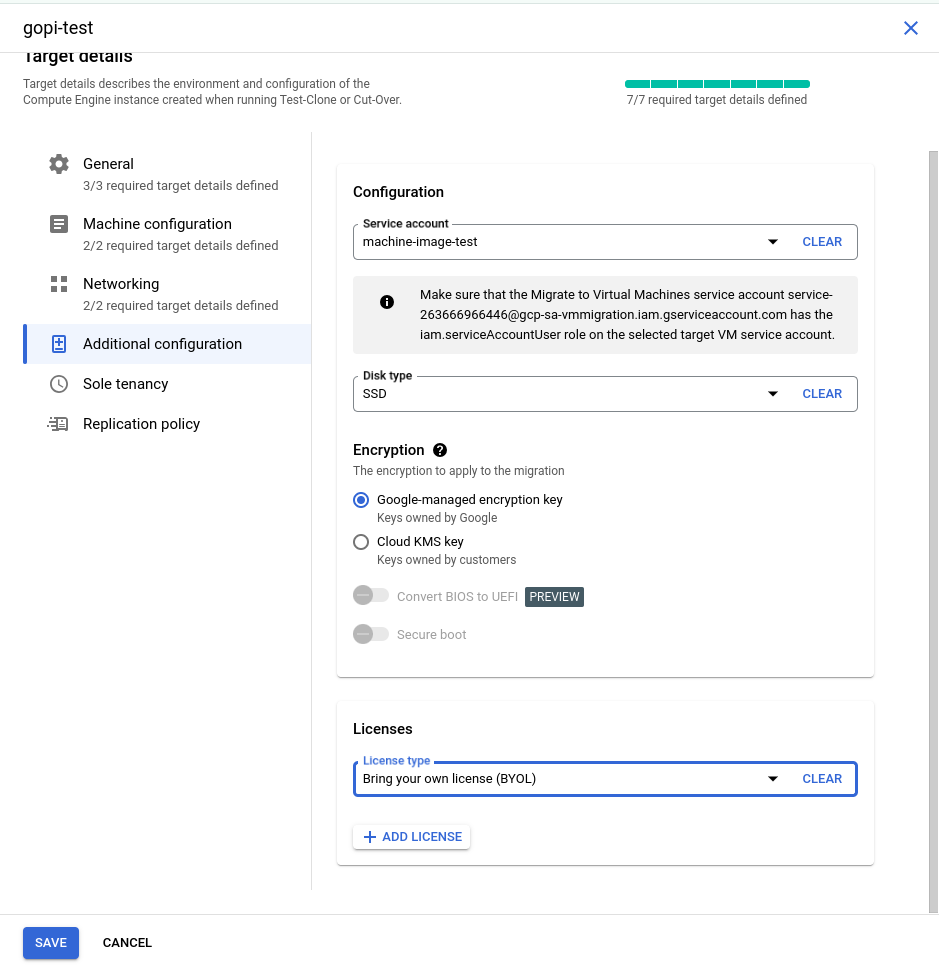
Specify the configuration details for launching the VM instance in GCP, including the machine type, VPC, instance name, public and private IPs, disk types, and service account. Also, assign the appropriate license to the newly launched VM instance by clicking "Edit Target Details" and providing the necessary information.

Fill in the details as shown in the screenshots:
STEP: 05
I have created a new service account in my testing GCP project with the "Service Account User" role. This role is essential for launching a GCP VM instance, so we need to include this service account in the source target details, as shown in the screenshots above.

Finally, verify all the details and then click 'Save.' The target details will be updated successfully.
STEP: 06
Before proceeding to the final cut-off state, we will launch a test VM instance using the test clone and confirm the setup. This step ensures that all configurations are correct and all data is successfully migrated before moving to the final cut-off state.
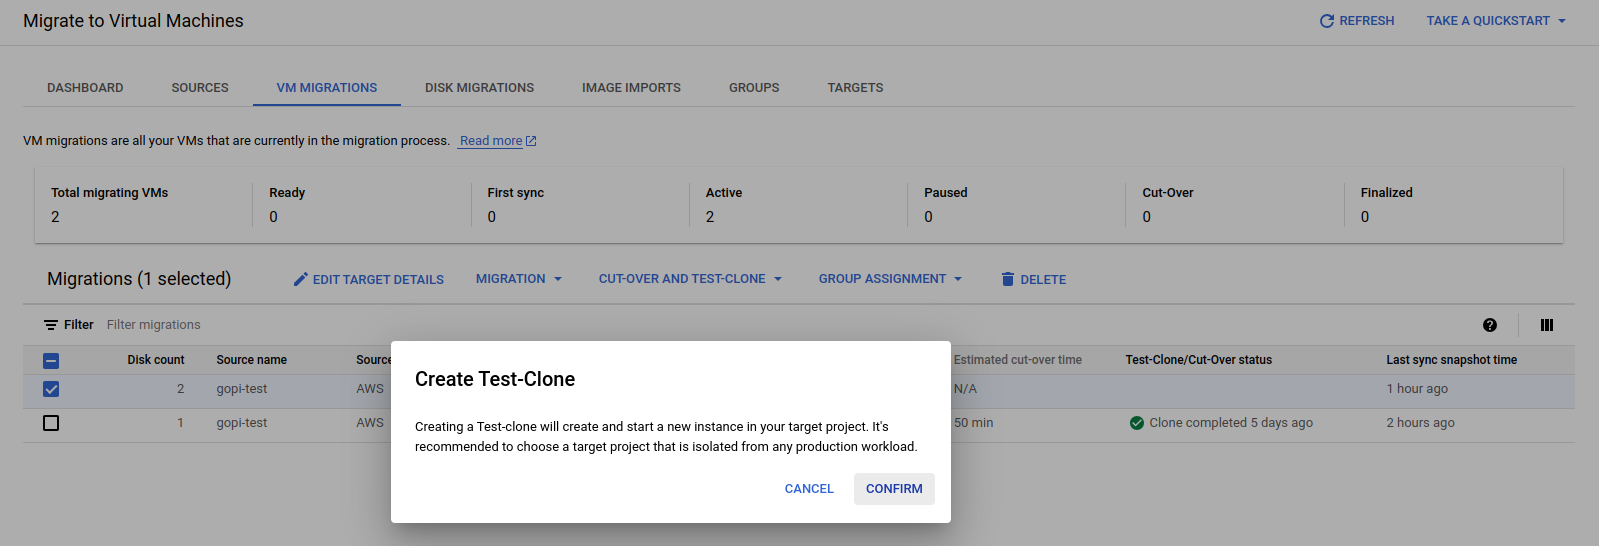
Where the test clone takes place—using the replicated data and target details—to launch a first test VM instance in the GCP console.
Test process:
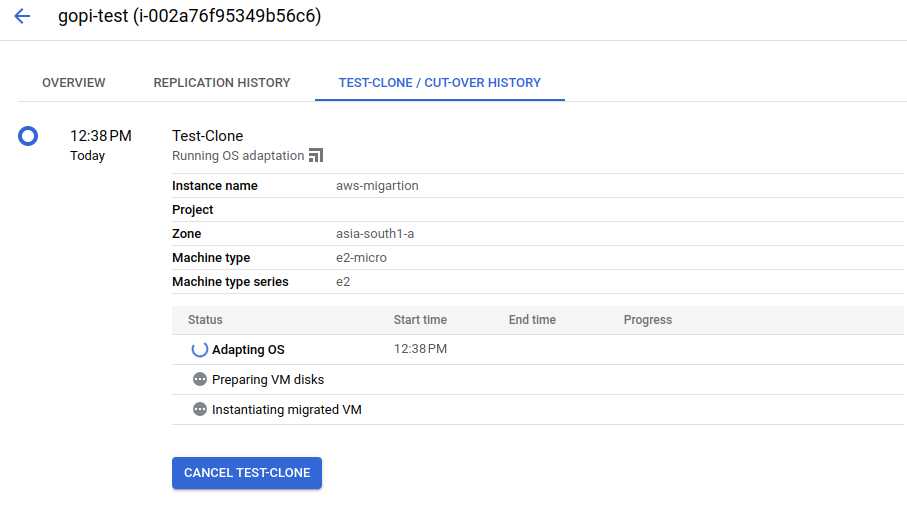
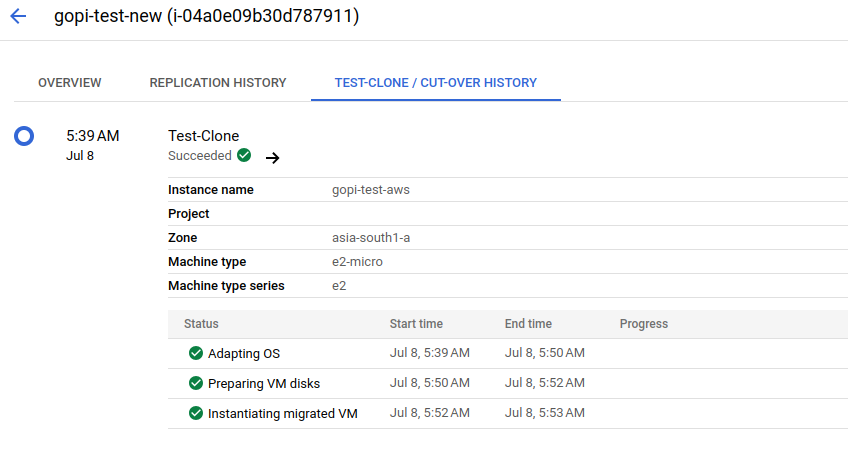
STEP: 07
During the final cut-over stage of the migration process, only the original VM instance is launched in the GCP console, exactly mirroring the EC2 instance in the AWS console
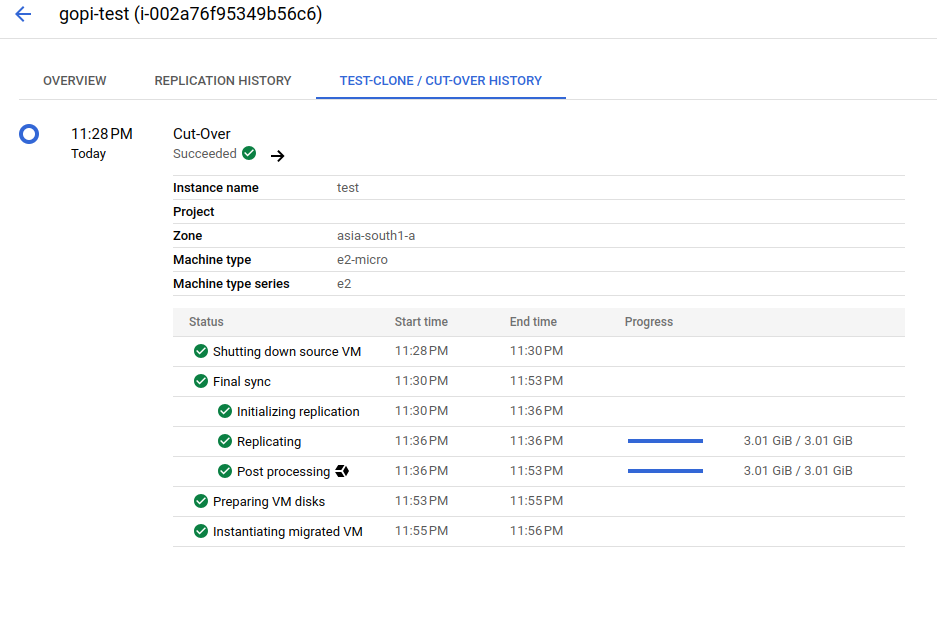
After the cut-over stage, we successfully launched a VM instance, as shown in the screenshots below.

STEP: 08
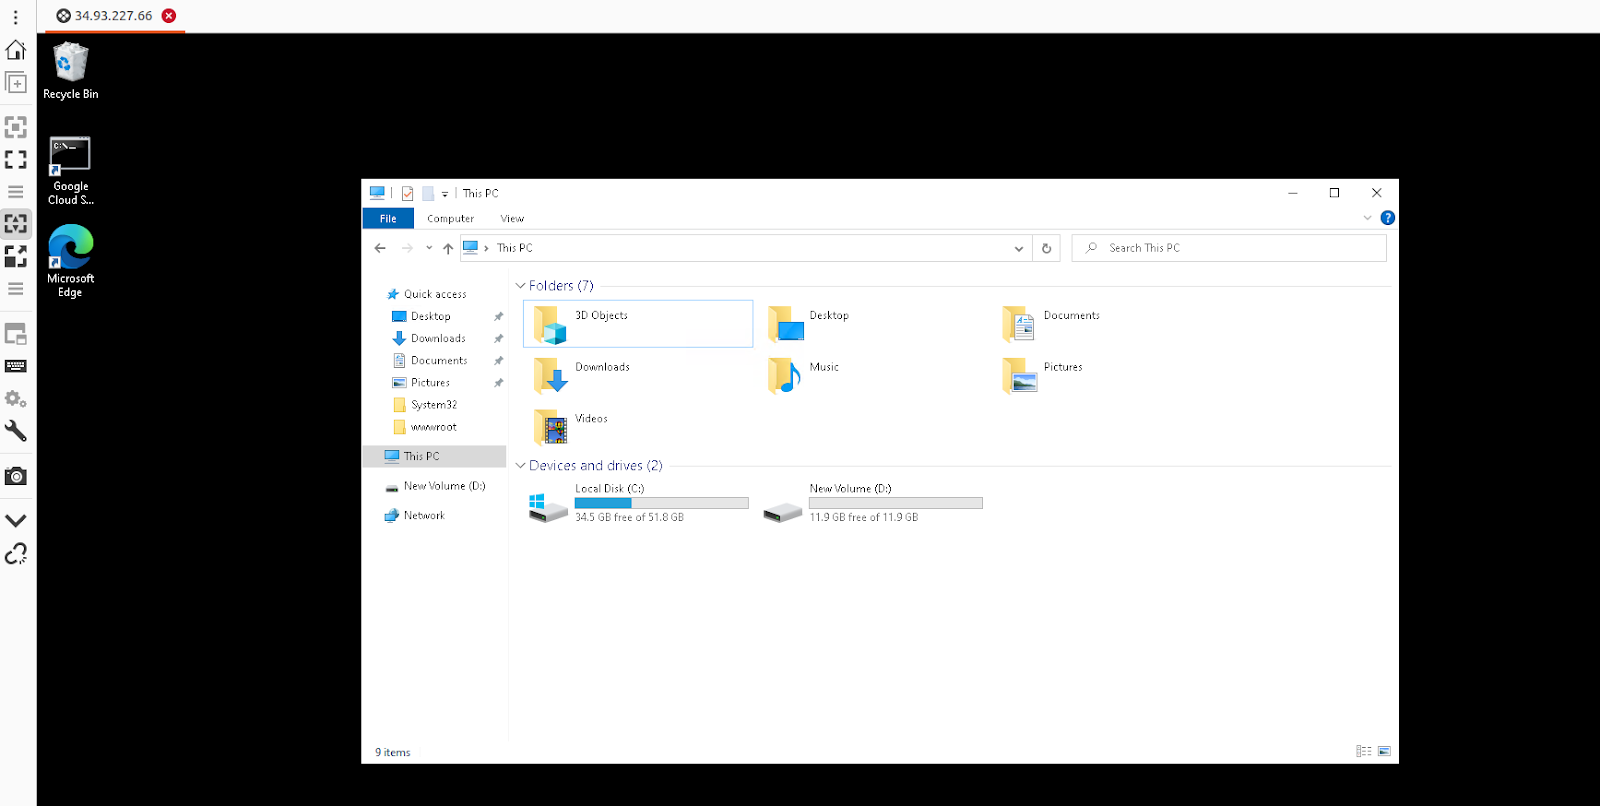
After successfully connecting via RDP to the newly launched VM instance in the GCP console, we verified that all data migrated from the EC2 instance in the AWS console was present in the GCP VM instance.
For reference, please find the screenshot below.
STEP: 09
We have also verified that our application, which is a static webpage hosted on an EC2 instance in the AWS console, is working as expected on the GCP VM machine.

Therefore, we have successfully migrated an AWS EC2 instance from AWS Cloud to GCP Cloud
Create dashboards on AWS QuickSight & make it accessible publicly on the internet
Amazon Quicksight powers data-driven organizations with unified business intelligence (Bi) at hyperscale. With the Quicksight, all users can meet varying analytic needs from the same source of truth through modern interactive dashboards, paginated reports, embedded analytics and natural language queries.
Benefits of AWS QuickSight :-
Build faster : Speed up the development by using one authoring experience to build modern dashboards and reports. Developers can quickly integrate rich analytics and ML-powered natural language query capabilities into applications with one-step, public embedding and rich APIs.
Low cost : Pay for what you use with the quicksight usage-based pricing. No need to buy thousands of end-user licenses for large scale Bi/embedded analytics deployments. With no servers or software to install or manage. Also can lower costs by removing upfront costs and complex capacity planning.
BI for everyone : Deliver insights to all your users when, where and how they need them. Users can explore modern & interactive dashboards, get insights within their applications, obtain scheduled formatted reports with reports and make decisions with ML insights.
Scalable : Quicksight is serverless, it automatically scale to tens of thousands of users without the need to set up, configure or manage your own servers. The Quicksight in-memory calculation engine, SPICE provides consistently fast response times for end users, removing the need to scale databases for high workloads.
Lets Start With QuickSight :-
Create a manifest file for uploading the dataset :
· Initially we have uploaded the data & manifest file into AWS S3.
· To create a manifest file you can refer the following.
· We have created a manifest file named manifest.json.
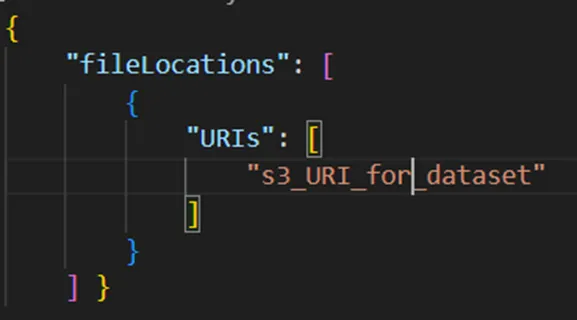
· Navigate to Quicksight in the AWS console.
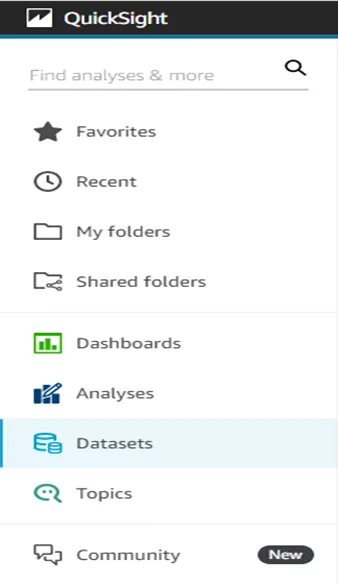
· Select the Datasets from the left side of the console.
· Click on New dataset to upload a new dataset.

· Now you will see the multiple datasources from where you can upload the data into quicksight.
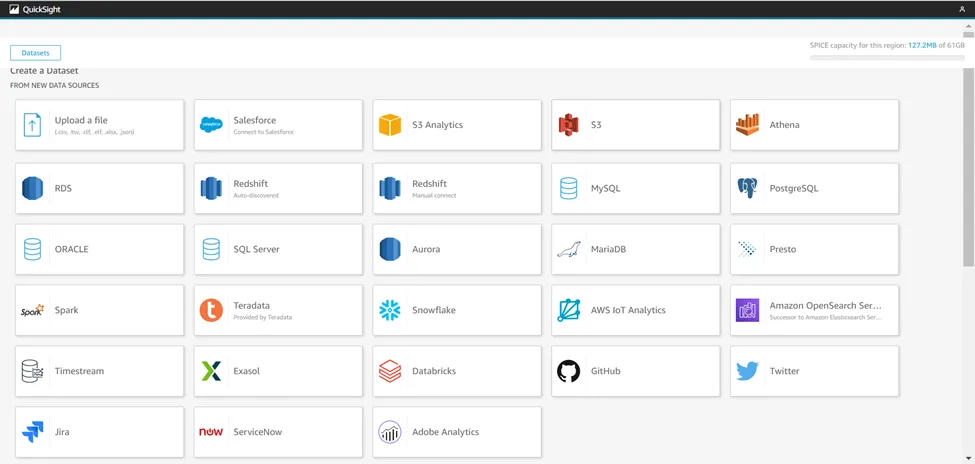
· So we are using S3 for the dataset.
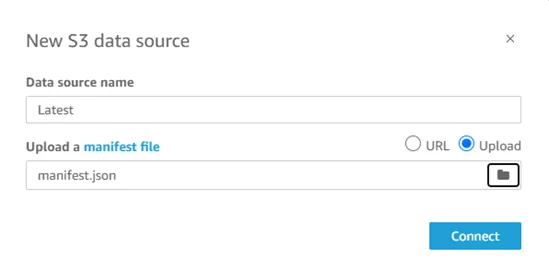
· Name the Dataset and upload the manifest file directly from the local by selecting Upload options or from S3 using URL.
· Click on connect to finish the upload.

· Here you will get the uploaded dataset which was named Latest.
Create a new analysis :
· Click on the Analyses to start the analysis and dashboards.
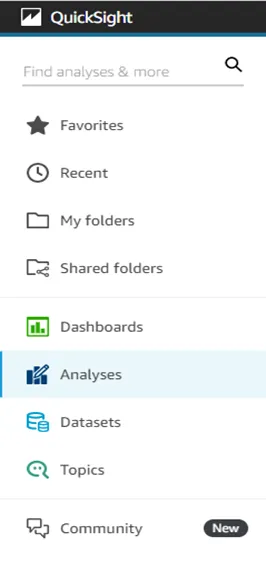
· Click on the New analysis button to start the analysis.

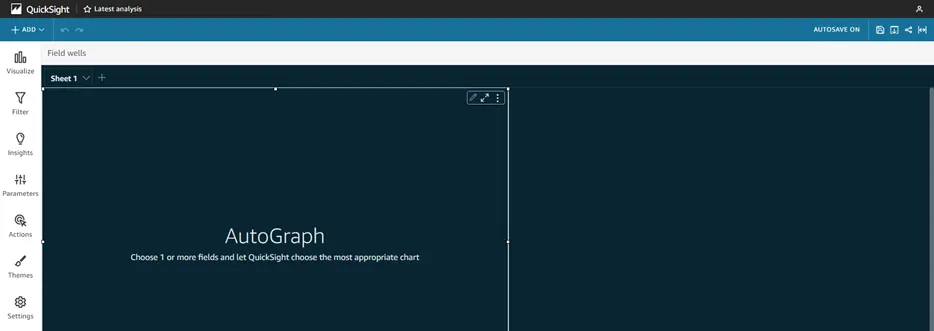
· Here you will be in the analysis, where you can do analysis, make dashboards and visuals.
Publish the dashboard and make it publically available :
· First save the analysis.
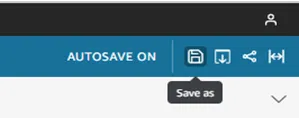
· Click on the Save icon & name the dashboard, Click on SAVE.

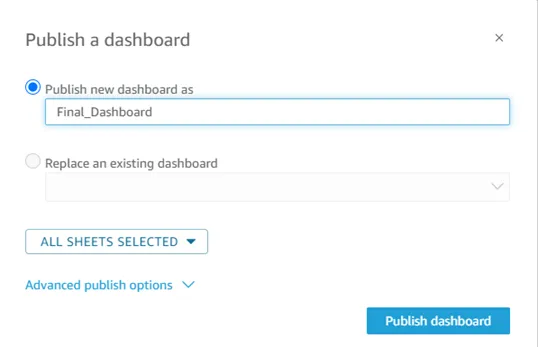
· Now click on the Share icon and select Publish dashboard option as shown below

· Name the dashboard & click on Publish dashboard button.
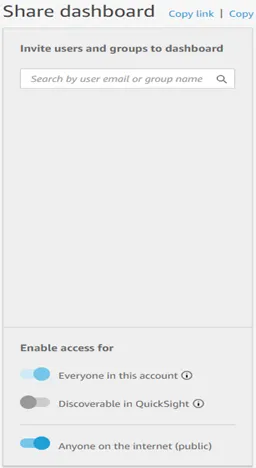
· Now Click on the share icon and select the Share dashboard option as shown below.

· You will see the option Anyone on the internet (public), just enable it.
· Copy the link by simply clicking on the Copy link.
· Paste the copied link in the browser or share it to anyone to see your dashboards.
