00 min read
Giving access to your AWS is simple and straightforward even if you are not experienced with AWS, just follow the step-by-step procedure explained below. This approach uses the official Identity and Access Management (IAM) service from AWS.
Note: the process here reported is specifically targeting the case in which you are giving access to your account to perform a Well-Architected Framework Review (WAFR), but it can be used for any other purposes. WAFR requires read-only access to both the AWS Management Console and the Command Line Interface (CLI) to your production account or production resources, as well as the Billing Dashboard (for cost-related recommendations).
Summary:
- Steps 1–11: Create an IAM user with the needed policies (ReadOnlyAccess, IAMUserChangePassword, AWSBillingReadOnlyAccess) and download access credentials
- Steps 12–15: Grant CLI access and download the access keys
- Steps 16–18: Make sure IAM access to the Billing dashboard is allowed
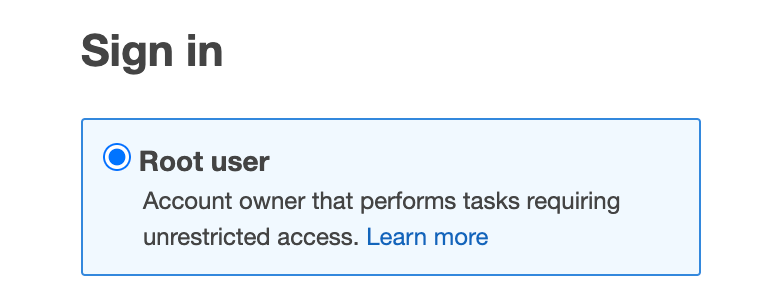
1. Open the AWS Management Console from a web browser and normally login into your AWS account with your Root user credentials
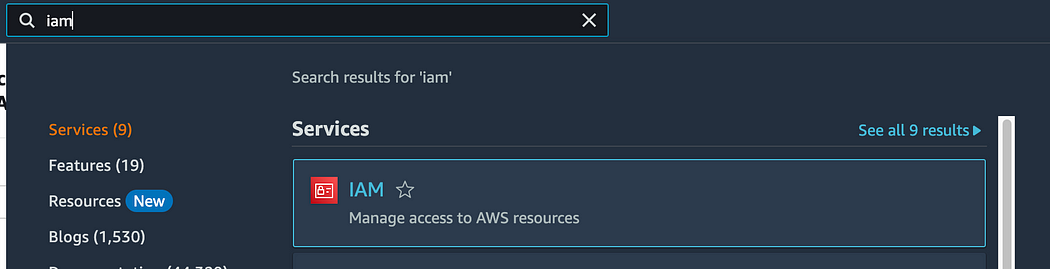
2. Access the IAM service.
The easiest way is to navigate to the top of the AWS console and type “iam” on the search bar, and select the first result.
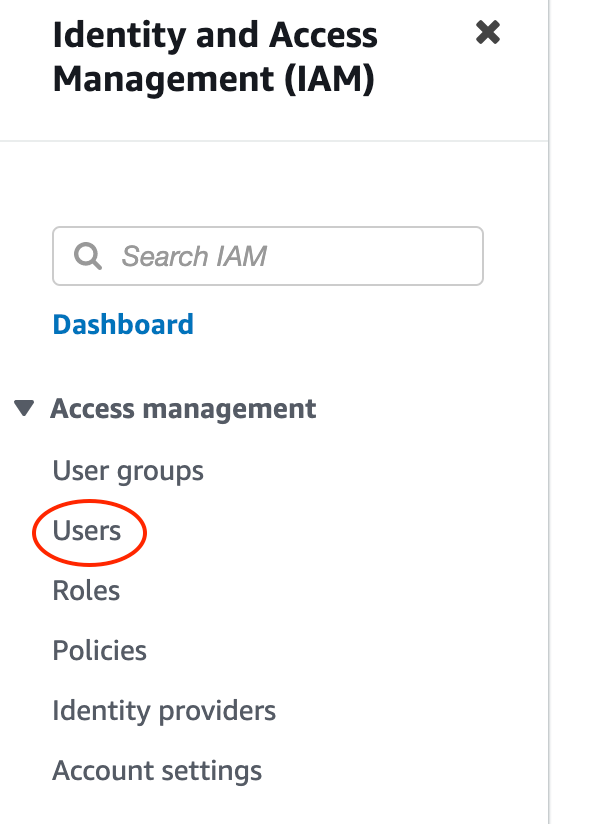
3. Select the “Users” menu from the left pane
4. Once the IAM/Users page is open, navigate to the right side and select the “Add User” blue button.

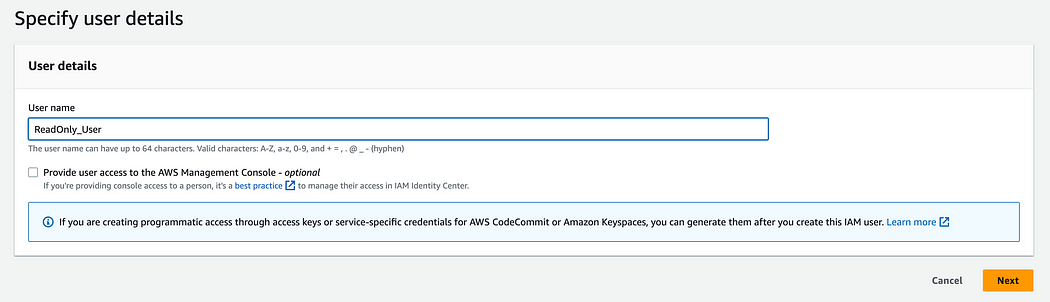
5. Specify a User name in the apposite field
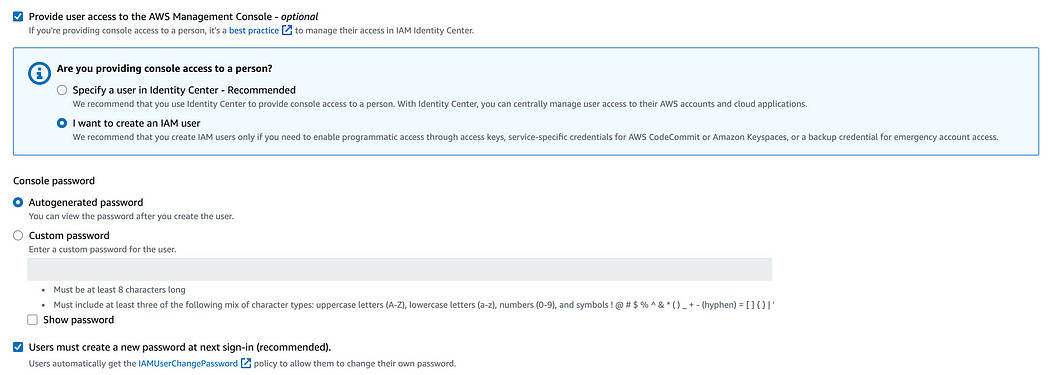
6. Select the “Provide user access to the AWS Management Console” box, and additional settings will appear (access to the Management Console is provided here; CLI access will be provided later).
Select “I want to create an IAM user”, leave “Autogenerated password” as default and tick the box “Users must create a new password at next sign-in” to allow the user to change the password after the first access.
Then click “Next”.
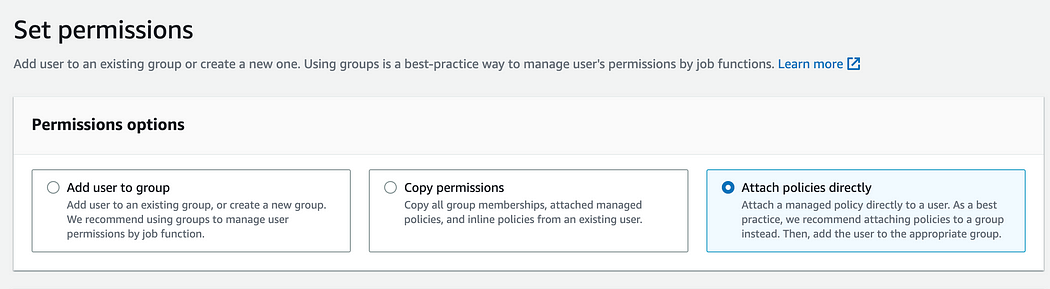
7. On the following page, select the “Attach policies directly” option to attach the necessary policies to the user.
8. Type “readonlyaccess” in the search bar to apply a filter, and navigate through the different pages by selecting a different page number on the top left. Find the ReadOnlyAccess policy and select it by ticking the box on the left.
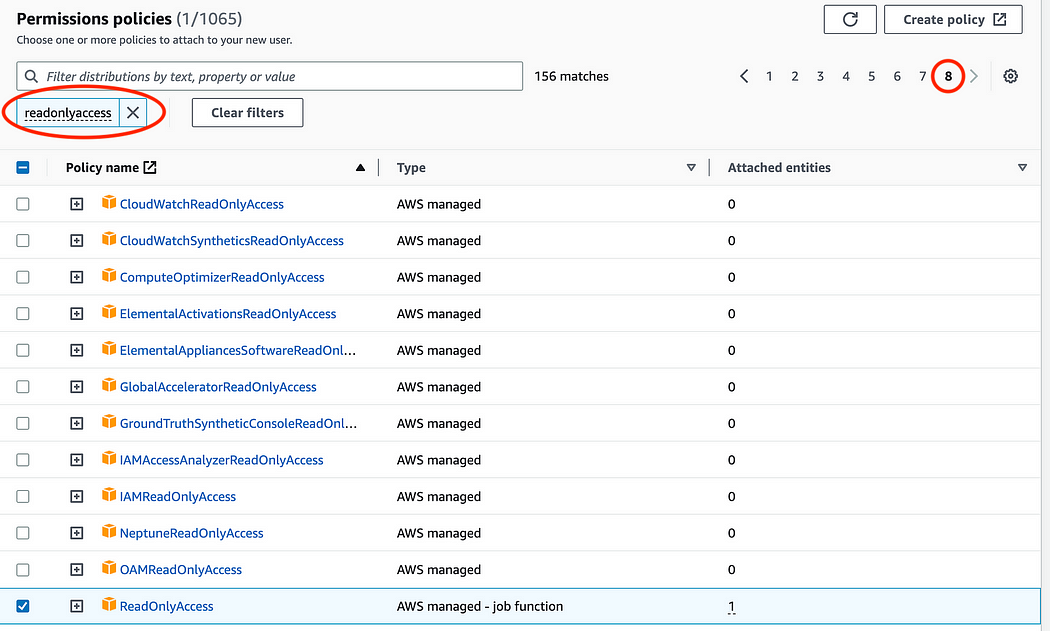
9. Remove the “readonlyaccess” filter by clicking on the X…

…and repeat step 9–10 to find and attach the AWSBillingReadOnlyAccess policy.
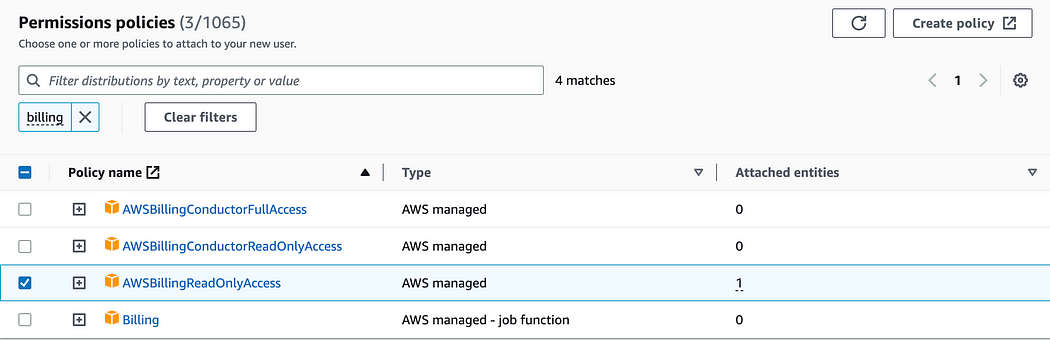
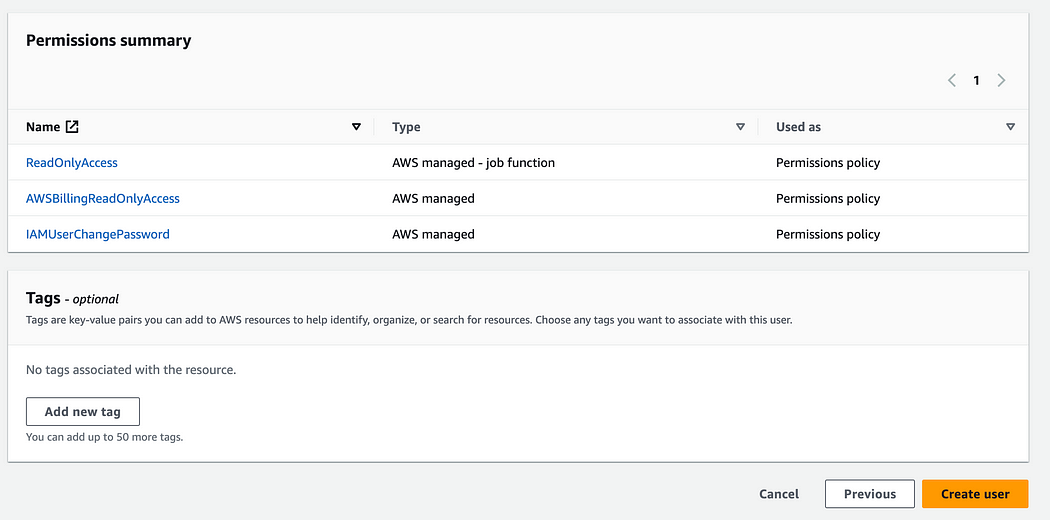
Once you have selected all the 2 policies, click “Next”.
10. On the summary page, make sure to have all these 3 policies listed, then click “Create user”
11. Before exiting the page, make sure to press the “Download .csv file” containg the access details, and save it to emailing it later.
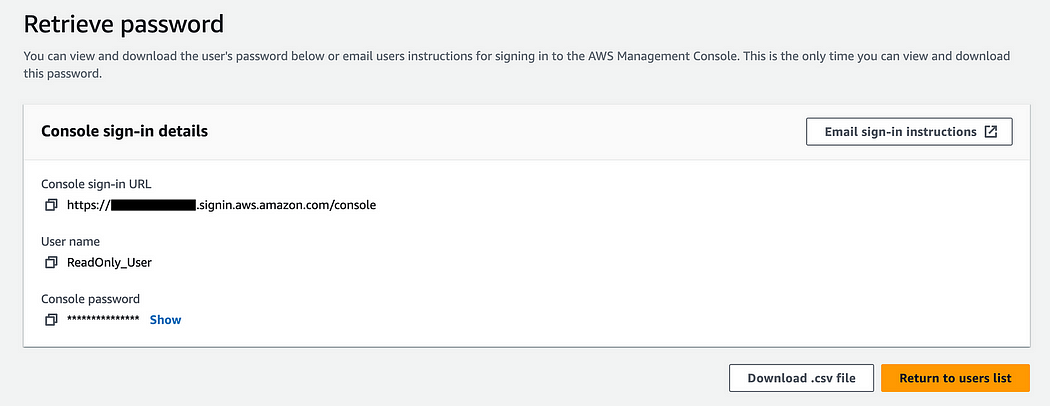
Then go back to the users list.
The IAM user creation is completed. The User has read only access to the Console and to the Billing dashboard, and is allowed to change the password on the first login.
To give also access to the CLI (required for WAFR), please follow the steps below.
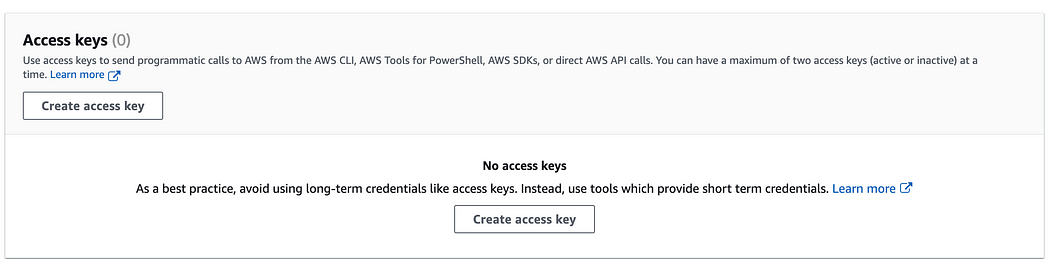
12. From the list of active users in the account, enter the one just created by clicking on it, and switch to the “Security credentials” pane.

13. Scroll down until you find the “Access keys” section and select “Create access key”
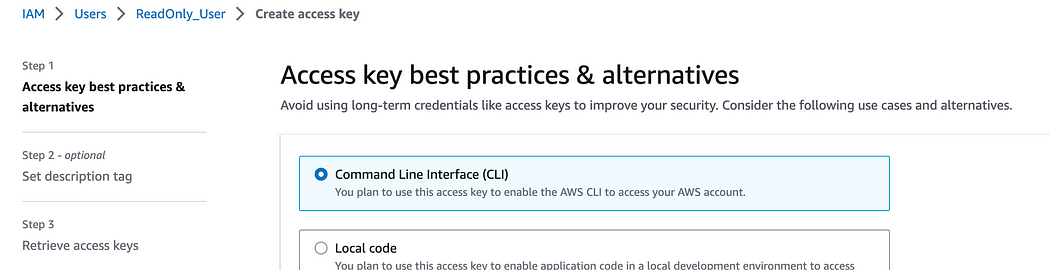
14. On the next page, select “Command Line Interface (CLI)”. Click “Next” and then “Create access key”
15. Click on the “Download the .csv file” button and save the file with the credentials.
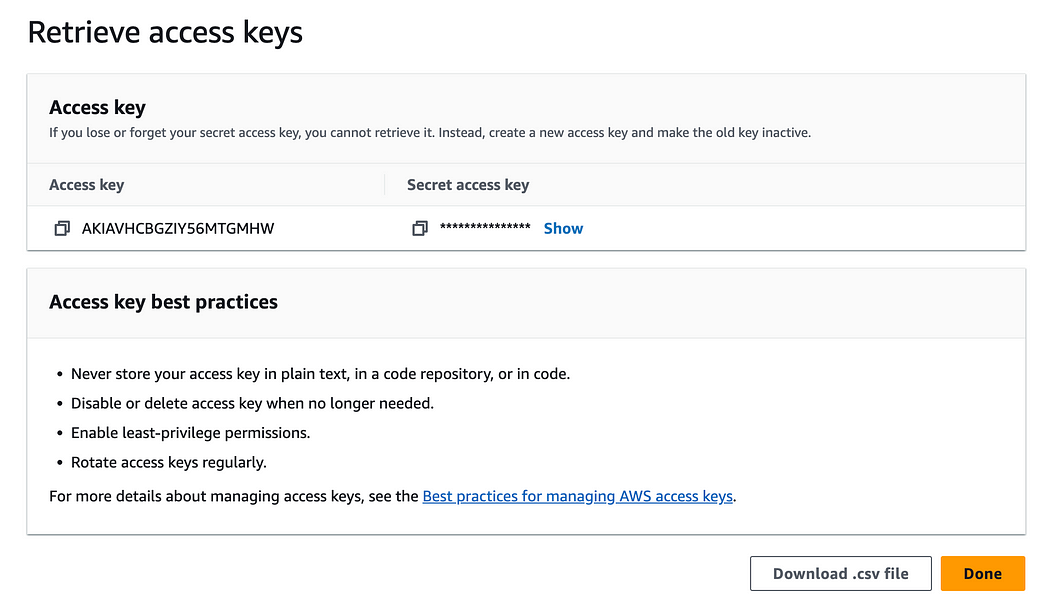
Now user credentials and Access keys have been created and downloaded, ready to be sent.
To make sure that the IAM User can access the Billing dashboard, make sure to enable the setting by following the next steps.
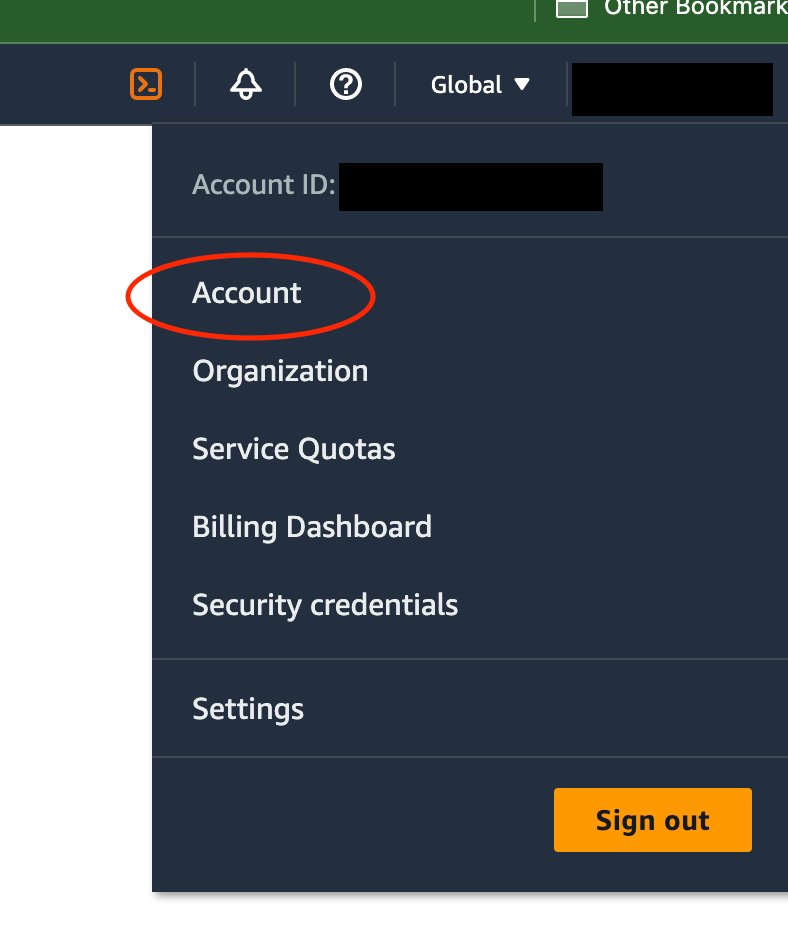
16. Click on your account name on the top-right and access the “Account” Section
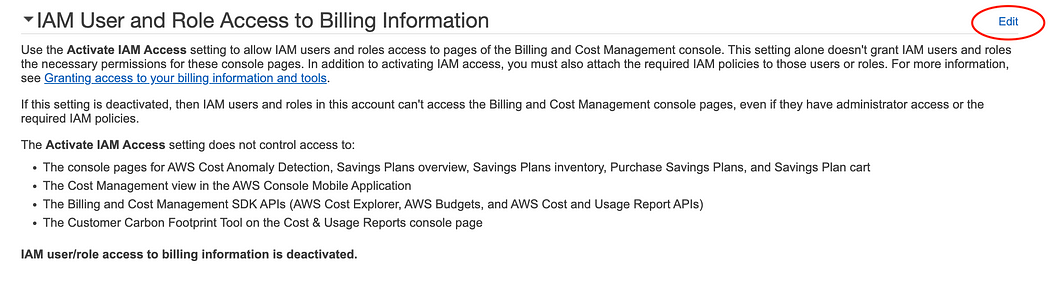
17. Scroll down until you find the “IAM User and Role Acess to Billing Information” section, and click “Edit”
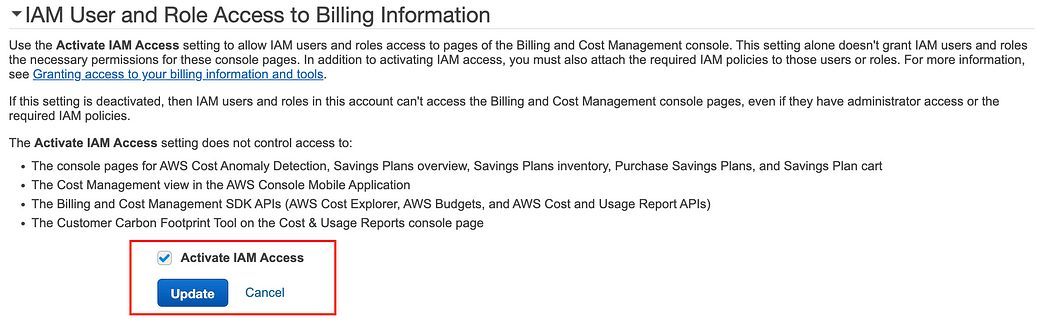
18. A new setting will appear on the bottom, check the box “Activate IAM Access” and click update.
Final step: to proceed with a Well-Architected Framework Review, email both the downloaded files containing the Username, Password, Console sign-in URL, Access key ID, Secret access key to the Solution Architect (or another person) who will work on your account.
How to grant Read-Only Access to your AWS Account

Giving access to your AWS is simple and straightforward even if you are not experienced with AWS, just follow the step-by-step procedure explained below. This approach uses the official Identity and Access Management (IAM) service from AWS.
Note: the process here reported is specifically targeting the case in which you are giving access to your account to perform a Well-Architected Framework Review (WAFR), but it can be used for any other purposes. WAFR requires read-only access to both the AWS Management Console and the Command Line Interface (CLI) to your production account or production resources, as well as the Billing Dashboard (for cost-related recommendations).
Summary:
- Steps 1–11: Create an IAM user with the needed policies (ReadOnlyAccess, IAMUserChangePassword, AWSBillingReadOnlyAccess) and download access credentials
- Steps 12–15: Grant CLI access and download the access keys
- Steps 16–18: Make sure IAM access to the Billing dashboard is allowed
1. Open the AWS Management Console from a web browser and normally login into your AWS account with your Root user credentials
2. Access the IAM service.
The easiest way is to navigate to the top of the AWS console and type “iam” on the search bar, and select the first result.
3. Select the “Users” menu from the left pane
4. Once the IAM/Users page is open, navigate to the right side and select the “Add User” blue button.
5. Specify a User name in the apposite field
6. Select the “Provide user access to the AWS Management Console” box, and additional settings will appear (access to the Management Console is provided here; CLI access will be provided later).
Select “I want to create an IAM user”, leave “Autogenerated password” as default and tick the box “Users must create a new password at next sign-in” to allow the user to change the password after the first access.
Then click “Next”.
7. On the following page, select the “Attach policies directly” option to attach the necessary policies to the user.
8. Type “readonlyaccess” in the search bar to apply a filter, and navigate through the different pages by selecting a different page number on the top left. Find the ReadOnlyAccess policy and select it by ticking the box on the left.
9. Remove the “readonlyaccess” filter by clicking on the X…
…and repeat step 9–10 to find and attach the AWSBillingReadOnlyAccess policy.
Once you have selected all the 2 policies, click “Next”.
10. On the summary page, make sure to have all these 3 policies listed, then click “Create user”
11. Before exiting the page, make sure to press the “Download .csv file” containg the access details, and save it to emailing it later.
Then go back to the users list.
The IAM user creation is completed. The User has read only access to the Console and to the Billing dashboard, and is allowed to change the password on the first login.
To give also access to the CLI (required for WAFR), please follow the steps below.
12. From the list of active users in the account, enter the one just created by clicking on it, and switch to the “Security credentials” pane.
13. Scroll down until you find the “Access keys” section and select “Create access key”
14. On the next page, select “Command Line Interface (CLI)”. Click “Next” and then “Create access key”
15. Click on the “Download the .csv file” button and save the file with the credentials.
Now user credentials and Access keys have been created and downloaded, ready to be sent.
To make sure that the IAM User can access the Billing dashboard, make sure to enable the setting by following the next steps.
16. Click on your account name on the top-right and access the “Account” Section
17. Scroll down until you find the “IAM User and Role Acess to Billing Information” section, and click “Edit”
18. A new setting will appear on the bottom, check the box “Activate IAM Access” and click update.
Final step: to proceed with a Well-Architected Framework Review, email both the downloaded files containing the Username, Password, Console sign-in URL, Access key ID, Secret access key to the Solution Architect (or another person) who will work on your account.
Related Blogs
How to build a Software-as-a-Service (SaaS) product on AWS
More and more companies operating in the IT sector are born with, have switched to, or are evaluating the Software-as-a-Service (SaaS) business model as an effective way to deliver their services to customers. SaaS in the cloud is the perfect solution to leverage all the available modern tools and automated processes, but how much do you know about the optimal way to build these products on AWS?
The problem
Let’s say that your company is interested in managing a SaaS product on AWS, but you are unsure how you should approach the problem or how to start implementing a new feature that needs to be integrated with the offer. Whether you are:
- Thinking about adopting a SaaS model
- Planning to onboard a lot of new customers
- Already using SaaS, on AWS or on another platform
- Working on new license-based solutions
- Looking to modernize your whole setup or a specific part of it
- Interested in improving your DevOps pipeline
… we at Ankercloud think you could strongly benefit from the AWS SaaS Discovery Program.
The solution
Being a SaaS-certified partner and benefitting from tight cooperation with AWS, Ankercloud embarks you on a discovery journey with the aim of giving you full guidance for SaaS-related innovations, customized to your needs. That’s what the SaaS Discovery Program is all about: a period of time ranging from 2–4 weeks to be spent together, starting with technical deep dive workshops to align on your specific starting point and requirements, all the way into AWS architecture design, modernization discussions, TCO computation, best practices explanation, and much more — always suited to your business case.
But the good part does not end here: depending on your growth potential, we are able to provide the SaaS Discovery Program free of charge for you (i.e. 100% discount/funding).
High Potential use cases
The focus of the SaaS Discovery Program is always to accommodate your needs and concentrate on improving your weak points. Depending on your inputs, examples of common use cases can be:
- SaaS Design Decomposition
- Authentication and Access Management
- CI/CD Pipelines
- Database Multi-tenancy and Tenants isolation
- Security and Reliability
- SaaS DevOps
- Agility and Operations
But this list is non-exhaustive, and we at Ankercloud are always open to learning about your specific obstacles and understanding how we can support you. And here is our challenge for you: bring us your most critical SaaS-related issue, we will be happy to discuss it and bring all our deep technical knowledge to develop a solution together.
What about the outcome?
This program is intended to provide flexibility and visibility during the whole planning and discovery process. Therefore, once the program is completed, there is no obligation to further continue with the implementation of the developed solution on AWS: no commitment of any kind is in fact implied, as the name discovery suggests.
Several documents and deliverables will anyway help you in the decision-making process, giving full visibility to the planned solution. At the end of the program, Ankercloud will in fact provide you with a detailed technical report with an architecture diagram, a complete analysis of the AWS costs within an 18 months time horizon, and a full proposal to continue working together with the implementation, to give us the possibility of providing further hands-on support if needed.
Sounds interesting? Are you ready to start exploring new SaaS solutions and best practices?
Don’t hesitate to contact us at: cloudengagement@ankercloud.com
Let us guide you through the steps and check your eligibility for the SaaS Discovery Program.
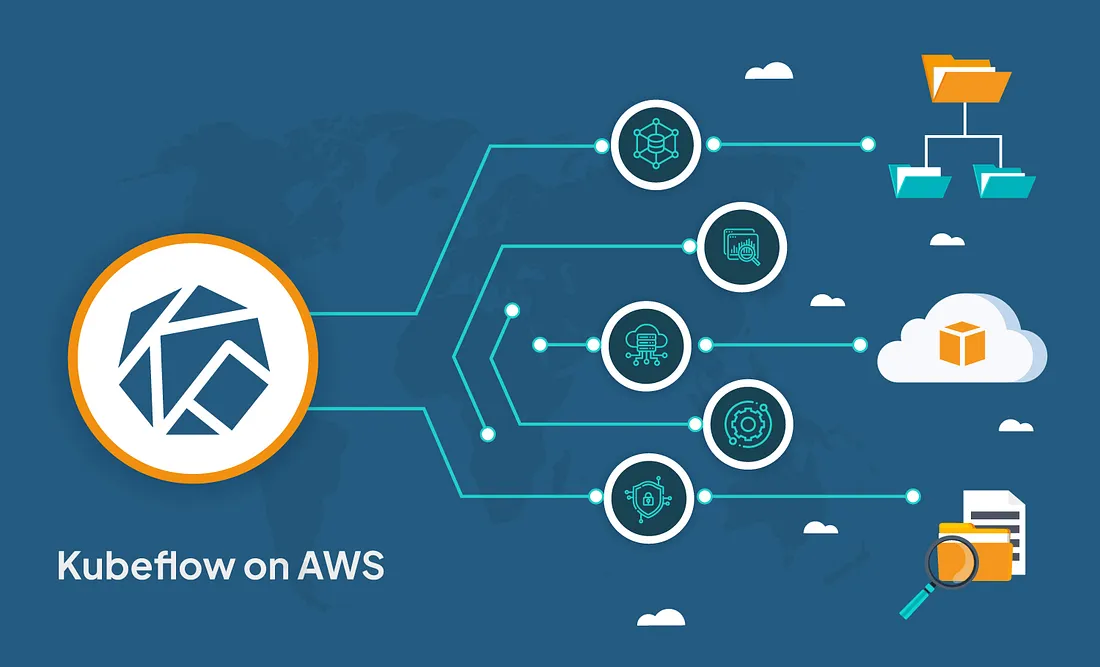
Kubeflow on AWS
What is Kubeflow?
The Kubeflow project aims to simplify, portability, and scalability of machine learning (ML) workflow deployments on Kubernetes. Our objective is to make it simple to deploy best-of-breed open-source ML systems to a variety of infrastructures, not to replicate other services. Run Kubeflow wherever Kubernetes is installed and configured.
Need of Kubeflow?
The need for Kubeflow arises from the challenges of building, deploying, and managing machine learning workflows at scale. By providing a scalable, portable, reproducible, collaborative, and automated platform, Kubeflow enables organizations to accelerate their machine learning initiatives and improve their business outcomes.
Here are some of the main reasons why Kubeflow is needed:
Scalability: Machine learning workflows can be resource-intensive and require scaling up or down based on the size of the data and complexity of the model. Kubeflow allows you to scale your machine learning workflows based on your needs by leveraging the scalability and flexibility of Kubernetes.
Portability: Machine learning models often need to be deployed across multiple environments, such as development, staging, and production. Kubeflow provides a portable and consistent way to build, deploy, and manage machine learning workflows across different environments.
Reproducibility: Reproducibility is a critical aspect of machine learning, as it allows you to reproduce results and debug issues. Kubeflow provides a way to reproduce machine learning workflows by using containerization and version control.
Collaboration: Machine learning workflows often involve collaboration among multiple teams, including data scientists, developers, and DevOps engineers. Kubeflow provides a collaborative platform where teams can work together to build and deploy machine learning workflows.
Automation: Machine learning workflows involve multiple steps, including data preprocessing, model training, and model deployment. Kubeflow provides a way to automate these steps by defining pipelines that can be executed automatically or manually.
Architecture Diagram:
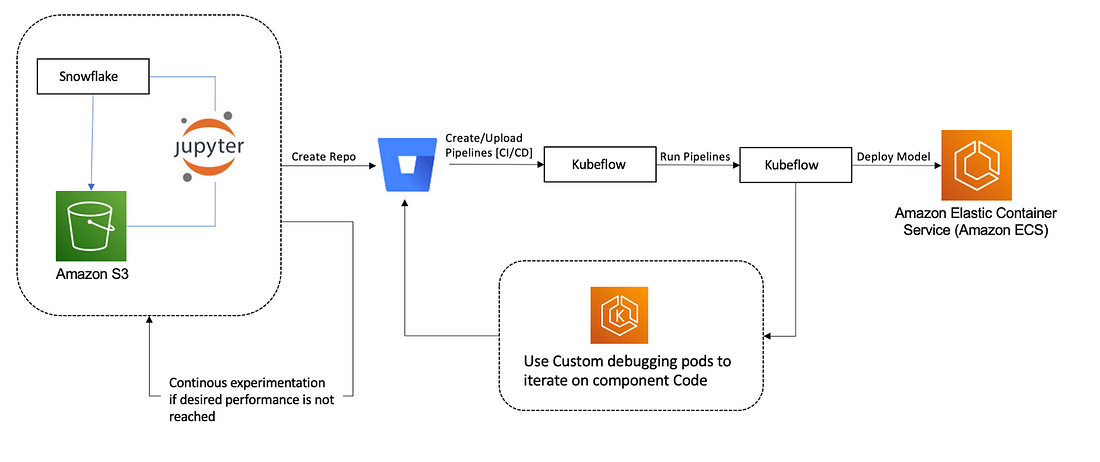
What does Kubeflow do?
Kubeflow provides a range of tools and frameworks to support the entire ML workflow, from data preparation to model training to deployment and monitoring. Here are some of the key components of Kubeflow:
Jupyter Notebooks: Kubeflow includes a Jupyter Notebook server that allows users to run Python code interactively and visualize data in real-time.
TensorFlow: Kubeflow includes TensorFlow, a popular open-source ML library, which can be used to train and deploy ML models.
TensorFlow Extended (TFX): TFX is an end-to-end ML platform for building and deploying production ML pipelines. Kubeflow integrates with TFX to provide a streamlined way to manage ML pipelines.
Katib: Kubeflow includes Katib, a framework for hyperparameter tuning and automated machine learning (AutoML).
Kubeflow Pipelines: Kubeflow Pipelines is a tool for building and deploying ML pipelines. It allows users to define complex workflows that can be run on a Kubernetes cluster.
What is Amazon SageMaker?
Amazon SageMaker is a fully-managed machine learning service that enables data scientists and developers to build, train, and deploy machine learning models at scale. Kubeflow, on the other hand, is an open-source machine learning platform that provides a framework for running machine learning workflows on Kubernetes.
Using Amazon SageMaker with Kubeflow can help streamline the machine learning workflow by providing a unified platform for model development, training, and deployment. Here are the key steps to using Amazon SageMaker with Kubeflow:
Set up a Kubeflow cluster on Amazon EKS or other Kubernetes platforms.
● Install the Amazon SageMaker operator in your Kubeflow cluster. The operator provides a custom resource definition (CRD) that allows you to create and manage SageMaker resources within your Kubeflow environment.
● Use the SageMaker CRD to create SageMaker resources such as training jobs, model endpoints, and batch transform jobs within your Kubeflow cluster.
● Run your machine learning workflow using Kubeflow pipelines, which can orchestrate SageMaker training jobs and other components of the workflow.
● Monitor and manage your machine learning workflow using Kubeflow’s web-based UI or command-line tools.
● By integrating Amazon SageMaker with Kubeflow, you can take advantage of SageMaker’s powerful features for model training and deployment, while also benefiting from Kubeflow’s flexible and scalable machine learning platform.
Amazon SageMaker Components for Kubeflow Pipelines:
Component 1: Hyperparameter tuning job
The first component runs an Amazon SageMaker hyperparameter tuning job to optimize the following hyperparameters:
· learning-rate — [0.0001, 0.1] log scale
· optimizer — [sgd, adam]
· batch-size– [32, 128, 256]
· model-type — [resnet, custom model]
Component 2: Selecting the best hyperparameters
During the hyperparameter search in the previous step, models are only trained for 10 epochs to determine well-performing hyperparameters. In the second step, the best hyperparameters are taken and the epochs are updated to 80 to give the best hyperparameters an opportunity to deliver higher accuracy in the next step.
Component 3: Training job with the best hyperparameters
The third component runs an Amazon SageMaker training job using the best hyperparameters and for higher epochs.
Component 4: Creating a model for deployment
The fourth component creates an Amazon SageMaker model artifact.
Component 5: Deploying the inference endpoint
The final component deploys a model with Amazon SageMaker deployment.
Conclusion:
Kubeflow is an open-source platform that provides a range of tools and frameworks to make it easier to run ML workloads on Kubernetes. With Kubeflow, you can easily build and deploy ML models at scale, while also benefiting from the scalability, flexibility, and reproducibility of Kubernetes.
DORA Metrics for DevOps Performance Tracking
INTRODUCTION TO DORA METRICS:
This blog is to explain the DevOps Research and Assessment capabilities to understand delivery and operational performance for better organizational performance.
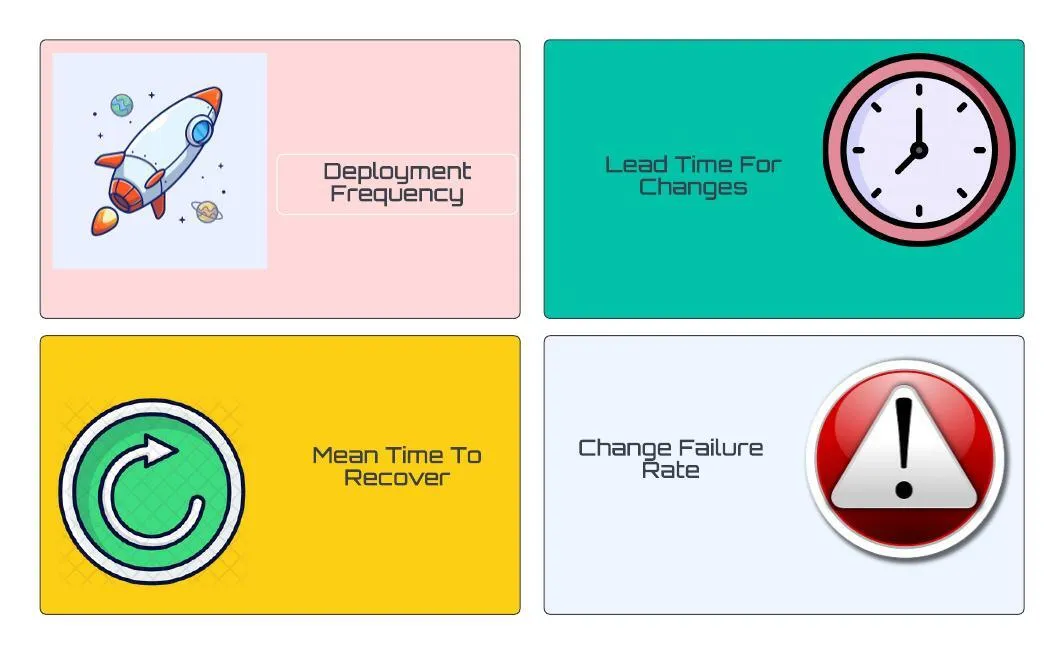
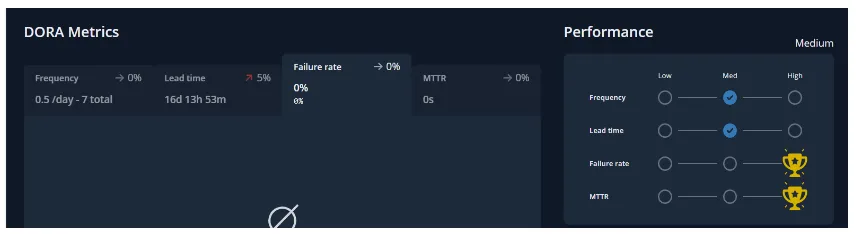
DORA — DORA (DevOps Research and Assessment) metrics help us to measure the DevOps performance if there are low or elite performers. The four metrics used are deployment frequency (DF), lead time for changes (LT), mean time to recovery (MTTR), and change failure rate (CFR).
The four essentials of DORA metrics:
- Deployment frequency
- Lead time for changes
- Mean time to recovery
- Change failure rate
Deployment Frequency :
Deploy frequency measures how often you deploy changes to a given target environment. Along with Change lead time, Deploy frequency is a measure of speed.
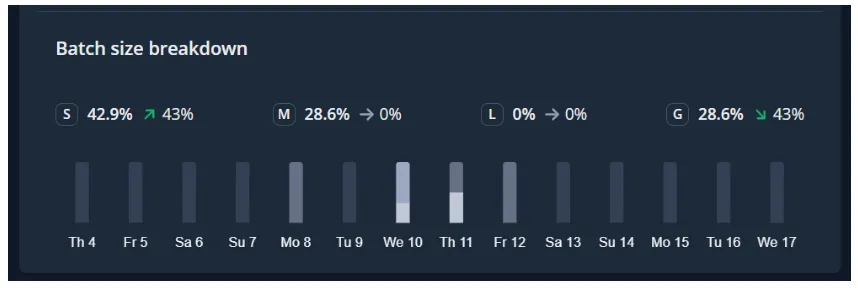
Deployment Frequency also provides us with Batch Size Breakdowns,
Allowing you to filter the code changes based on Small batch, Medium, Large, and Gigantic batch sizes.
- Small — usually 1 pull request, 1–10 commits, and a few hundred lines of code changed
- Medium — usually 1–2 pull requests, 10–30 commits, and many hundreds of lines of code changed
- Large — usually 2–4 pull requests, 20–40 commits, and many hundreds of lines of code changed
- Gigantic — usually 4 or more pull requests or 30 or more commits or many thousands of lines of code changed.
Lead Time for Change:
Change lead time measures the time it takes for a change to go from its initial start of coding to being deployed in its target environment. Like Deploy frequency, Change lead time is a measure of speed (whereas Change failure rate and MTTR are measures of quality or stability).
In addition to the Lead Time for Change, Sleuth provided us with a detailed breakdown of how much time your teams, on average, are spending.
- Coding — the time spent from the first commit (or the time spent from the first transition of an issue to an “in-progress state) to when a pull request is opened
- Review lag time — the time spent between a pull request being opened and the first review
- Review time — the time spent from the first review to the pull request being merged
- Deploying — the time spent from pull request merge to deployment

Mean Time to Recovery:
Change failure rate measures the percentage of deployed changes that cause their target environments to end up in a state of failure. Along with MTTR, Change failure rate is a measure of the quality, or stability of your software delivery capability.
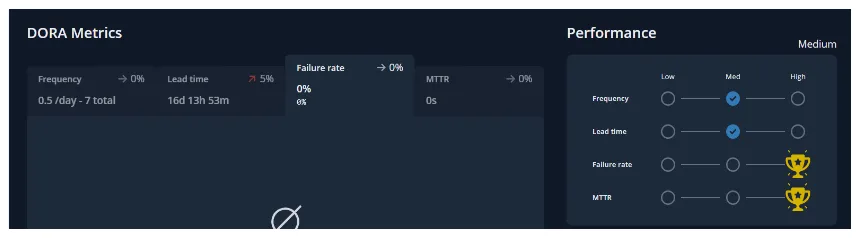
Change Failure Rate
Measures the quality and stability while deployment frequency and Lead Time for Changes don’t indicate the quality of the software but just the velocity of the delivery.
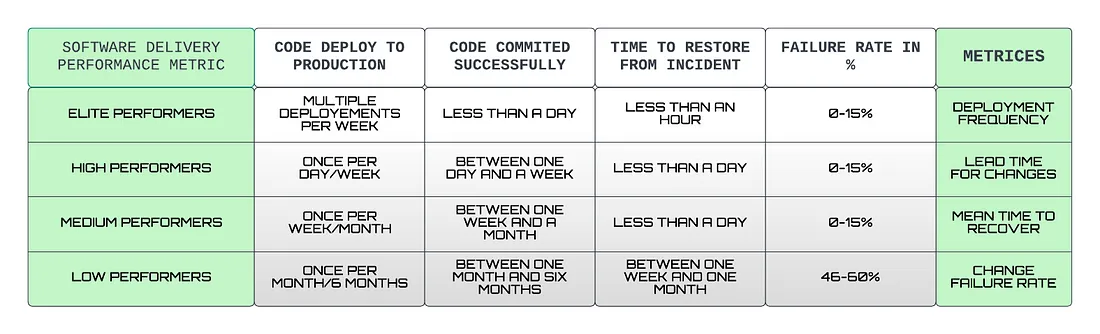
Here’s a table of how DORA metrics are calculated depending on the deployment that occurred, coding and review time, time is taken to restore from an incident or a failure, and failure rate that occurred due to the deployments.
Apart from the four metrics of DORA, there is a fifth one, Reliability, happens to be most important when it comes to operational performance which brings together DevOps and SRE teams to build us a better infrastructure and software. The Reliability metrics is a great way to showcase a team’s overall software delivery performance.
Become an Elite :
According to the most recent State of DevOps report, elite performers have recently grown to now represent 20% of survey respondents. High performers represent 23%, medium performers represent 44%, and low performers only represent 12%.
CONCLUSION :
DORA metrics are a great way to measure the performance of your software development and deployment practices. DORA metrics can help organizations to measure software delivery and stability to a team’s improvement, which also decreases the difficulties and allows for quicker, higher quality software delivery.