Resources
The latest industry news, interviews, technologies and resources.
Building an Automated Voice Bot with Amazon Connect, Lex V2, and Lambda for Real-Time Customer Interaction
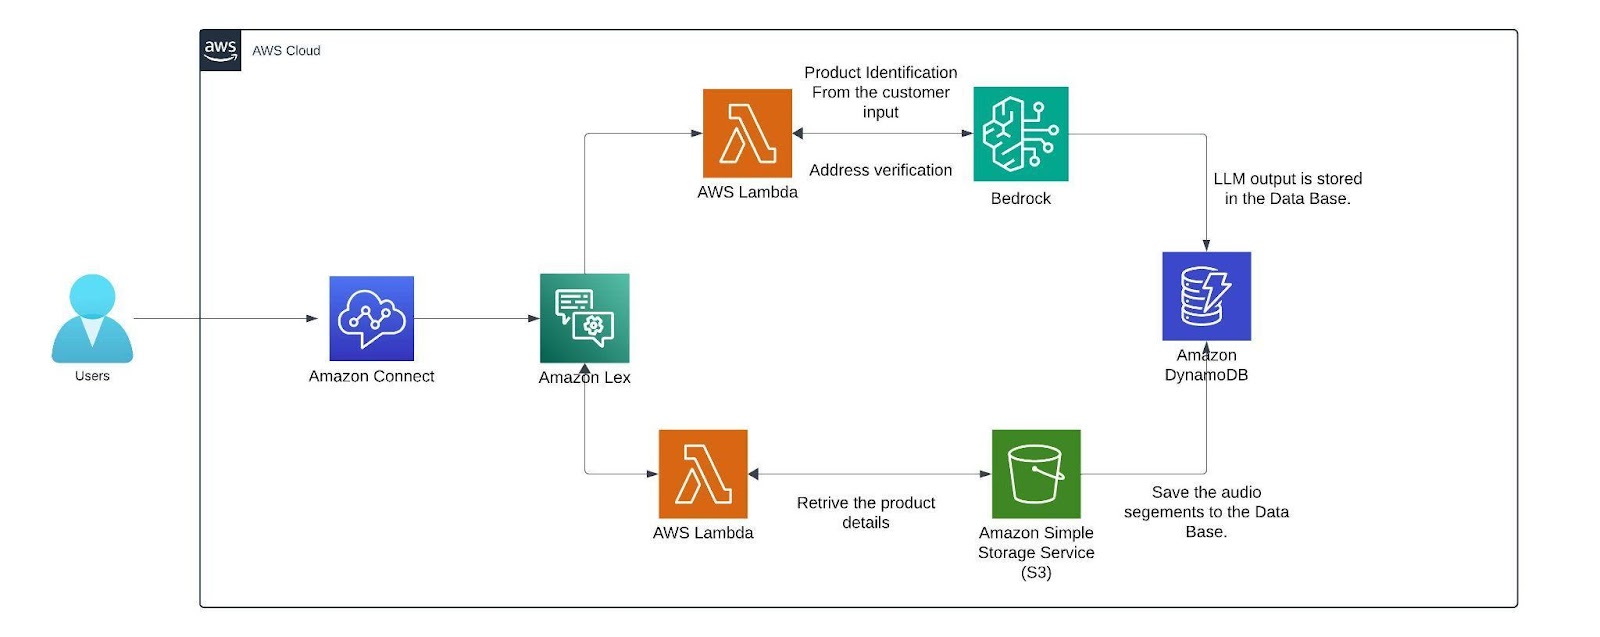
Today we are going to build a completely automated Voice Bot or to set up a call center flow which can provide you with real time conversation by using Amazon connect, Lex V2, DynamoDB, S3 and Lambda Function services available in the amazon console. The voice bot is built in German and below is the entire flow that is followed in this blog.
Advantages of using Lex bot
- Lex enables any developer to build conversational chatbots quickly.
- No deep learning expertise is necessary—to create a bot, you just specify the basic conversation flow in the Amazon Lex console. The ASR (Automatic Speech Recognition) part is internally taken care of lex so we don’t have to worry about that. You seamlessly integrate lambda functions, DynamoDB, Cognito and other services of AWS.
- Compared to other services Amazon Lex is cost effective.
Architecture Diagram
Architecture
Within the AWS environment, Amazon Connect is a useful tool for establishing a call center. It facilitates customer conversations and creates a smooth flow that combines with a German-trained Lex v2 bot. This bot is made to manage a range of client interactions, gathering vital data via slots (certain data points the bot needs) and intents (activities the bot might execute). The lex bot is then attached to a lambda function which gets triggered when the customer responds with a product name if not it directly connects the customer to the human agent for further queries.
The lambda function first finds the product name from the customer input then it is compared with the product's list which we have in the S3 bucket where it has details like price, weight, size, etc.. from an excel sheet (excel sheet) that now contains only two products namely Samsung Galaxy S24 and Apple iPhone 15 with the pricing weight and size of the product. The customer's input is matched with the closest product name in the excel sheet using the fuzzy matching algorithm.
The threshold for this matching of products is set to 60 or more which can be altered based on the need. Only if the customer wants to order, the bot starts collecting customer details like name and other details. The bot has a confirmation block which responds to the customer with what it understood from the customer input(like an evaluation ) if the customer doesn’t confirm it asks for that particular intent again. If you need, we can add the retry logic. Here a max retry of 3 is set to all the customer details just to make sure the bot retrieves the right data from the customers while transcribing from speech to text (ASR).
After retrieving the data from the customer before storing them we can verify the data collected from the customer is valid or not by passing it to the Mixtral 8x7B Instruct v0.1 model here i am using this model because my conversation will be in German and since the mistral model is trained in German and other languages it will be easy for me to process this model is called using the Amazon Bedrock service. We are invoking this model in the lambda function which has a prompt template which describes a set of instructions for example here i am giving instructions like just extract the product name from the callers input. After getting the response from LLM the output is then stored as session attributes in code snippet below along with the original data and the call recordings segments from the s3 bucket.
def update_custom_attribute(event, field_name, field_value):
session_state = event['sessionState']
if 'sessionAttributes' not in session_state:
session_state['sessionAttributes'] = {}
if 'userInfo' not in session_state['sessionAttributes']:
user_info = {}
else:
user_info = json.loads(session_state['sessionAttributes']['userInfo'])
updated_session_state = update_custom_attribute(event, 'name', name_value)
return {
"sessionState": {
"dialogAction": {
"type": "ElicitSlot",
"slotToElicit": "country"
},
"intent": {
"name": "CountryName",
"state": "InProgress",
"slots": {}
},
"sessionAttributes": updated_session_state['sessionAttributes']
},
"messages": [
{
"contentType": "PlainText",
"content": "what is the name of your country?"
}
]
}
Finally the recordings are stored in the dynamo db. with the time as primary key so that each record is unique.
AMAZON CONNECT
This is how the interface of Amazon Connect looks like you can create a new instance by clicking the add an instance button. you can specify the name of the URL connect instance. After creating the instance click the emergency login/access URL(sign in with the user account you created while creating the instance).
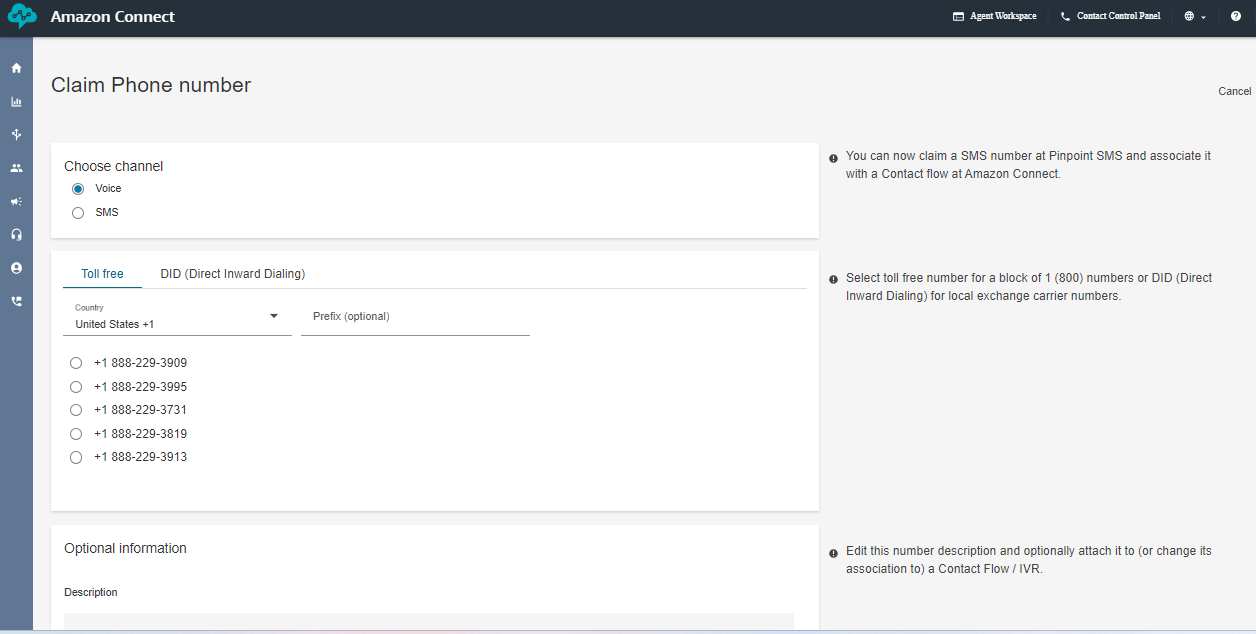
The below image creates the toll free numbers where you select the phone icon and select the phone number and click claim a number then select the voice for voice bot and the country in which you want to create the number for and click the save button remember while you are claiming the number for few countries you need to submit proof of documents refer this document [1] .
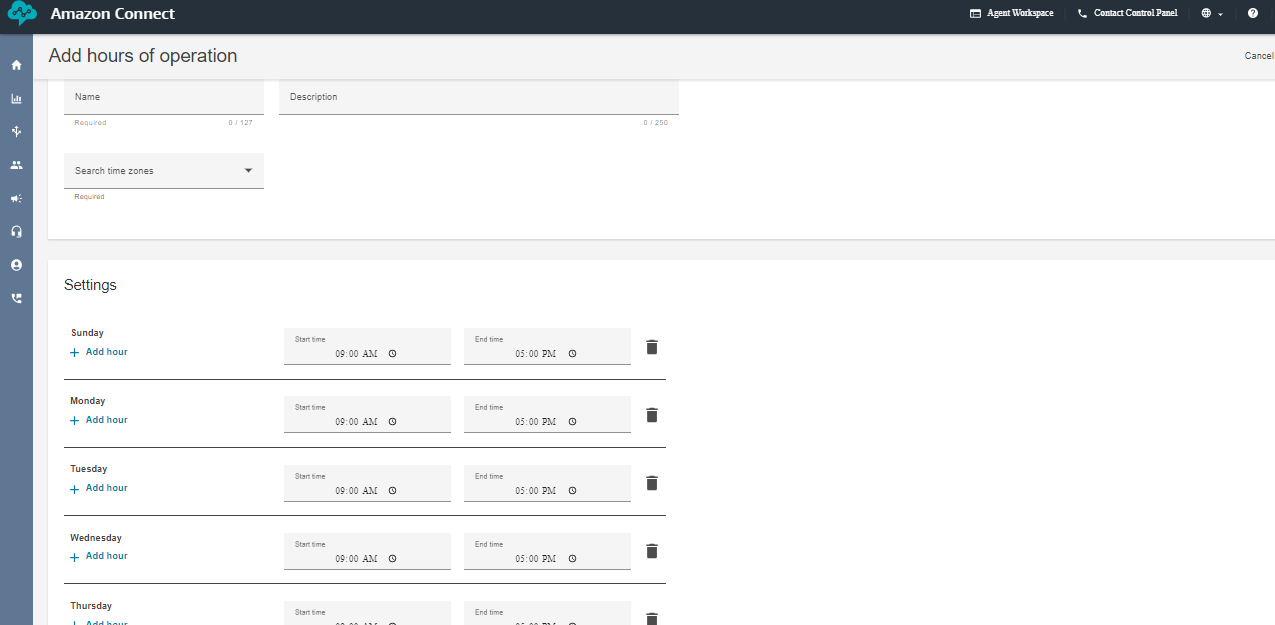
Next, create the working hours from the flow arrow of the console. I have created a 9 A.M to 5 P.M so that i can connect the call to the human agent if the caller has any queries. But if you want your voice bot to be available 24/7 then change the availability or create a new hours of operations.
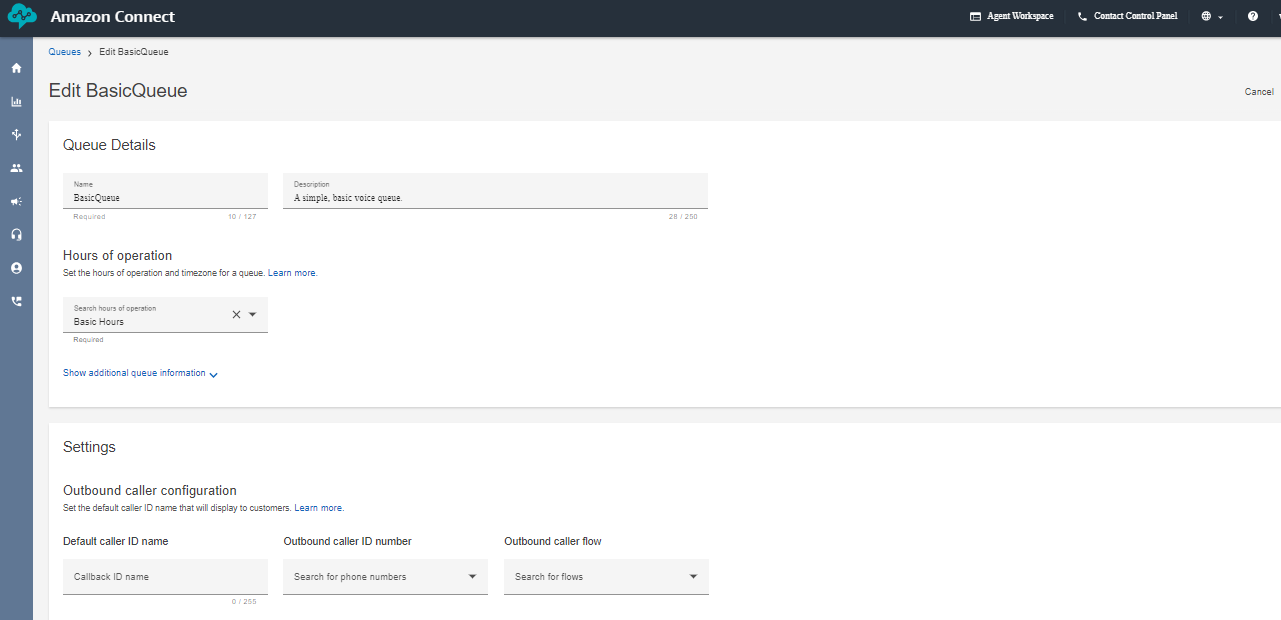
Next create a queue and add the hours of operation in the queue. That's it we are almost done setting up a few things in the Amazon Connect now lets go inside the flows and look how our complete flow looks like.
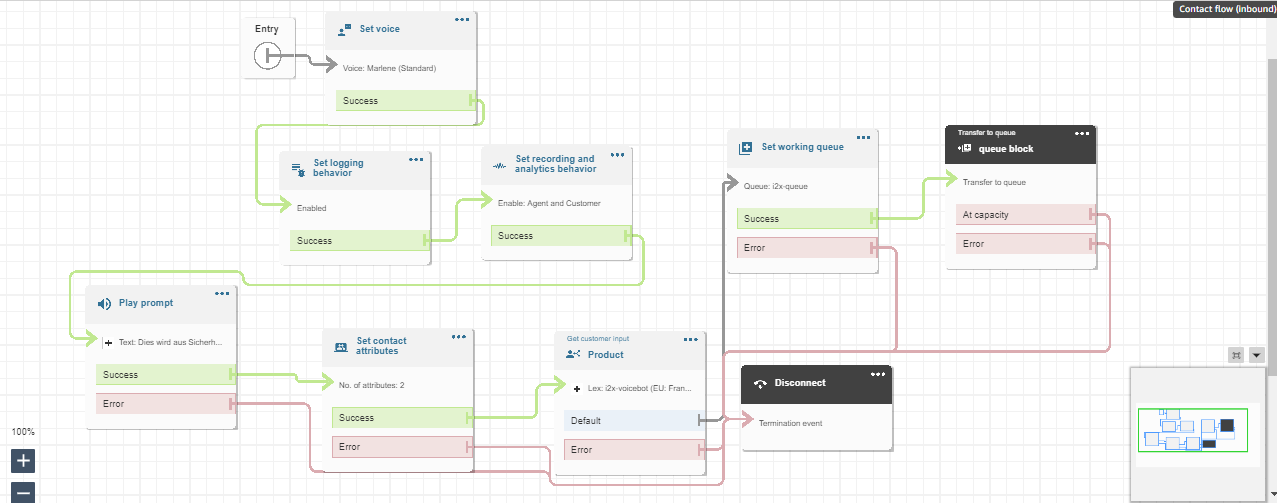
This above diagram is the Amazon Connect Flow where the set voice block is used to set a specific voice. The set logging behavior block and set recording and analytics behavior is used to record the conversation after connecting to the agent. Play prompt is used to respond a simple prompt saying the call is recorded. The set contacts attribute block contains two session attributes one for focusing on the user’s voice rather than the background noise and another is to not barge in when the bot is responding after adding these two session attributes in the connect flow the call is able to pass the flow even when there a certain amount of background noise. The get customer input block is used for connecting the call to the lex bot if the customer wants to connect to the agent the set working queue ensures to connect to the agent. Finally the call is disconnected using the disconnect block.
AMAZON LEX
Next, We can create a bot from scratch by clicking on the create bot icon on the lex console. you can specify the name of the bot with the required IAM permissions and select “no” for the child protection. In the next step choose the language you want your bot to train and select the voice. The intent classification score is set in between 0 to 1. It is similar to a threshold where the bot can classify the customers/user reason for example, if i have multiple intent based on the score it connects to the most likely intent. you can also add multiple languages to train your
bot.
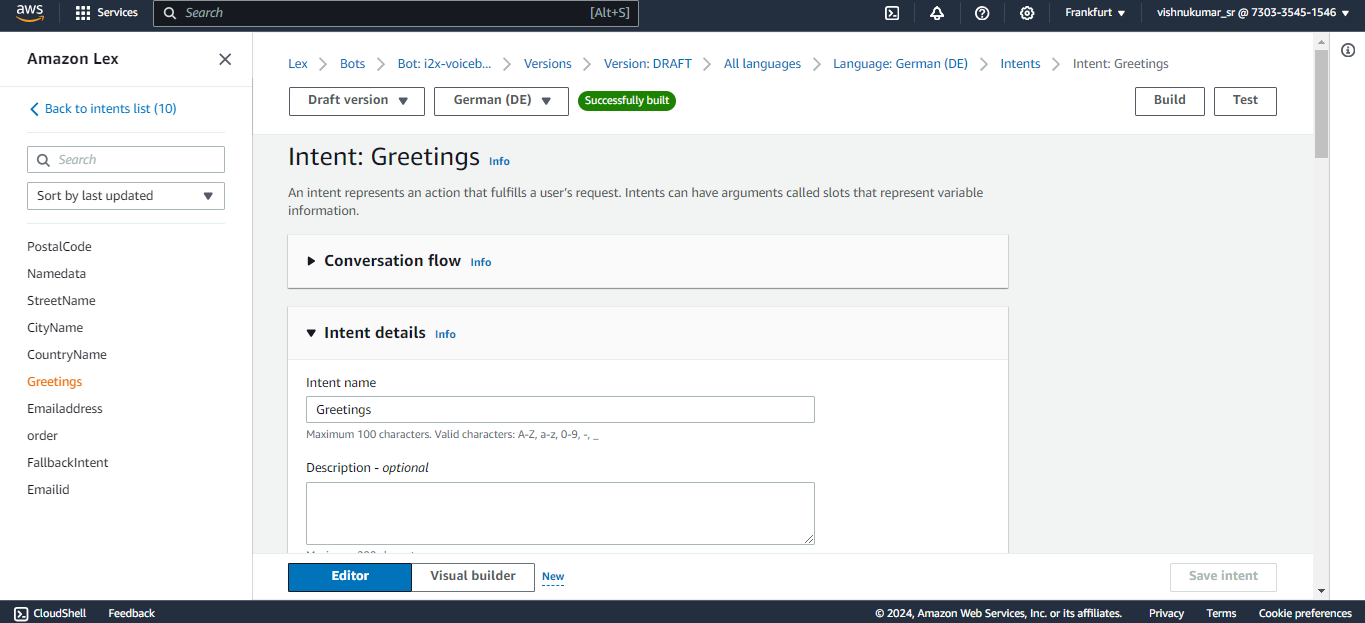
You can create an intent to know the customers/callers need for calling like, Ordering a mobile in our case we expect a product name from the customer like Samsung galaxy or apple iPhone. The sample utterances are used to initiate the conversation with the bot at the very beginning of the conversation for example we can say hi, hello, i want to order, etc. to trigger the intent that you expect your bot to responded based the customer reason. If you have multiple intents like greetings, order, address you connect these intent in a flow one after other in a flow using the go to intent block.
Slots are used to fulfill the intent like for example here the bot needs to know which product the customer wants to order to complete this greetings intent. Likewise you can create slots in a single intents or create separate slots in each intent and connect them in the flow. The confirmation block is used for rechecking the user input like the product name based on the response from the customer (if the customer says “yes” it will go to the next step if “no” then it goes to the previous state and asks the question again).
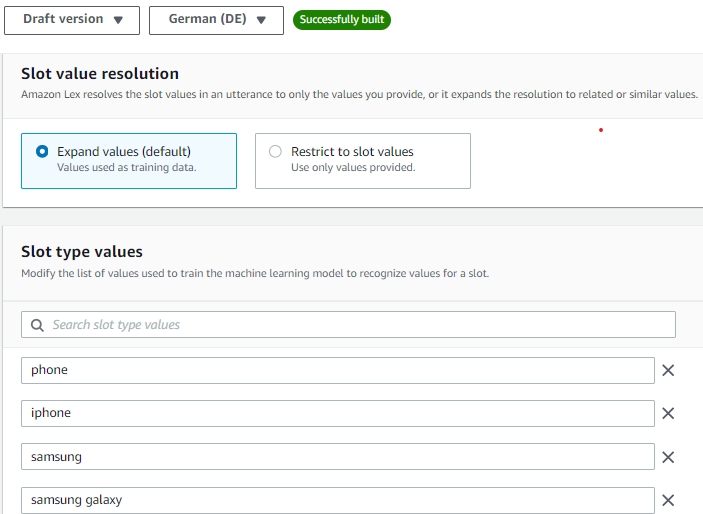
You can improve the accuracy of the lex bot by recognizing what the customer is saying speech recognition (ASR) by creating a custom slot type and training the bot with a few examples of what the customer might say. For example, in our case the customer might say the product names like iPhone, apple iPhone, iPhone 15 etc.. so add few values in the slot utterances which can improve the speech detection. You can create multiple custom slot types like product name, customer name, address, etc..
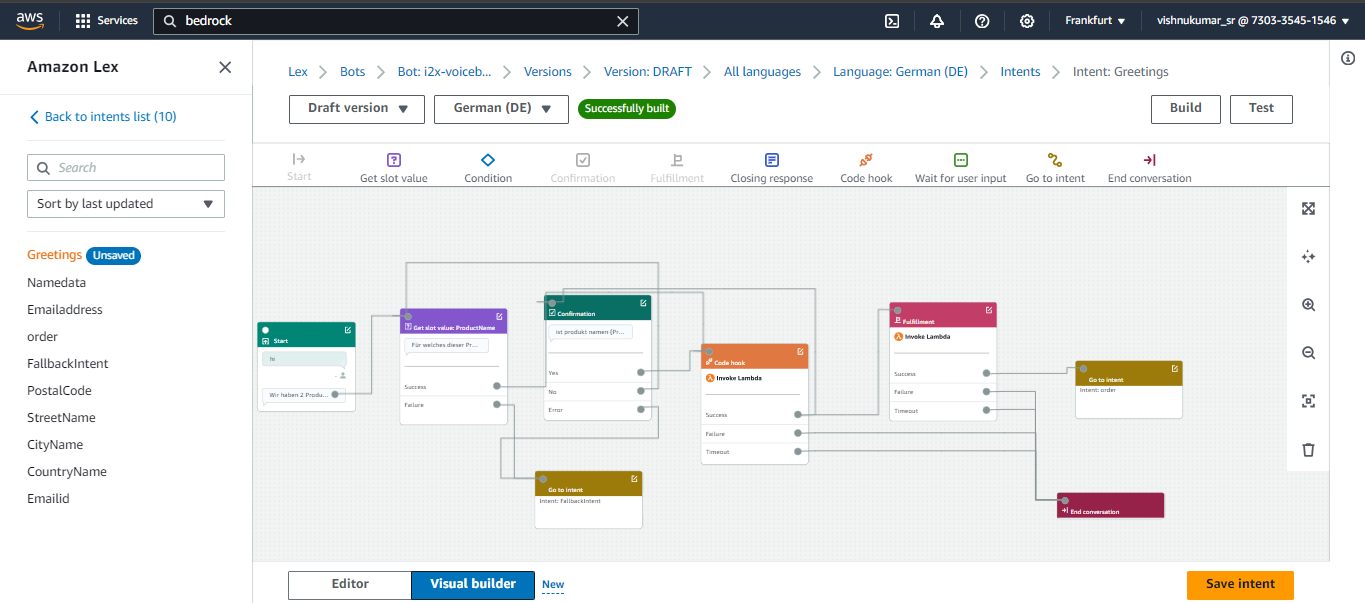
You can click the Visual Builder option to view your flow in Lex V2 bot let’s discuss what each block does and we can simply drag and drop these blocks to create the flow . Lambda Block or code hook block are used in the flow when you want your bot to retrieve information from different services(S3 which is done in a lambda function). For example my product details like price, size, weight all are stored in a S3 bucket to retrieve the data and we are also using fuzzy logic to match the closest response. we can invoke only one lambda function per bot so we have added the logic passing the customer input to the Mistral 8X7 model for verification and for storing the final output with the audio folder to the DynamoDB.
Lambda Function
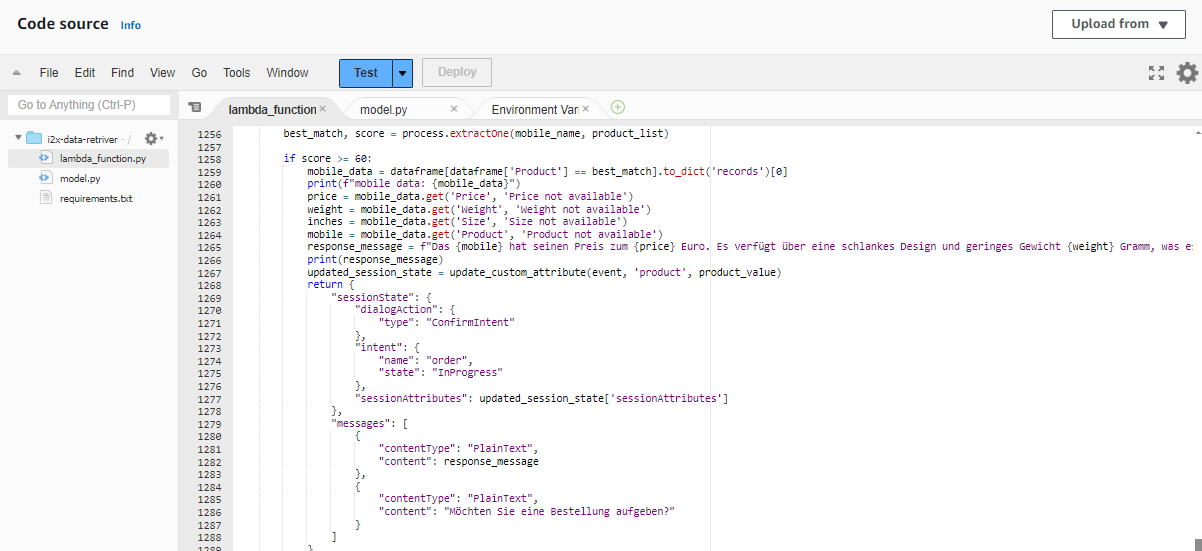
This Lambda Function is used to retrieve the product information after getting the customers input. For example when the customer says Apple iPhone the lambda function brings the details from the S3 bucket and it matches it using the fuzzy logic we have set the score to a threshold of 80 or more if the score of user input matches the threshold value it will return the product details and move to the next intent. The bots expects a response with in 3-4 seconds after it asking the user intent if no response is received (when the caller is on silent or hasn’t said anything) the bot was initially taking the empty string as response and it directly connected to the agent but we have included a logic to continue the flow by asking for the input again if it receives an empty input.In the next session let's look how to store the data in aDynamoDB table do look at the references below.
Sample Calls

Here after receiving the greeting the available products information is responded and ask for what product they are looking for.

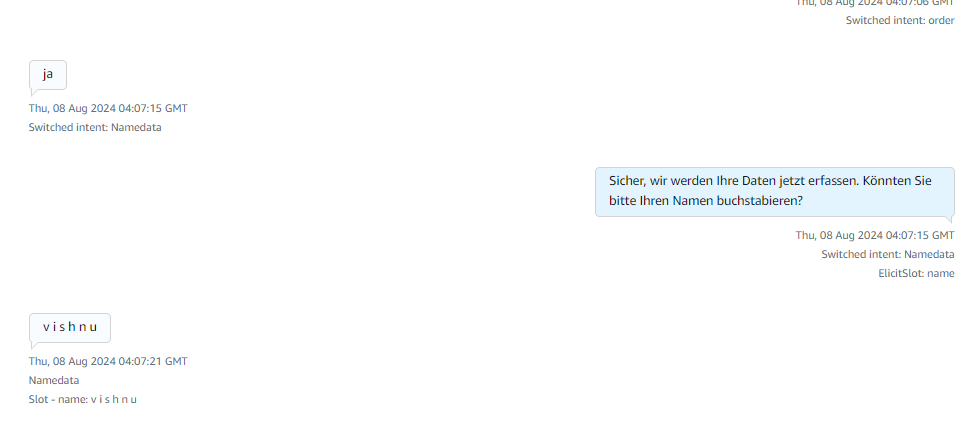
After receiving the product name it explains about the products and asks for order confirmation if yes it starts collecting caller details if no or if there are no products matching the caller requirement then it connects to the human agent for more information.
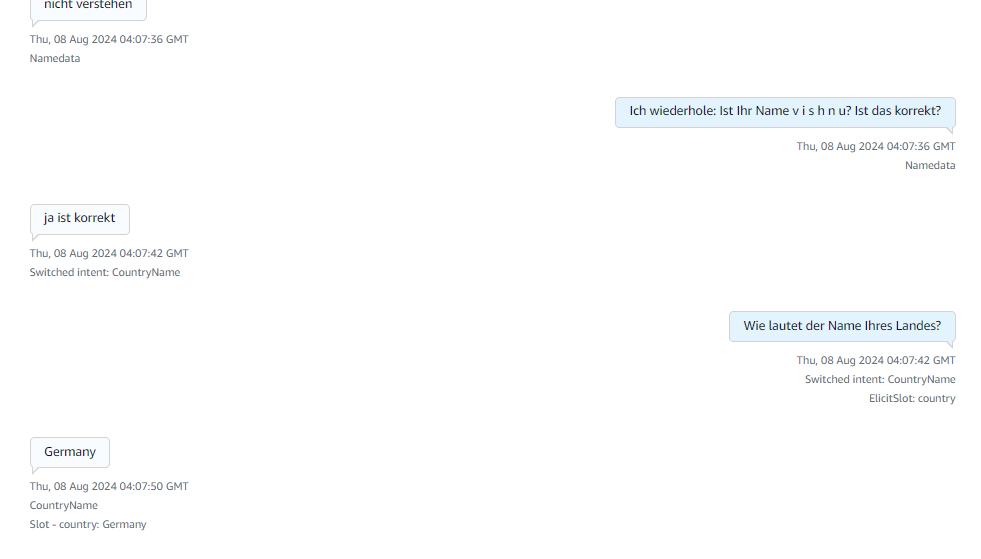
Here in the above image it collects details like name and the country details of the caller.

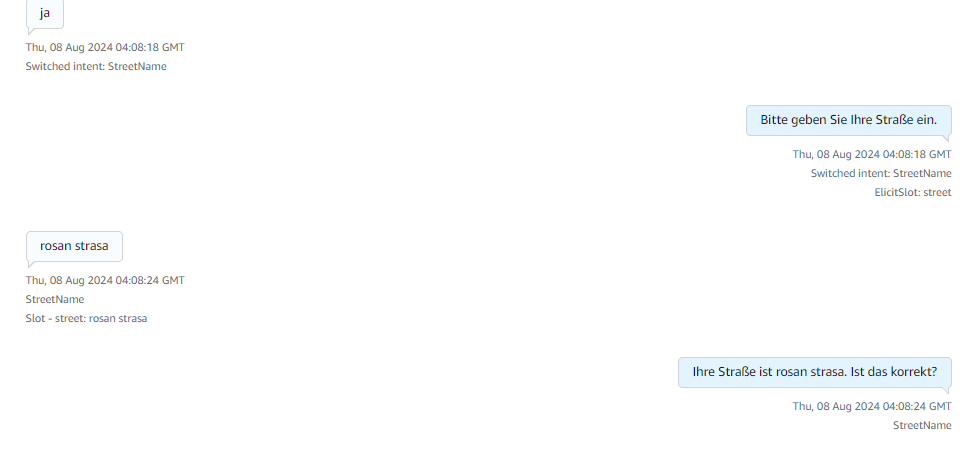
Then it starts collecting the city name and the street name of the caller.

Finally it collects the zip code/postal code and replies to a thankyou message with an order confirmation message from the lex. These images describe the complete flow of how Amazon Lex responds to the customer. It has incorporated a retry logic of max 3 times where the bot asks the customer if it is not able to understand the customer intent. The bot has been trained to connect to a human agent if it is not able to respond or if the customer directly says that they wanted to talk to an agent. After reaching the Email Address intent Fallback it will give a thankyou message and will connect to the agent if the customer has any doubts.
References
Region requirements for ordering and porting phone numbers - Amazon Connect
How to migrate an EC2 instance from AWS to GCP: step by step explanation
Why are we adopting this approach
We needed to migrate an entire EC2 instance from AWS to GCP, including all data and the application hosted on the AWS EC2 instance. To achieve this, we chose the "Migrate to Virtual Machines" option under the Compute Engine service in GCP. Other options are available that migrate the EC2 instance’s AMI, where additional data should be transferred is a significant challenge.
The EC2 instance migration was accomplished successfully by using the method described below, which streamlined the entire GCP migration procedure.
A detailed, step-by-step explanation is documented below.
Pre-Requirements on AWS console
We created a user in the AWS console, generated an access key and secret key for the user, and assigned them Administrator permissions. These keys were used to migrate an EC2 instance to a GCP VM instance.
Below are our EC2 instances listed in the AWS console. We are migrating these instances to the GCP console.
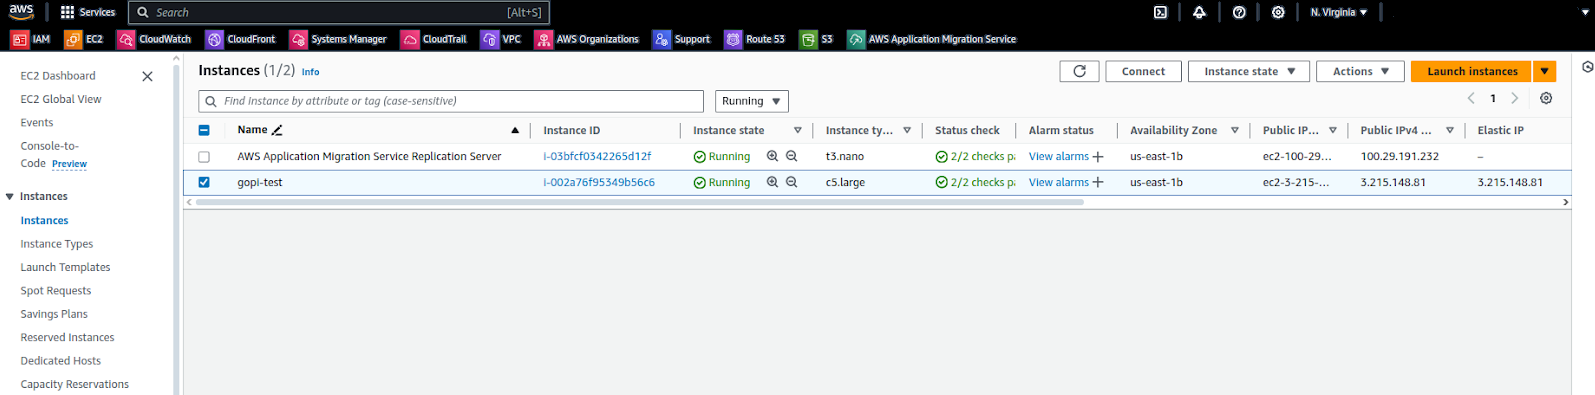
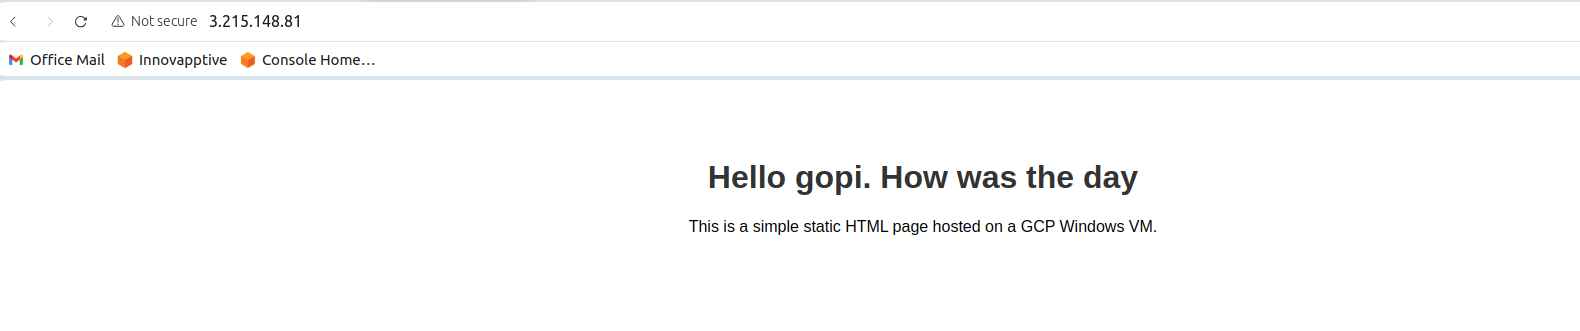
In this EC2 instance, we have a static web application as shown in the screenshot below.
STEP: 01
Open the GCP console, navigate to Compute Engine, and go to the "Migrate to Virtual Machines" service.
Migrate to Virtual Machines
Using the "Virtual Machines" option under the Compute Engine service, we successfully migrated the EC2 instance.
STEP: 02
Add the source from which we need to migrate the EC2 instance, such as AWS or Azure. Here, we are migrating an EC2 instance from AWS to GCP.
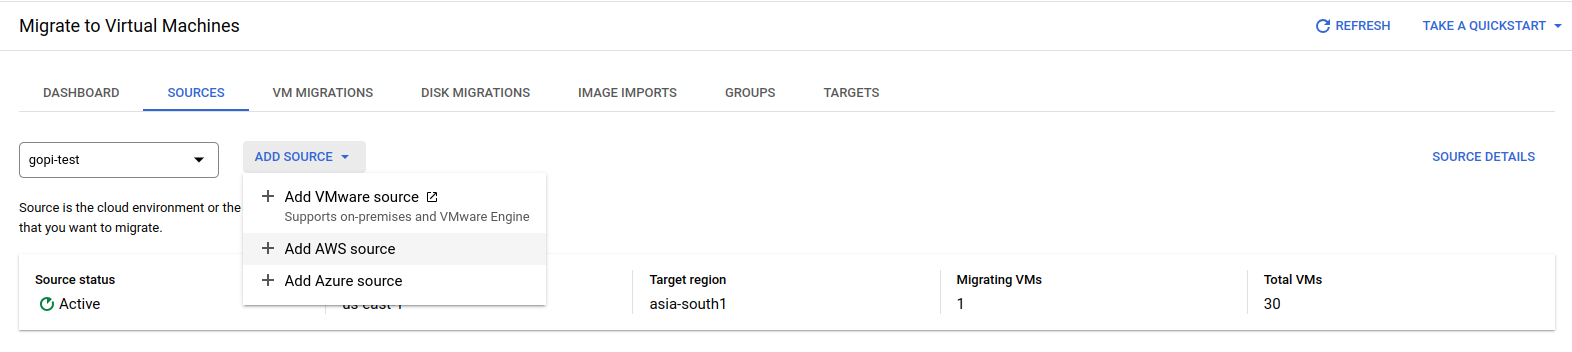
Choose an AWS source.
To create the AWS source, please provide the necessary details as shown in the screenshot below.
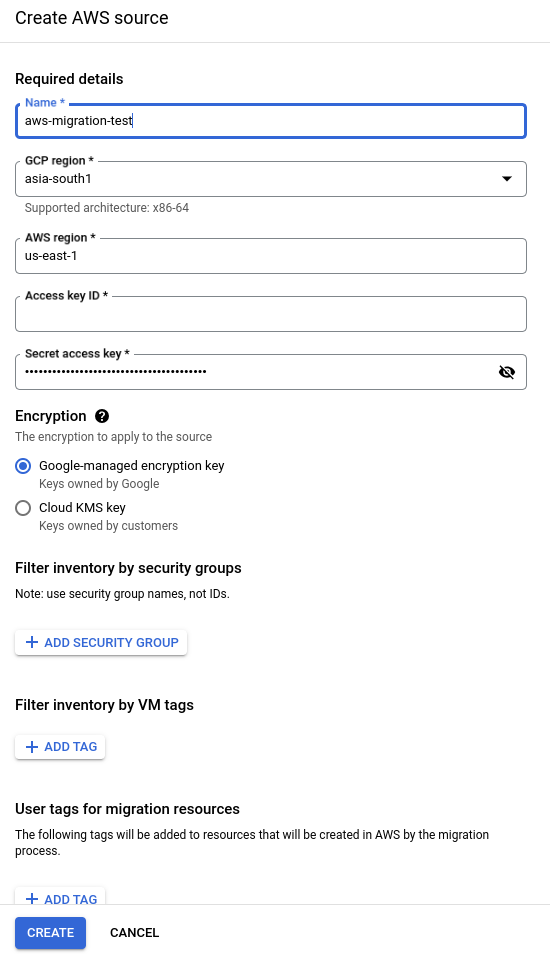
Verify all the details and create the AWS source. Once an AWS source is created, all AWS EC2 instances from that source will be visible in our GCP console, as shown in the screenshot below.
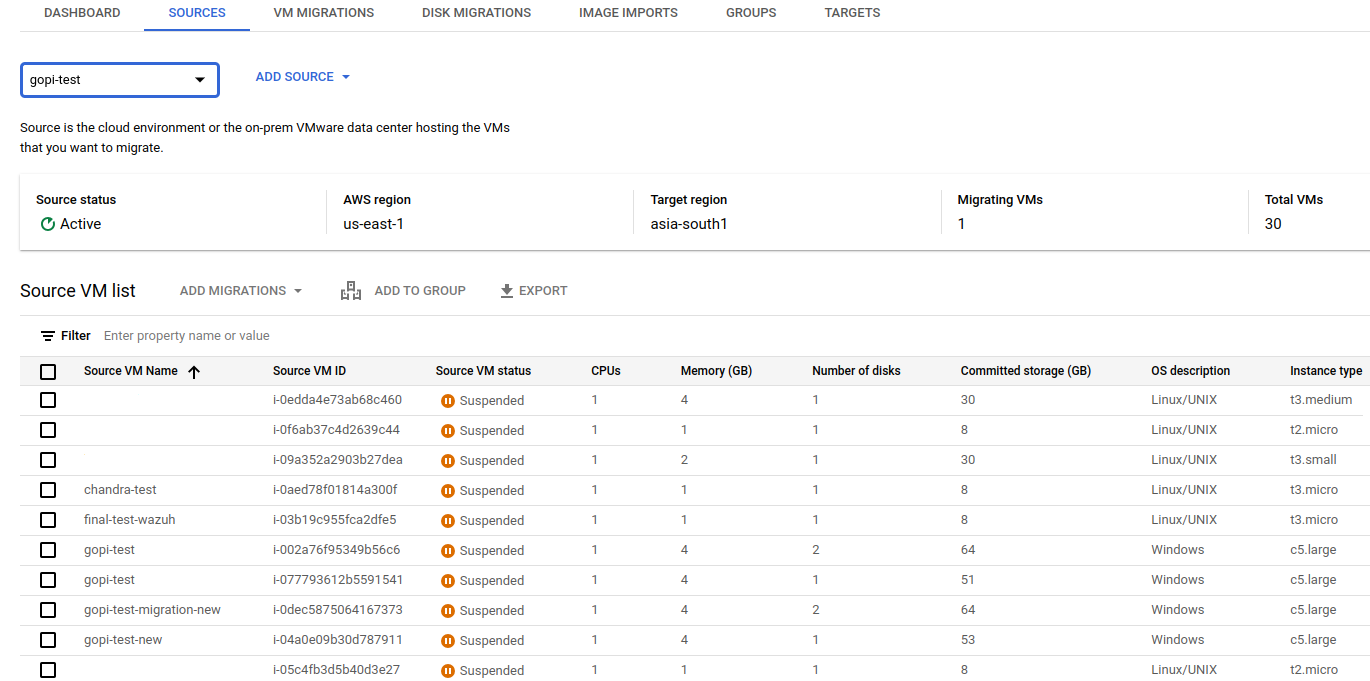
Select the instance from the list above that should be migrated to a GCP VM instance.
STEP: 03
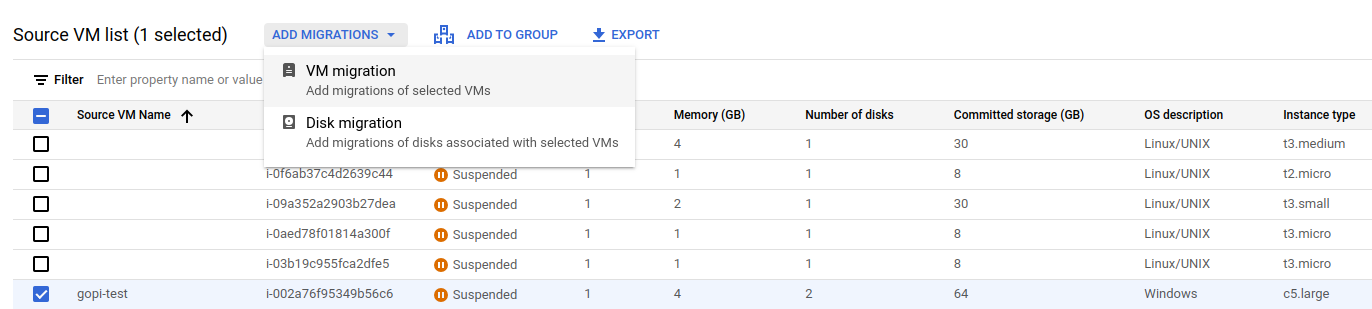
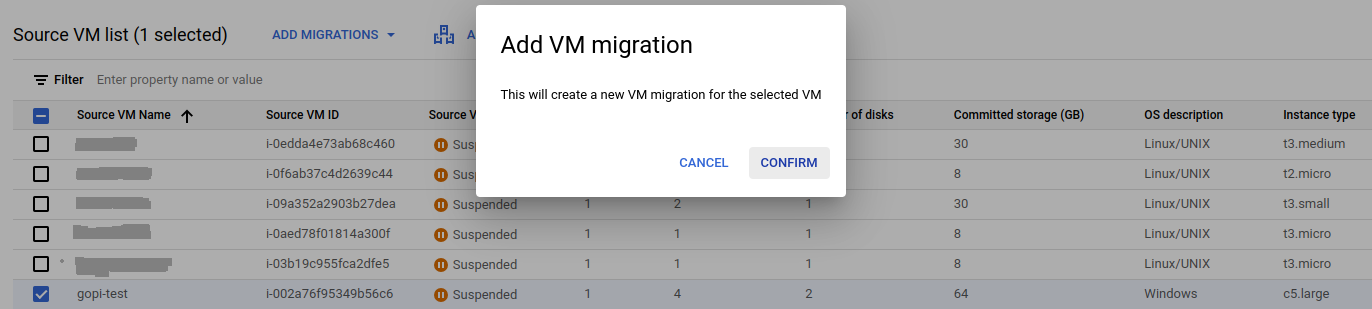
I have selected an AWS EC2 instance and want to migrate it to Google Cloud by clicking "Add VM Migration" and confirming, as shown below.
Navigate to VM migration and start the replication.

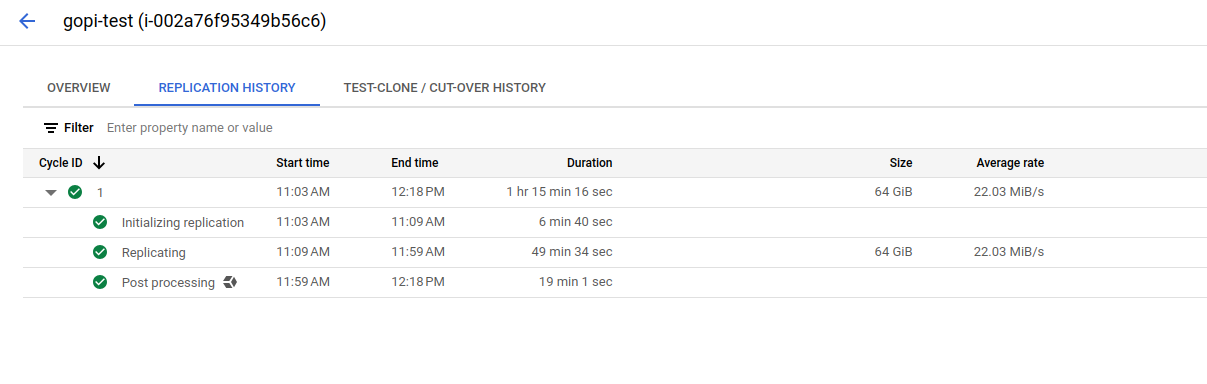
Migrating all the data from AWS to GCP, as shown in the screenshot, takes some time.
STEP: 04
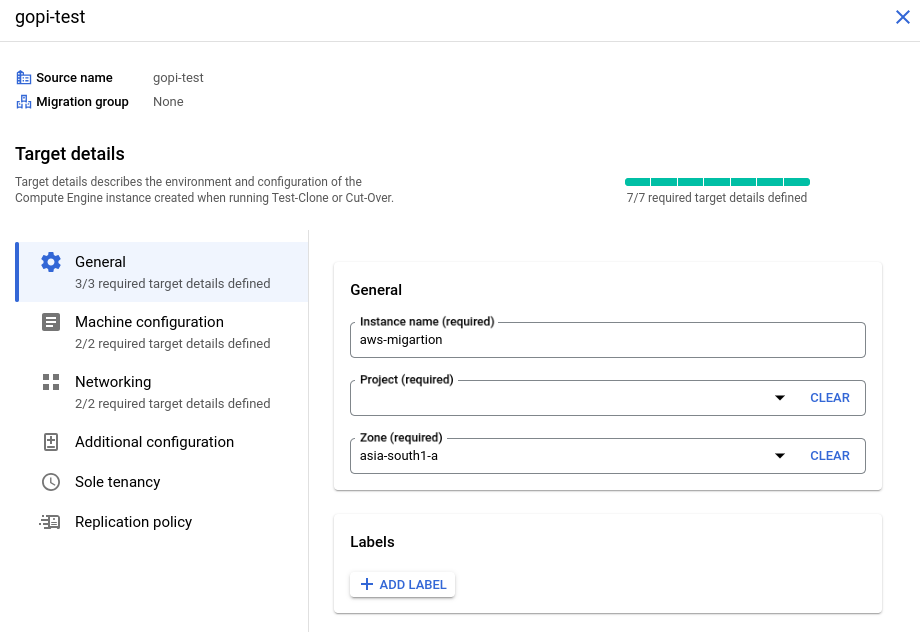
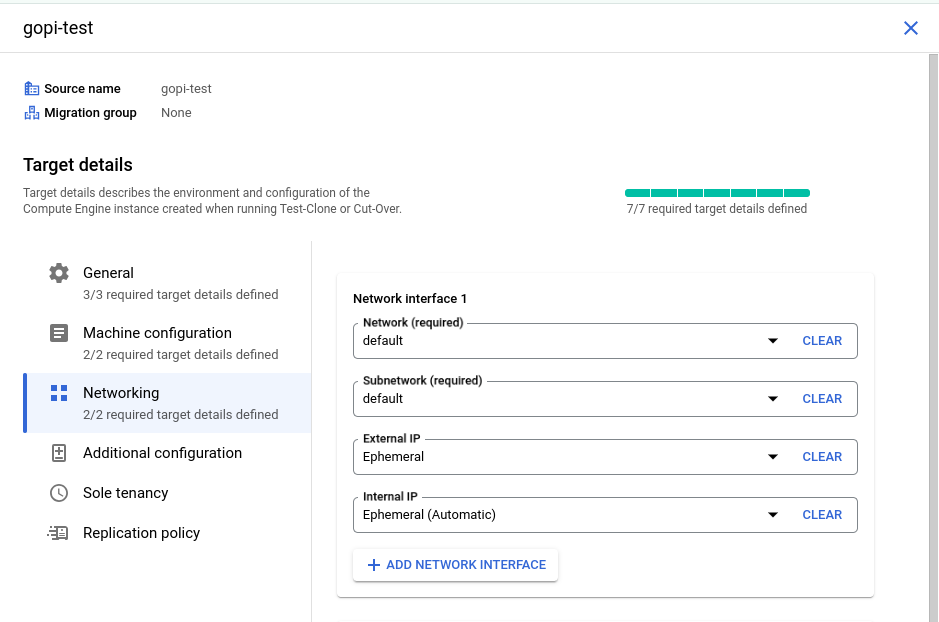
Specify the configuration details for launching the VM instance in GCP, including the machine type, VPC, instance name, public and private IPs, disk types, and service account. Also, assign the appropriate license to the newly launched VM instance by clicking "Edit Target Details" and providing the necessary information.
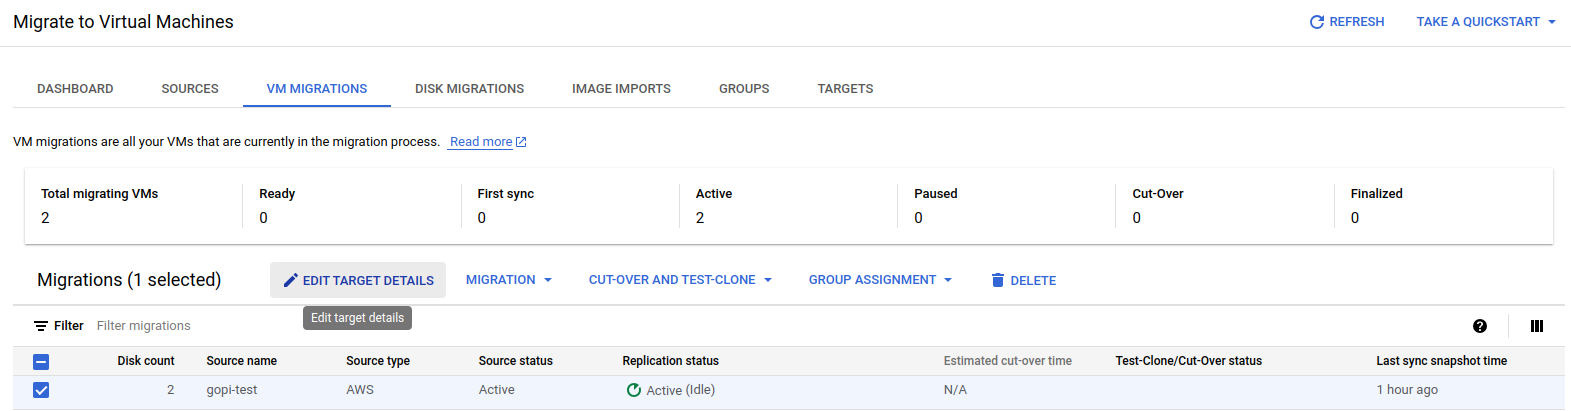
Fill in the details as shown in the screenshots:
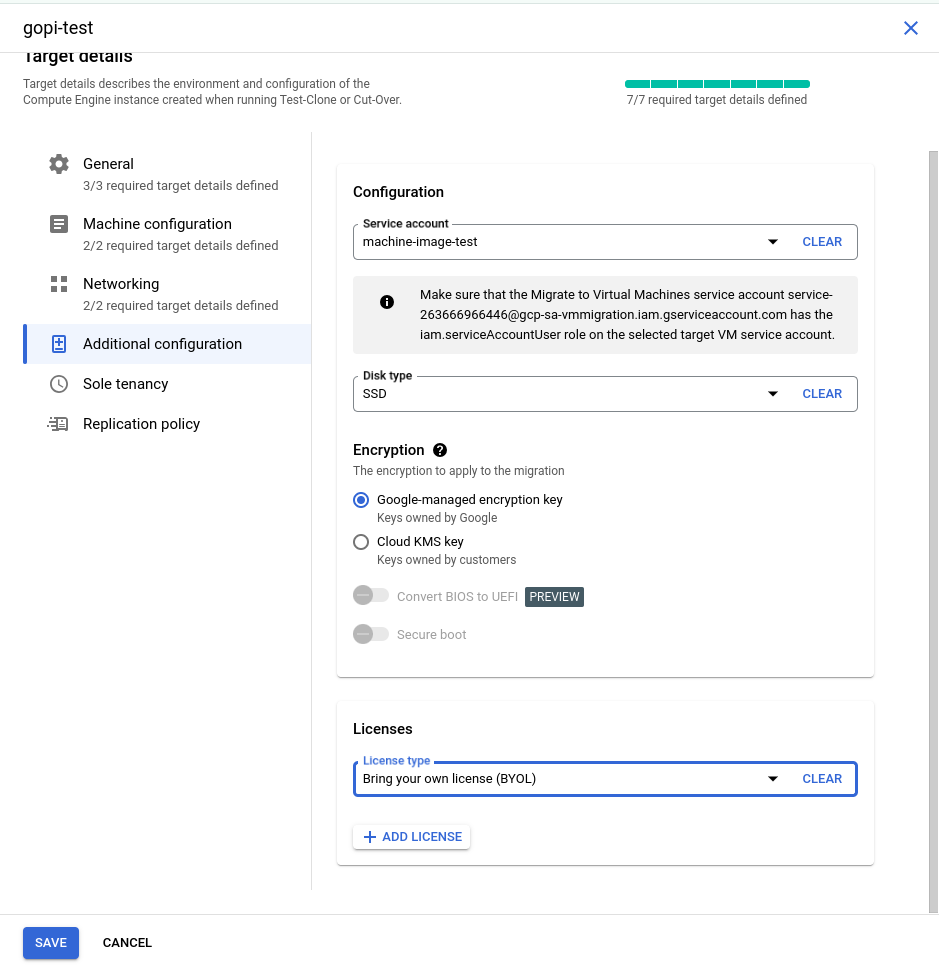
STEP: 05
I have created a new service account in my testing GCP project with the "Service Account User" role. This role is essential for launching a GCP VM instance, so we need to include this service account in the source target details, as shown in the screenshots above.

Finally, verify all the details and then click 'Save.' The target details will be updated successfully.
STEP: 06
Before proceeding to the final cut-off state, we will launch a test VM instance using the test clone and confirm the setup. This step ensures that all configurations are correct and all data is successfully migrated before moving to the final cut-off state.
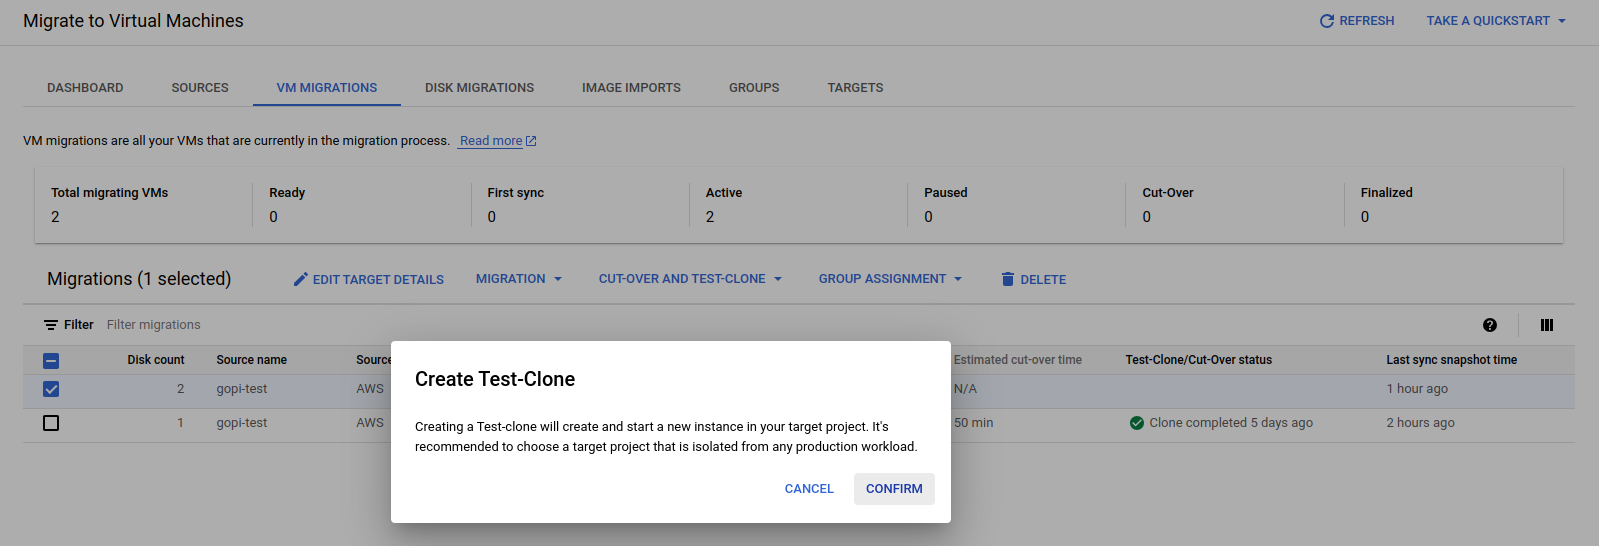
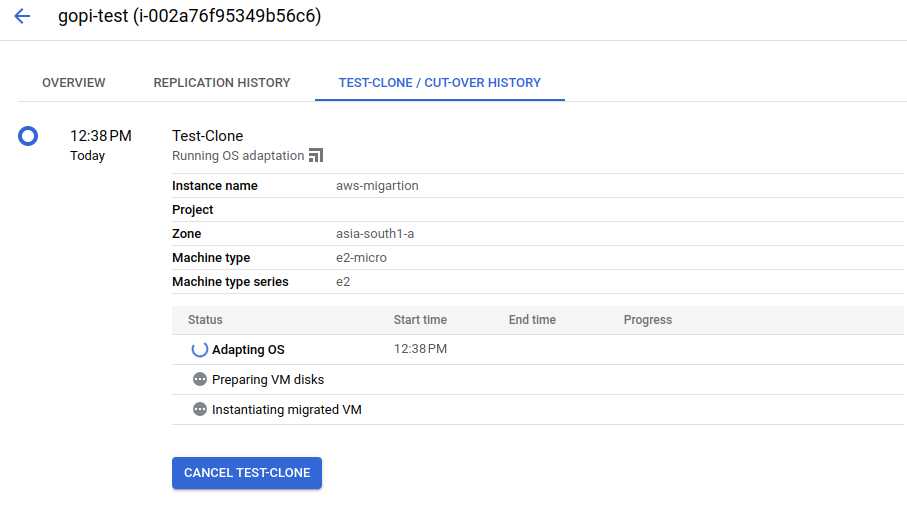
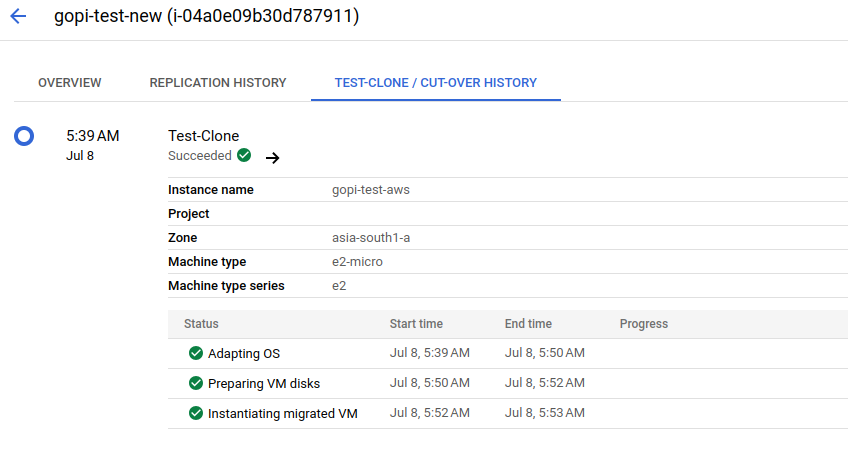
Where the test clone takes place—using the replicated data and target details—to launch a first test VM instance in the GCP console.
Test process:
STEP: 07
During the final cut-over stage of the migration process, only the original VM instance is launched in the GCP console, exactly mirroring the EC2 instance in the AWS console
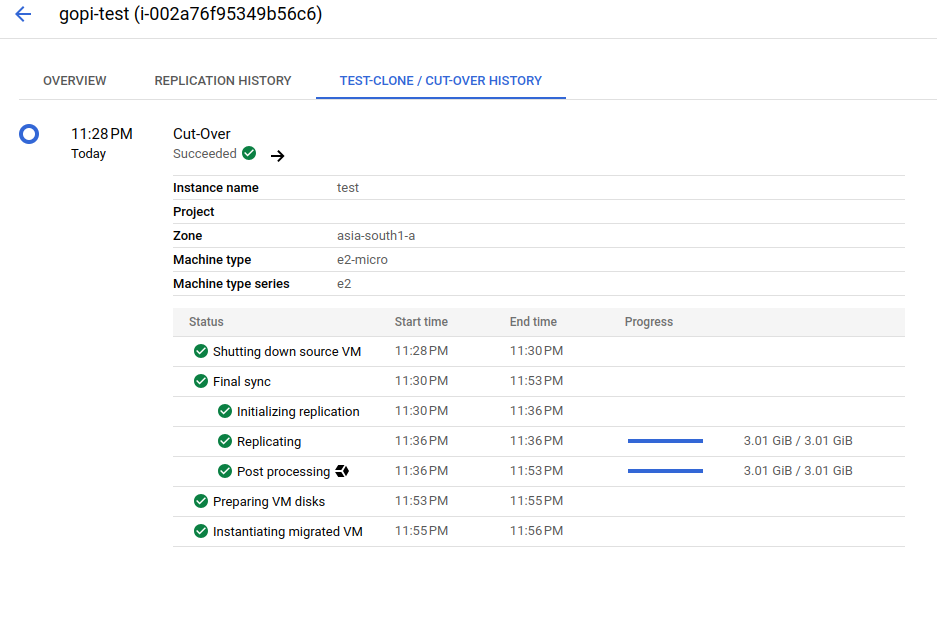
After the cut-over stage, we successfully launched a VM instance, as shown in the screenshots below.

STEP: 08
After successfully connecting via RDP to the newly launched VM instance in the GCP console, we verified that all data migrated from the EC2 instance in the AWS console was present in the GCP VM instance.
For reference, please find the screenshot below.
STEP: 09
We have also verified that our application, which is a static webpage hosted on an EC2 instance in the AWS console, is working as expected on the GCP VM machine.

Therefore, we have successfully migrated an AWS EC2 instance from AWS Cloud to GCP Cloud
Email Spoofing: What is it and How to Protect Against it
E-mail spoofing is a technique whereby the attacker forges the sender's address in such a way as to make the recipient believe it is coming from a trusted party. It could be a colleague in the office, a company, or even a financial institution. In this scenario, an attacker sends email headers in a manner such that the recipient would consider it to have come from a particular person, and the possibility of getting people to click on links they should not download attachments that will harm them or share with sensitive information becomes more probable.
Most of the current email systems lack a good feature that identifies forged sender addresses, and this explains why most phishing, spear-phishing, and business email compromise attacks rely on such a strategy.
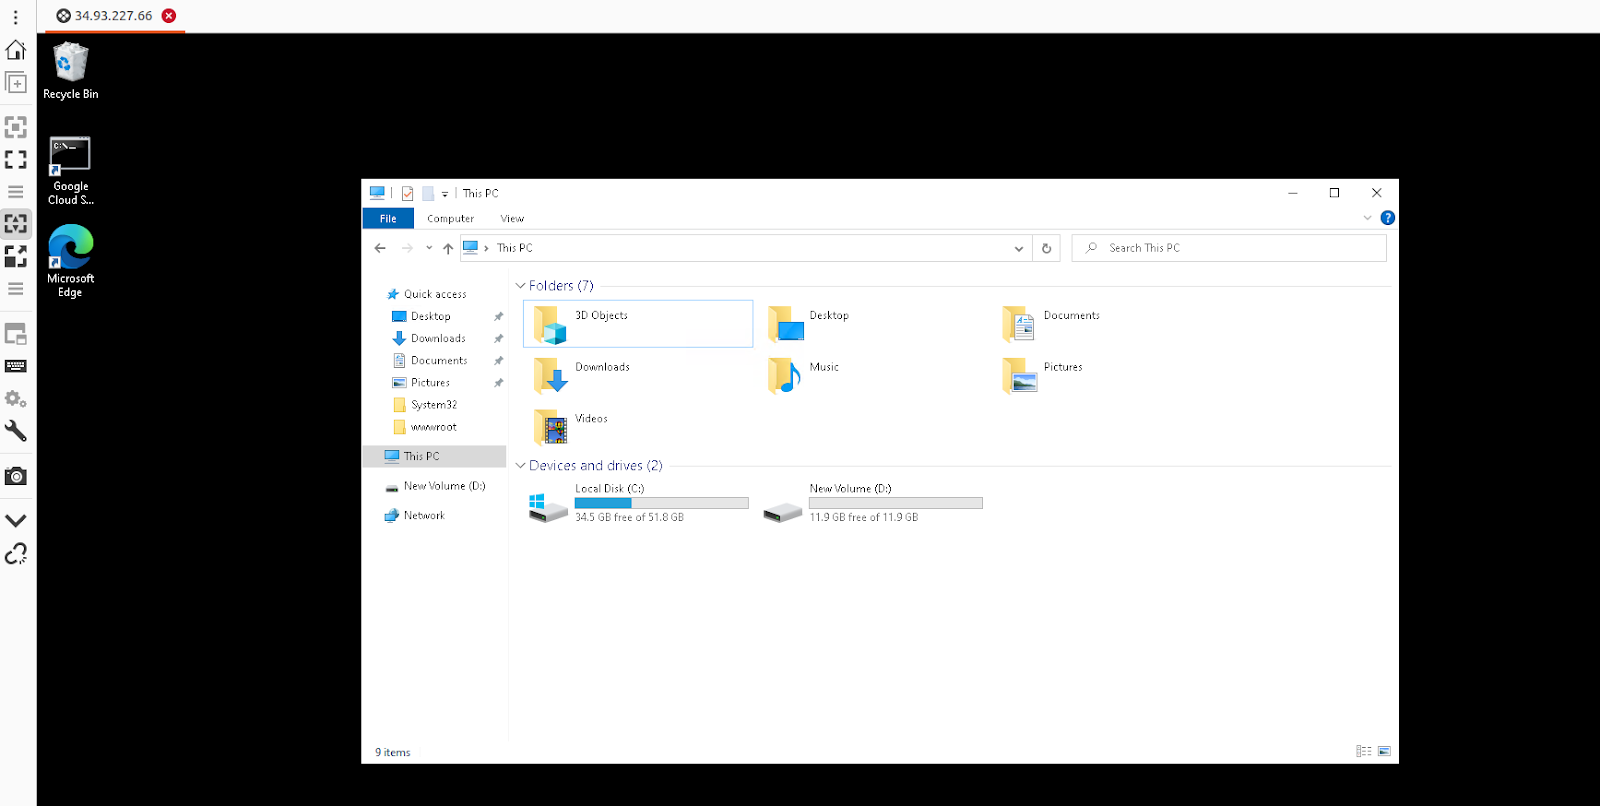
For example, you might get an email that you are in both "To" and "From." Now, that doesn't mean someone has breached your email account. What they would do instead is pretend to be you or maybe another person you trust so that you open the email and may click on malicious links or release sensitive information.
How to Identify a Spoofed Email?
Sent Folder does not have an e-mail - When you send yourself an e-mail, it always is going to be in your Sent folder. And consequently, since spammers spoofed your address, you'd never see it there because he sent it from nowhere, but it would appear as if it was from your account.


NOTE: If you compose an email to yourself and delete it from your sent folder, then you will no longer see the email in your inbox also.
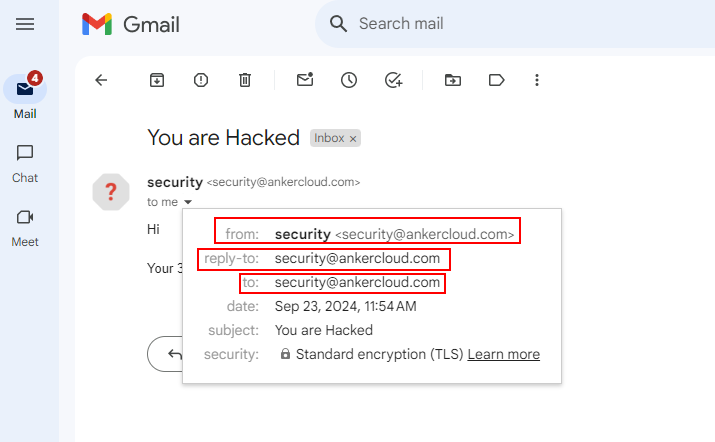
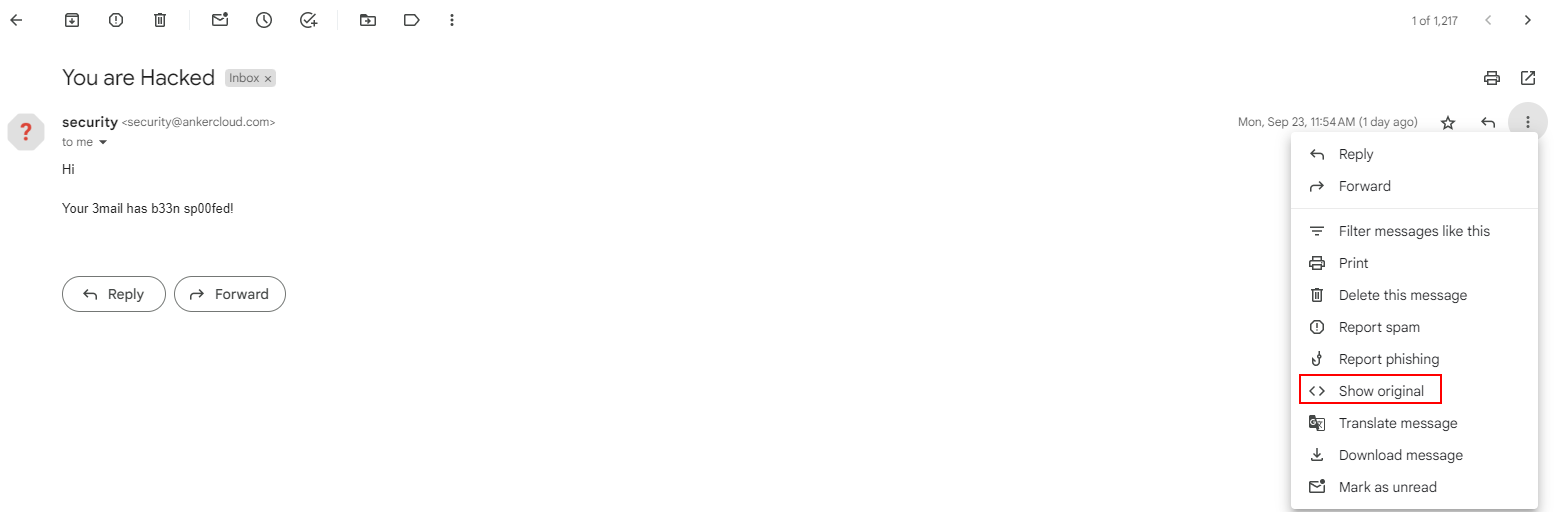
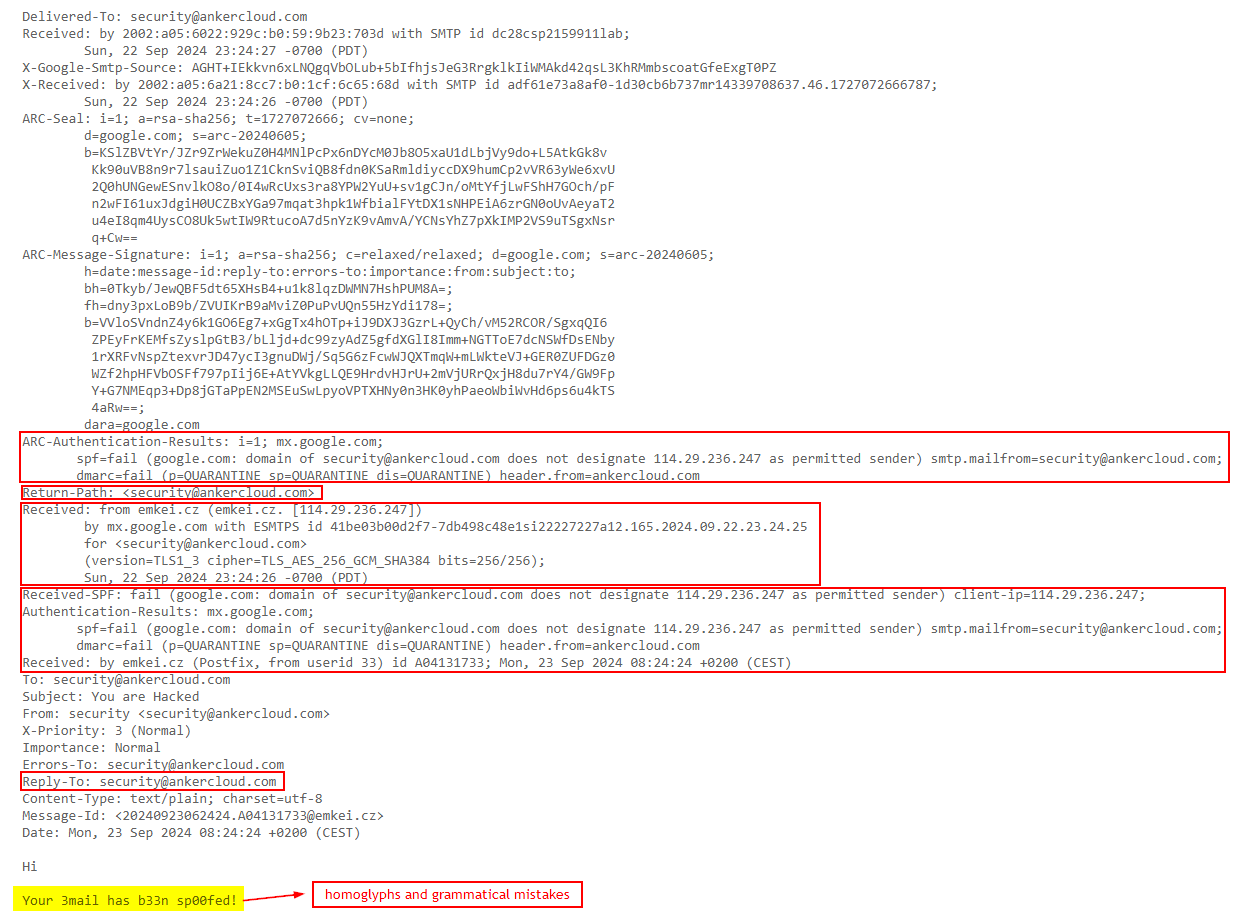
Check the Original Email - Most E-mail systems will show you the "original" or "raw" version of an e-mail. This shows all the technical details of how the e-mail is sent. Look for a possible sign such as suspicious From, Reply-To, Return-Path, or Received, fields that don't look just right, maybe an indicator of a spoofed e-mail.
Grammar and spelling mistakes - Always keep an eye out for homoglyphs (Example: Ankercloud as Amk3rc10ud) and grammatical errors that a legitimate sender would never make.
Preventive measures: protecting both yourself and your organization
- Implement the SPF, DKIM, and DMARC email security protocols as a layer of protection against spoofing which helps in verifying that an email was actually sent from the person that it says it is, if not then the email will go to spam/deleted immediately.
- Use spam filters- Generally, most email services have spam filters. These can filter suspicious-looking emails even before they reach your inbox. To be on the safe side, assume that your spam filter is active.
- Be Cautious - Be wary of opening any uncalled-for emails, particularly when suspicious, or asking for information that could be confidential.
What to Do If You Fall Victim to Spoofing Attack
- Don’t panic and disconnect the device from the internet immediately, to make sure no further damage is done by the malicious programs downloaded.
- Report the IT team on what happened so they can decide if sensitive information has been put at risk and make all the necessary arrangements to ensure safety measures are taken about your account.
- Change your passwords in case you think you got infected, change all the passwords right away from a different device, and implement/enforce 2FA for that added layer of security.
- Keep an eye on your email account and other accounts online for suspicious activities such as unauthorized login attempts or suspicious activities through your accounts.
Conclusion
Email spoofing is very hard to prevent, but definitely difficult to detect; if you are alert and think of some basic precautions, you should never fall for such a scam. So, always check suspicious emails and contact your IT/security team whenever in doubt, please ask for help.
Navigating the New AI Act in Europe: How Ankercloud can help your business to comply with it
In June 2023, the European Union took a significant step in regulating artificial intelligence with the introduction of the AI Act. This landmark legislation aims to create a legal framework for AI development and deployment across the EU, ensuring that AI technologies are used responsibly and ethically. For businesses leveraging AI, understanding and complying with the AI Act is crucial to avoid penalties and maintain consumer trust. This is where Ankercloud comes into play, offering solutions to help businesses navigate the complexities of the new law.
Understanding the AI Act
The AI Act classifies AI systems into three categories based on their potential risks:
- Unacceptable Risk: AI applications deemed a threat to safety, livelihoods, and rights are banned. This includes systems for social scoring by governments and real-time biometric identification in public spaces.
- High Risk: AI systems that impact critical areas such as healthcare, transport, and employment must meet strict requirements. This includes robust risk management, high-quality data, human oversight, and transparency.
- Limited Risk: Applications with a minimal risk, like chatbots, must ensure transparency and inform users that they are interacting with AI.
For businesses, especially those operating in high-risk categories, the AI Act mandates a comprehensive approach to risk management, data governance, and compliance documentation.
Challenges for Businesses
The introduction of the AI Act presents several challenges for businesses:
- Compliance Costs: Adhering to the stringent requirements of the AI Act may involve significant costs, particularly for SMEs.
- Technical Expertise: Ensuring that AI systems meet the law's standards requires specialized knowledge in AI development and data governance.
- Documentation and Transparency: Businesses need to maintain detailed records of their AI systems' design, testing, and deployment processes.
How Ankercloud Can Help
Ankercloud offers a suite of services designed to help businesses comply with the new AI Act seamlessly and efficiently. Here’s how Ankercloud can assist:
- Risk Assessment and Management:
- Comprehensive Risk Analysis: Ankercloud provides support to assess the risks associated with AI systems, helping businesses identify potential issues early in the development process in line with the industry best practices.
- Risk Mitigation Strategies: Through detailed analysis and expert guidance, Ankercloud helps implement robust risk mitigation strategies, ensuring compliance with the AI Act’s high-risk requirements.
- Data Governance:
- Quality Data Management: Ankercloud’s approach to data governance ensures that AI systems are trained on high-quality, non-biased data, meeting the AI Act’s standards.
- ISO/IEC 25024: This international standard outlines data quality measurement criteria like accuracy, completeness, consistency, and timeliness. Ankercloud's platform helps businesses assess these metrics to ensure their data meets regulatory expectations.
- Fairness and Bias Mitigation: According to the AI Act, data used for high-risk AI systems must be free from bias. Ankercloud incorporates AI fairness tools that detect and correct biased datasets, ensuring compliance with EU requirements for fairness, inclusivity, and non-discrimination.
- Traceability and Transparency: Ankercloud enables businesses to track and document the provenance of their data, ensuring compliance with the transparency demands of the AI Act. This feature helps maintain accountability and verifiability throughout the AI lifecycle.
- Data Security and Privacy: Ensuring that personal data is protected and privacy is maintained is crucial. Ankercloud helps implement security measures and privacy protocols compliant with the AI Act.
- ISO/IEC 27001: This standard defines the requirements for a comprehensive Information Security Management System (ISMS). Ankercloud helps businesses implement and manage information security strategies to ensure sensitive data is protected.
- GDPR (General Data Protection Regulation): GDPR is the key regulation in the EU for protecting personal data. Ankercloud supports businesses in meeting GDPR requirements, including data minimization, obtaining consent for data use, and ensuring data subject rights are respected.
- ISO/IEC 27701: This extension to ISO 27001 provides guidelines for privacy and helps implement a Privacy Information Management System (PIMS). Ankercloud incorporates this standard to assist businesses in complying with privacy regulations.
- Encryption and Access Controls: Ankercloud implements technologies such as end-to-end encryption and multi-factor authentication to ensure data is protected during transmission and storage. This helps businesses meet the AI Act's security requirements. Ankercloud’s comprehensive security and privacy solutions help businesses minimize the risk of data breaches and ensure compliance with relevant security standards, which is critical for using AI in line with the AI Act.
- Quality Data Management: Ankercloud’s approach to data governance ensures that AI systems are trained on high-quality, non-biased data, meeting the AI Act’s standards.
- Transparency and Documentation:
- Documentation Support: Ankercloud assists in creating and maintaining comprehensive documentation of AI system development and deployment, essential for audits and regulatory reviews.
- Human Oversight:
- Human-in-the-Loop Solutions: Ankercloud helps integrate human oversight mechanisms into AI systems, ensuring that critical decisions are reviewed by humans, as required by the AI Act.
- Training and Support:
- Ongoing Support: With continuous support and 24/7 account management delivered by a dedicated Managed Services team, Ankercloud continuously ensures that businesses stay compliant with evolving regulations and industry standards over the long term.
Conclusion
The EU’s AI Act marks a pivotal moment in the regulation of artificial intelligence, emphasizing the importance of ethical and responsible AI use. For businesses, navigating this new legal landscape may seem daunting. However, with Ankercloud’s comprehensive suite of solutions, companies can confidently manage compliance, mitigate risks, and leverage AI’s full potential within the bounds of the law. Partnering with Ankercloud ensures that your business not only meets regulatory requirements but also sets a benchmark for responsible AI innovation.
ALBeast Vulnerability: What It Is and How to Protect Your Applications
A newly identified vulnerability called "ALBeast" can cause a significant risk for AWS Application Load Balancer (ALB) using the load balancer authentication. This vulnerability was found by Miggo Research, meaning it is a severe problem that can lead to unauthorized access, data exfiltration, data breaches, and insider threats. Understanding it and mitigating this vulnerability is essential to organizations that are relying on the AWS Application Load Balancer to secure their applications.
Understanding ALBeast: What You Need to Know
ALBeast is a configuration-based vulnerability, the base of this vulnerability is "how AWS ALB handles the user authentication". ALB is a load balancer that operates on the OSI model's Layer 7. Its purpose is to handle the traffic by distributing the incoming application traffic across multiple targets like EC2 instances, containers, or IP addresses. On the one hand, the ALB improves reliability, fault tolerance, and scalability. And, the misconfiguration in ALB's authentication process can lead to a security breach where applications are exposed to the risk of being compromised.
The ALBeast vulnerability is critical because, with the help of this vulnerability, the attackers can bypass the critical security controls and lead to unauthorized access, by which attackers can access the applications without authentication. The Miggo research has identified over 15,000 potentially vulnerable applications out of the 371,000 ALBs analyzed, these potentially vulnerable applications do not contain the proper signer validation which is a key contributor to ALB-based authentication.
How Does ALBeast Vulnerability Work?
The ALBeast vulnerability exploits the weaknesses in how the applications validate the tokens provided by ALB. This vulnerability is raised because of two main issues which are:
- Missing Signer Validation: Many of the applications fail to verify the authenticity of the token signer, which means that the attacker can forge a token, manipulate it, impersonate it as a legitimate token, and present it to the application. Because of this misconfiguration, the application does not validate the signer's identity, accepts the token then grants the attacker unauthorized access.
- Misconfigured Security Groups: ALBeast vulnerability also takes advantage of misconfigurations in configured security groups that do not restrict traffic to trusted ALB instances. If an application accepts traffic from any source rather than limiting it to a specific ALB, an attacker can exploit this to bypass security controls.
Exploitation Scenario: How Attackers Exploit
- Setting Up a Malicious ALB: The attacker creates the malicious Application Load Balancer (ALB) which has similar configurations to the victim's setup.
- Forging a Token: The attacker forges a token and changes the information inside it, especially the part that says who issued it, to match what the victim’s application considers legitimate.
- Altering the Configurations: The attacker changes the configurations on the Malicious ALB so that AWS signs the token in a way that makes it look legitimate to the victim’s system.
- Bypassing Defenses: The attacker then uses this fake token to trick the victim’s application into bypassing security checks and gaining unauthorized access.

Best Practices to Mitigate ALBeast
- Verify Token Signer: Ensure that the applications are validating the signer of a JWT token provided with ALB to verify that the signer field from the JWT header matches the Amazon Resource Name (ARN) of the ALB signing the token.
- Restrict Traffic to Trusted ALBs: Configure your security groups to accept traffic only from trusted ALB instances. This can be achieved by referencing the ALB’s security group in the inbound rules for your target security group.
- Deploy Targets in Private Subnets: To prevent direct access from the public internet, deploy your ALB targets in private subnets without public IP addresses or Elastic IP addresses.
- Review and Update Configurations: Regularly review your application’s configurations to ensure they adhere to the latest AWS documentation. AWS has updated its authentication feature documentation to include new code for validating the signer, making it crucial for users to implement these changes.
Conclusion
The ALBeast vulnerability is a wake-up call for all organizations about how misconfigurations can lead to complex vulnerabilities in cloud-based applications. AWS has provided reliable tools for security management, though the responsibility to properly set up these tools is on the user. Organizations can immensely reduce the threat of unauthorized access to their applications based on the ALBeast issue by following the recommended mitigation strategies. These security risks accompany the continuous changes in cloud environments. The organizations should keep themselves up to date, ensure that they regularly update the configurations, and prepare to defend against threats like ALBeast.
Pinpoint APM Implementation for Node Js Application
Introduction
Application Performance Management (APM) is crucial for monitoring and managing the performance and availability of software applications. Pinpoint is an open-source APM tool that offers comprehensive insights into the performance and reliability of applications. It is designed to monitor large-scale distributed systems, providing real-time performance metrics, tracing, and detailed visualizations.
This guide provides a step-by-step approach to implementing Pinpoint APM for a Node.js application, including setting up the server, installing Docker, deploying Pinpoint, and integrating it with the Node.js application.
About Pinpoint
Pinpoint is a powerful APM tool that helps understand the application's performance and track down issues. It supports a variety of technologies and provides functionalities like:
- Real-time application monitoring
- Distributed tracing
- Visualization of application topology
- Alerts and notifications
- Detailed transaction analysis
Setup a server:
We have to launch a new server with a minimum of 2vCPU and 4GB RAM.
Install Docker Engine
sudo apt-get update
sudo apt-get install docker-ce docker-ce-cli containerd.io
Install Docker Compose
Download the Docker Compose binary into the /usr/local/bin directory:
sudo curl -L "https://github.com/docker/compose/releases/download/1.29.2/docker-compose-$(uname -s)-$(uname -m)" -o /usr/local/bin/docker-compose
Apply executable permissions to the binary
sudo chmod +x /usr/local/bin/docker-compose
Verify the installation:
docker --version
docker-compose --version
Deploy Pinpoint Using Docker
Clone the git repository:
git clone https://github.com/pinpoint-apm/pinpoint-docker.git
cd pinpoint-docker
sudo docker-compose pull && docker-compose up -d
NOTE:
If the above docker-compose.yml won’t work please use the following yml file to up the docker.
version: "3.6"
services:
pinpoint-hbase:
build:
context: ./pinpoint-hbase/
dockerfile: Dockerfile
args:
- PINPOINT_VERSION=${PINPOINT_VERSION}
container_name: "${PINPOINT_HBASE_NAME}"
image: "pinpointdocker/pinpoint-hbase:${PINPOINT_VERSION}"
networks:
- pinpoint
environment:
- AGENTINFO_TTL=${AGENTINFO_TTL}
- AGENTSTATV2_TTL=${AGENTSTATV2_TTL}
- APPSTATAGGRE_TTL=${APPSTATAGGRE_TTL}
- APPINDEX_TTL=${APPINDEX_TTL}
- AGENTLIFECYCLE_TTL=${AGENTLIFECYCLE_TTL}
- AGENTEVENT_TTL=${AGENTEVENT_TTL}
- STRINGMETADATA_TTL=${STRINGMETADATA_TTL}
- APIMETADATA_TTL=${APIMETADATA_TTL}
- SQLMETADATA_TTL=${SQLMETADATA_TTL}
- TRACEV2_TTL=${TRACEV2_TTL}
- APPTRACEINDEX_TTL=${APPTRACEINDEX_TTL}
- APPMAPSTATCALLERV2_TTL=${APPMAPSTATCALLERV2_TTL}
- APPMAPSTATCALLEV2_TTL=${APPMAPSTATCALLEV2_TTL}
- APPMAPSTATSELFV2_TTL=${APPMAPSTATSELFV2_TTL}
- HOSTAPPMAPV2_TTL=${HOSTAPPMAPV2_TTL}
volumes:
- hbase_data:/home/pinpoint/hbase
- /home/pinpoint/zookeeper
expose:
# HBase Master API port
- "60000"
# HBase Master Web UI
- "16010"
# Regionserver API port
- "60020"
# HBase Regionserver web UI
- "16030"
ports:
- "60000:60000"
- "16010:16010"
- "60020:60020"
- "16030:16030"
restart: always
depends_on:
- zoo1
pinpoint-mysql:
container_name: pinpoint-mysql
image: mysql:8.0
restart: "no"
hostname: pinpoint-mysql
entrypoint: >
sh -c "
curl -SL "https://raw.githubusercontent.com/ga-ram/pinpoint/latest/web/src/main/resources/sql/CreateTableStatement-mysql.sql" -o /docker-entrypoint-initdb.d/CreateTableStatement-mysql.sql &&
curl -SL "https://raw.githubusercontent.com/ga-ram/pinpoint/latest/web/src/main/resources/sql/SpringBatchJobRepositorySchema-mysql.sql" -o /docker-entrypoint-initdb.d/SpringBatchJobRepositorySchema-mysql.sql &&
sed -i '/^--/d' /docker-entrypoint-initdb.d/CreateTableStatement-mysql.sql &&
sed -i '/^--/d' /docker-entrypoint-initdb.d/SpringBatchJobRepositorySchema-mysql.sql &&
docker-entrypoint.sh mysqld
"
ports:
- "3306:3306"
environment:
- MYSQL_ROOT_PASSWORD=${MYSQL_ROOT_PASSWORD}
- MYSQL_USER=${MYSQL_USER}
- MYSQL_PASSWORD=${MYSQL_PASSWORD}
- MYSQL_DATABASE=${MYSQL_DATABASE}
volumes:
- mysql_data:/var/lib/mysql
networks:
- pinpoint
pinpoint-web:
build:
context: ./pinpoint-web/
dockerfile: Dockerfile
args:
- PINPOINT_VERSION=${PINPOINT_VERSION}
container_name: "${PINPOINT_WEB_NAME}"
image: "pinpointdocker/pinpoint-web:${PINPOINT_VERSION}"
depends_on:
- pinpoint-hbase
- pinpoint-mysql
- zoo1
- redis
restart: always
expose:
- "9997"
ports:
- "9997:9997"
- "${WEB_SERVER_PORT:-8080}:8080"
environment:
- WEB_SERVER_PORT=${WEB_SERVER_PORT}
- SPRING_PROFILES_ACTIVE=${SPRING_PROFILES}
- PINPOINT_ZOOKEEPER_ADDRESS=${PINPOINT_ZOOKEEPER_ADDRESS}
- CLUSTER_ENABLE=${CLUSTER_ENABLE}
- ADMIN_PASSWORD=${ADMIN_PASSWORD}
- CONFIG_SENDUSAGE=${CONFIG_SENDUSAGE}
- LOGGING_LEVEL_ROOT=${WEB_LOGGING_LEVEL_ROOT}
- CONFIG_SHOW_APPLICATIONSTAT=${CONFIG_SHOW_APPLICATIONSTAT}
- JDBC_DRIVERCLASSNAME=${JDBC_DRIVERCLASSNAME}
- JDBC_URL=${SPRING_DATASOURCE_HIKARI_JDBCURL}
- JDBC_USERNAME=${SPRING_DATASOURCE_HIKARI_USERNAME}
- JDBC_PASSWORD=${SPRING_DATASOURCE_HIKARI_PASSWORD}
- SPRING_DATASOURCE_HIKARI_JDBCURL=${SPRING_DATASOURCE_HIKARI_JDBCURL}
- SPRING_DATASOURCE_HIKARI_USERNAME=${SPRING_DATASOURCE_HIKARI_USERNAME}
- SPRING_DATASOURCE_HIKARI_PASSWORD=${SPRING_DATASOURCE_HIKARI_PASSWORD}
- SPRING_METADATASOURCE_HIKARI_JDBCURL=${SPRING_METADATASOURCE_HIKARI_JDBCURL}
- SPRING_METADATASOURCE_HIKARI_USERNAME=${SPRING_METADATASOURCE_HIKARI_USERNAME}
- SPRING_METADATASOURCE_HIKARI_PASSWORD=${SPRING_METADATASOURCE_HIKARI_PASSWORD}
- SPRING_DATA_REDIS_HOST=${SPRING_DATA_REDIS_HOST}
- SPRING_DATA_REDIS_PORT=${SPRING_DATA_REDIS_PORT}
- SPRING_DATA_REDIS_USERNAME=${SPRING_DATA_REDIS_USERNAME}
- SPRING_DATA_REDIS_PASSWORD=${SPRING_DATA_REDIS_PASSWORD}
links:
- "pinpoint-mysql:pinpoint-mysql"
networks:
- pinpoint
pinpoint-collector:
build:
context: ./pinpoint-collector/
dockerfile: Dockerfile
args:
- PINPOINT_VERSION=${PINPOINT_VERSION}
container_name: "${PINPOINT_COLLECTOR_NAME}"
image: "pinpointdocker/pinpoint-collector:${PINPOINT_VERSION}"
depends_on:
- pinpoint-hbase
- zoo1
- redis
restart: always
expose:
- "9991"
- "9992"
- "9993"
- "9994"
- "9995"
- "9996"
ports:
- "${COLLECTOR_RECEIVER_GRPC_AGENT_PORT:-9991}:9991/tcp"
- "${COLLECTOR_RECEIVER_GRPC_STAT_PORT:-9992}:9992/tcp"
- "${COLLECTOR_RECEIVER_GRPC_SPAN_PORT:-9993}:9993/tcp"
- "${COLLECTOR_RECEIVER_BASE_PORT:-9994}:9994"
- "${COLLECTOR_RECEIVER_STAT_UDP_PORT:-9995}:9995/tcp"
- "${COLLECTOR_RECEIVER_SPAN_UDP_PORT:-9996}:9996/tcp"
- "${COLLECTOR_RECEIVER_STAT_UDP_PORT:-9995}:9995/udp"
- "${COLLECTOR_RECEIVER_SPAN_UDP_PORT:-9996}:9996/udp"
networks:
pinpoint:
ipv4_address: ${COLLECTOR_FIXED_IP}
environment:
- SPRING_PROFILES_ACTIVE=${SPRING_PROFILES}
- PINPOINT_ZOOKEEPER_ADDRESS=${PINPOINT_ZOOKEEPER_ADDRESS}
- CLUSTER_ENABLE=${CLUSTER_ENABLE}
- LOGGING_LEVEL_ROOT=${COLLECTOR_LOGGING_LEVEL_ROOT}
- FLINK_CLUSTER_ENABLE=${FLINK_CLUSTER_ENABLE}
- FLINK_CLUSTER_ZOOKEEPER_ADDRESS=${FLINK_CLUSTER_ZOOKEEPER_ADDRESS}
- SPRING_DATA_REDIS_HOST=${SPRING_DATA_REDIS_HOST}
- SPRING_DATA_REDIS_PORT=${SPRING_DATA_REDIS_PORT}
- SPRING_DATA_REDIS_USERNAME=${SPRING_DATA_REDIS_USERNAME}
- SPRING_DATA_REDIS_PASSWORD=${SPRING_DATA_REDIS_PASSWORD}
pinpoint-quickstart:
build:
context: ./pinpoint-quickstart/
dockerfile: Dockerfile
container_name: "pinpoint-quickstart"
image: "pinpointdocker/pinpoint-quickstart"
ports:
- "${APP_PORT:-8085}:8080"
volumes:
- data-volume:/pinpoint-agent
environment:
JAVA_OPTS: "-javaagent:/pinpoint-agent/pinpoint-bootstrap.jar -Dpinpoint.agentId=${AGENT_ID} -Dpinpoint.applicationName=${APP_NAME} -Dpinpoint.profiler.profiles.active=${SPRING_PROFILES}"
networks:
- pinpoint
depends_on:
- pinpoint-agent
pinpoint-batch:
build:
context: ./pinpoint-batch/
dockerfile: Dockerfile
args:
- PINPOINT_VERSION=${PINPOINT_VERSION}
container_name: "${PINPOINT_BATCH_NAME}"
image: "pinpointdocker/pinpoint-batch:${PINPOINT_VERSION}"
depends_on:
- pinpoint-hbase
- pinpoint-mysql
- zoo1
restart: always
environment:
- BATCH_SERVER_PORT=${BATCH_SERVER_PORT}
- SPRING_PROFILES_ACTIVE=${SPRING_PROFILES}
- PINPOINT_ZOOKEEPER_ADDRESS=${PINPOINT_ZOOKEEPER_ADDRESS}
- CLUSTER_ENABLE=${CLUSTER_ENABLE}
- ADMIN_PASSWORD=${ADMIN_PASSWORD}
- CONFIG_SENDUSAGE=${CONFIG_SENDUSAGE}
- LOGGING_LEVEL_ROOT=${BATCH_LOGGING_LEVEL_ROOT}
- CONFIG_SHOW_APPLICATIONSTAT=${CONFIG_SHOW_APPLICATIONSTAT}
- BATCH_FLINK_SERVER=${BATCH_FLINK_SERVER}
- JDBC_DRIVERCLASSNAME=${JDBC_DRIVERCLASSNAME}
- JDBC_URL=${SPRING_DATASOURCE_HIKARI_JDBCURL}
- JDBC_USERNAME=${SPRING_DATASOURCE_HIKARI_USERNAME}
- JDBC_PASSWORD=${SPRING_DATASOURCE_HIKARI_PASSWORD}
- SPRING_DATASOURCE_HIKARI_JDBCURL=${SPRING_DATASOURCE_HIKARI_JDBCURL}
- SPRING_DATASOURCE_HIKARI_USERNAME=${SPRING_DATASOURCE_HIKARI_USERNAME}
- SPRING_DATASOURCE_HIKARI_PASSWORD=${SPRING_DATASOURCE_HIKARI_PASSWORD}
- SPRING_METADATASOURCE_HIKARI_JDBCURL=${SPRING_METADATASOURCE_HIKARI_JDBCURL}
- SPRING_METADATASOURCE_HIKARI_USERNAME=${SPRING_METADATASOURCE_HIKARI_USERNAME}
- SPRING_METADATASOURCE_HIKARI_PASSWORD=${SPRING_METADATASOURCE_HIKARI_PASSWORD}
- ALARM_MAIL_SERVER_URL=${ALARM_MAIL_SERVER_URL}
- ALARM_MAIL_SERVER_PORT=${ALARM_MAIL_SERVER_PORT}
- ALARM_MAIL_SERVER_USERNAME=${ALARM_MAIL_SERVER_USERNAME}
- ALARM_MAIL_SERVER_PASSWORD=${ALARM_MAIL_SERVER_PASSWORD}
- ALARM_MAIL_SENDER_ADDRESS=${ALARM_MAIL_SENDER_ADDRESS}
- ALARM_MAIL_TRANSPORT_PROTOCOL=${ALARM_MAIL_TRANSPORT_PROTOCOL}
- ALARM_MAIL_SMTP_PORT=${ALARM_MAIL_SMTP_PORT}
- ALARM_MAIL_SMTP_AUTH=${ALARM_MAIL_SMTP_AUTH}
- ALARM_MAIL_SMTP_STARTTLS_ENABLE=${ALARM_MAIL_SMTP_STARTTLS_ENABLE}
- ALARM_MAIL_SMTP_STARTTLS_REQUIRED=${ALARM_MAIL_SMTP_STARTTLS_REQUIRED}
- ALARM_MAIL_DEBUG=${ALARM_MAIL_DEBUG}
links:
- "pinpoint-mysql:pinpoint-mysql"
networks:
- pinpoint
pinpoint-agent:
build:
context: ./pinpoint-agent/
dockerfile: Dockerfile
args:
- PINPOINT_VERSION=${PINPOINT_VERSION}
container_name: "${PINPOINT_AGENT_NAME}"
image: "pinpointdocker/pinpoint-agent:${PINPOINT_VERSION}"
restart: unless-stopped
networks:
- pinpoint
volumes:
- data-volume:/pinpoint-agent
environment:
- SPRING_PROFILES=${SPRING_PROFILES}
- COLLECTOR_IP=${COLLECTOR_IP}
- PROFILER_TRANSPORT_AGENT_COLLECTOR_PORT=${PROFILER_TRANSPORT_AGENT_COLLECTOR_PORT}
- PROFILER_TRANSPORT_METADATA_COLLECTOR_PORT=${PROFILER_TRANSPORT_METADATA_COLLECTOR_PORT}
- PROFILER_TRANSPORT_STAT_COLLECTOR_PORT=${PROFILER_TRANSPORT_STAT_COLLECTOR_PORT}
- PROFILER_TRANSPORT_SPAN_COLLECTOR_PORT=${PROFILER_TRANSPORT_SPAN_COLLECTOR_PORT}
- PROFILER_SAMPLING_TYPE=${PROFILER_SAMPLING_TYPE}
- PROFILER_SAMPLING_COUNTING_SAMPLING_RATE=${PROFILER_SAMPLING_COUNTING_SAMPLING_RATE}
- PROFILER_SAMPLING_PERCENT_SAMPLING_RATE=${PROFILER_SAMPLING_PERCENT_SAMPLING_RATE}
- PROFILER_SAMPLING_NEW_THROUGHPUT=${PROFILER_SAMPLING_NEW_THROUGHPUT}
- PROFILER_SAMPLING_CONTINUE_THROUGHPUT=${PROFILER_SAMPLING_CONTINUE_THROUGHPUT}
- DEBUG_LEVEL=${AGENT_DEBUG_LEVEL}
- PROFILER_TRANSPORT_MODULE=${PROFILER_TRANSPORT_MODULE}
depends_on:
- pinpoint-collector
#zookeepers
zoo1:
image: zookeeper:3.4.13
restart: always
hostname: zoo1
expose:
- "2181"
- "2888"
- "3888"
ports:
- "2181"
environment:
ZOO_MY_ID: 1
ZOO_SERVERS: server.1=0.0.0.0:2888:3888 server.2=zoo2:2888:3888 server.3=zoo3:2888:3888
networks:
- pinpoint
zoo2:
image: zookeeper:3.4.13
restart: always
hostname: zoo2
expose:
- "2181"
- "2888"
- "3888"
ports:
- "2181"
environment:
ZOO_MY_ID: 2
ZOO_SERVERS: server.1=zoo1:2888:3888 server.2=0.0.0.0:2888:3888 server.3=zoo3:2888:3888
networks:
- pinpoint
zoo3:
image: zookeeper:3.4.13
restart: always
hostname: zoo3
expose:
- "2181"
- "2888"
- "3888"
ports:
- "2181"
environment:
ZOO_MY_ID: 3
ZOO_SERVERS: server.1=zoo1:2888:3888 server.2=zoo2:2888:3888 server.3=0.0.0.0:2888:3888
networks:
- pinpoint
##flink
jobmanager:
build:
context: pinpoint-flink
dockerfile: Dockerfile
args:
- PINPOINT_VERSION=${PINPOINT_VERSION}
container_name: "${PINPOINT_FLINK_NAME}-jobmanager"
image: "pinpointdocker/pinpoint-flink:${PINPOINT_VERSION}"
expose:
- "6123"
ports:
- "${FLINK_WEB_PORT:-8081}:8081"
command: standalone-job -p 1 pinpoint-flink-job.jar -spring.profiles.active release
environment:
- JOB_MANAGER_RPC_ADDRESS=jobmanager
- PINPOINT_ZOOKEEPER_ADDRESS=${PINPOINT_ZOOKEEPER_ADDRESS}
networks:
- pinpoint
depends_on:
- zoo1
taskmanager:
build:
context: pinpoint-flink
dockerfile: Dockerfile
args:
- PINPOINT_VERSION=${PINPOINT_VERSION}
container_name: "${PINPOINT_FLINK_NAME}-taskmanager"
image: "pinpointdocker/pinpoint-flink:${PINPOINT_VERSION}"
expose:
- "6121"
- "6122"
- "19994"
ports:
- "6121:6121"
- "6122:6122"
- "19994:19994"
depends_on:
- zoo1
- jobmanager
command: taskmanager
links:
- "jobmanager:jobmanager"
environment:
- JOB_MANAGER_RPC_ADDRESS=jobmanager
networks:
- pinpoint
redis:
image: redis:7.0.14
restart: always
hostname: pinpoint-redis
ports:
- "6379:6379"
networks:
- pinpoint
volumes:
data-volume:
mysql_data:
hbase_data:
networks:
pinpoint:
driver: bridge
ipam:
config:
- subnet: ${PINPOINT_NETWORK_SUBNET}
The explanation of the components that we have used in the docker-compose yaml files
1. Services
Services are the individual containers that make up the application. Each service runs in its container but can interact with other services defined in the same docker-compose.yml file.
a. pinpoint-hbase
- Purpose: Pinpoint uses HBase as its primary storage for storing tracing data.
- Build: The service is built from a Dockerfile located in the ./pinpoint-hbase/ directory.
- Environment Variables: These variables define various TTL (Time-to-Live) settings for different types of data stored in HBase.
- Volumes: Persistent storage for HBase data is mounted on the host to ensure data persistence across container restarts.
- Ports: The service exposes several ports for communication (60000, 16010, 60020, 16030).
- Depends_on: This ensures that zoo1 (Zookeeper) service starts before pinpoint-hbase.
b. pinpoint-mysql
- Purpose: MySQL is used to store application metadata and other relational data needed by Pinpoint.
- Image: A MySQL 8.0 image from Docker Hub is used.
- Environment Variables: These include MySQL credentials like root password, user, password, and database name.
- Volumes: Persistent storage for MySQL data is mounted on the host.
- Ports: The MySQL service is exposed on port 3306.
c. pinpoint-web
- Purpose: This is the web UI for Pinpoint, allowing users to visualize and analyze the tracing data.
- Build: The service is built from a Dockerfile located in the ./pinpoint-web/ directory.
- Depends_on: This ensures that the pinpoint-hbase, pinpoint-mysql, zoo1, and redis services are running before starting the web service.
- Environment Variables: These configure the web service, including database connections, logging levels, and other properties.
- Ports: The service exposes port 9997 for the web interface.
d. pinpoint-collector
- Purpose: The collector service gathers trace data from applications and stores it in HBase.
- Build: The service is built from a Dockerfile located in the ./pinpoint-collector/ directory.
- Depends_on: This ensures that pinpoint-hbase, zoo1, and redis services are running before starting the collector.
- Environment Variables: These configure the collector service, including its connection to HBase, Zookeeper, and logging levels.
- Ports: The collector exposes several ports (9991-9996) for various types of communication (gRPC, UDP, etc.).
- Networks: The collector service is part of the pinpoint network and uses a fixed IP address.
e. zoo1
- Purpose: Zookeeper is used to manage and coordinate the distributed components of Pinpoint.
- Image: A Zookeeper image (3.4.14) from Docker Hub is used.
- Environment Variables: These configure the Zookeeper instance.
- Ports: The service is exposed on port 2181 for Zookeeper communication.
f. redis
- Purpose: Redis is used as a caching layer for Pinpoint, helping to improve performance.
- Image: A Redis image (5.0.6) from Docker Hub is used.
- Ports: The Redis service is exposed on port 6379.
2. Networks
Networks allow the services to communicate with each other. In this docker-compose.yml, a custom bridge network named pinpoint is defined.
- pinpoint: This is a user-defined bridge network that allows all the services to communicate with each other on a private network. Each service can reach others using their service names.
3. Volumes
Volumes provide persistent storage that survives container restarts. They are used to store data generated by services (like databases).
- hbase_data: A volume for storing HBase data.
- mysql_data: A volume for storing MySQL data.
4. Environment Variables
Environment variables are used to configure the services at runtime. These can include database credentials, logging levels, ports, and other configuration details. Each service defines its own set of environment variables, tailored to its specific needs.
5. Ports
Ports are exposed to allow external access to the services. For example:
- 3306:3306 for MySQL
- 9997:9997 for the Pinpoint Web UI
- 6379:6379 for Redis
6. Restart Policies
Restart policies (restart: always) ensure that the containers are automatically restarted if they stop or crash. This helps maintain the high availability of the services.
7. Links
Links allow containers to communicate with each other using hostnames. In this docker-compose.yml, the pinpoint-web and pinpoint-collector services are linked to the pinpoint-mysql service to facilitate database communication.
8. Expose vs. Ports
- Expose: This allows containers to communicate with each other internally, without exposing the ports to the host machine.
- Ports: These map the container ports to the host machine, allowing external access to the services.
Then need to whitelist the following ports 8080, 80, and 443 in the security groups.
We can see the dashboard below.

Integrate Pinpoint to the Node Js application:
We have to import the pinpoint agent in the Nodejs application.
Commands to be run after import pinpoint agent:
Install with npm:
npm install --save pinpoint-node-agent
Install with yarn:
yarn add pinpoint-node-agent
Adding a code:
To run Pinpoint agent for applications, we need to make sure the prerequisites are in place first.
CommonJS
require('pinpoint-node-agent')
If we are using pm2, use node-args(CLI) or node_args(Ecosystem File).
module.exports = {
apps : [{
name: "app",
script: "./app.js",
'node_args': ['-r', 'pinpoint-node-agent']
}]
}
Below is the example of we have attached,

Configure with environment variables and start the application
Based on the pinpoint-config-default.json file in the server, only necessary parts are set as environment variables.
PINPOINT_AGENT_ID=${HOSTNAME} PINPOINT_APPLICATION_NAME=Test-Node-App PINPOINT_COLLECTOR_IP=<pinpoint server private-ip> PINPOINT_ENABLE=true pm2 start ~/application path/app.js
Once the application is running and then check the site. The output is attached below

Conclusion
By following these steps, we have successfully set up Pinpoint APM to monitor our Node.js application. With Pinpoint, we can gain deep insights into our application's performance, identify bottlenecks, and optimize our code to ensure a smooth and efficient user experience. Pinpoint's real-time monitoring and comprehensive tracing capabilities make it an invaluable tool for managing the performance of our applications.
Reference
https://github.com/pinpoint-apm
https://github.com/pinpoint-apm/pinpoint
Migrating a VM Instance from GCP to AWS A Step by Step Guide
Overview
Moving a virtual machine (VM) instance from Google Cloud Platform (GCP) to Amazon Web Services (AWS) can seem scary. But with the right tools and a step by step process it can be done. In this post we will walk you through the entire process and make the transition from GCP to AWS smooth. Here we are using AWS’s native tool, Application Migration Service, to move a VM instance from GCP to AWS.
Architecture Diagram

Step-by-Step Guide
Step 1: Setup on GCP
Launch a Test Windows VM Instance
Go to your GCP console and create a test Windows VM. We created a 51 GB boot disk for this example. This will be our source VM.
RDP into the Windows Server
Next RDP into your Windows server. Once connected you need to install the AWS Application Migration Service (AMS) agent on this server.
Install the AMS Agent
To install the AMS agent, download it using the following command:
For more details, refer to the AWS documentation: https://docs.aws.amazon.com/mgn/latest/ug/windows-agent.html
Step 2: Install the AMS Agent
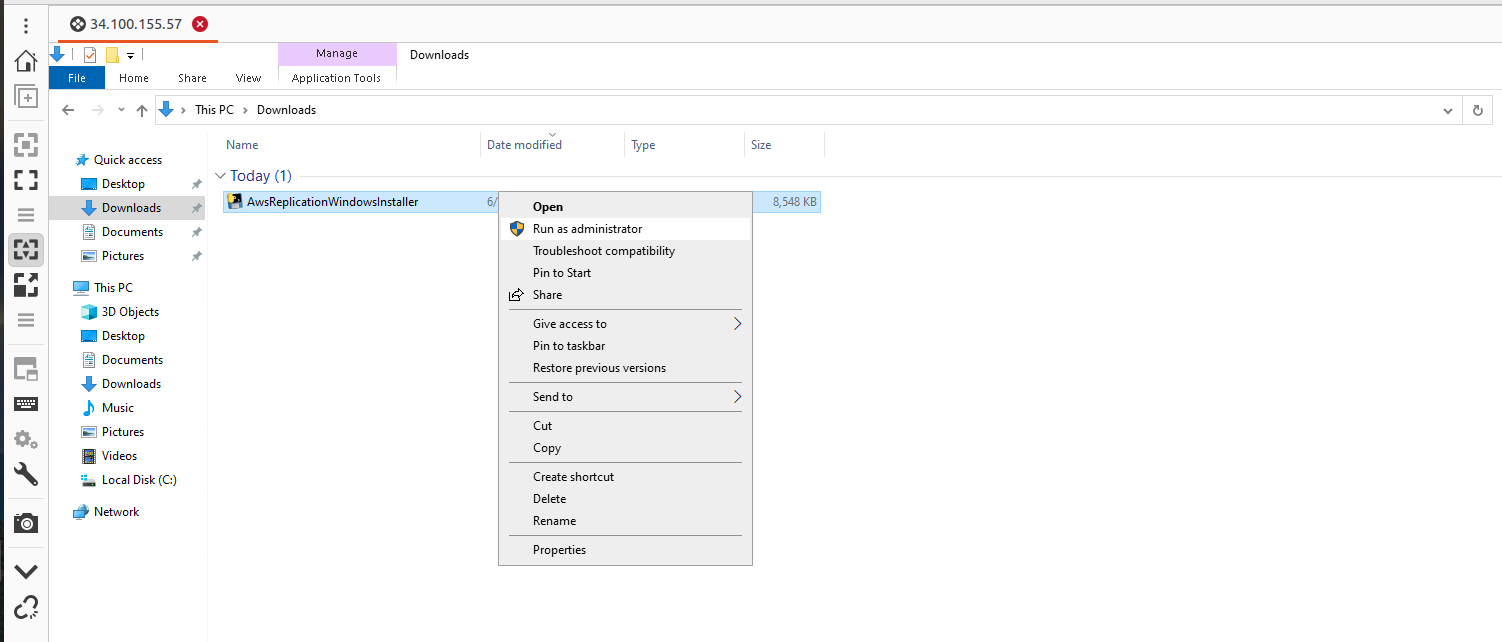
Navigate to the Downloads folder and open the AWS agent with administrator privileges using the Command prompt.

When installing you will be asked to choose the AWS region to replicate to. For this guide we chose N.V.
Step 3: Prepare the AWS Console
Create a User and Attach Permissions
In the AWS console create a new user and attach an AWS replication permission role to it. Generate access and secret keys for this user.
While creating keys choose the “third-party service” option for that key.

Enter the Keys into the GCP Windows Server
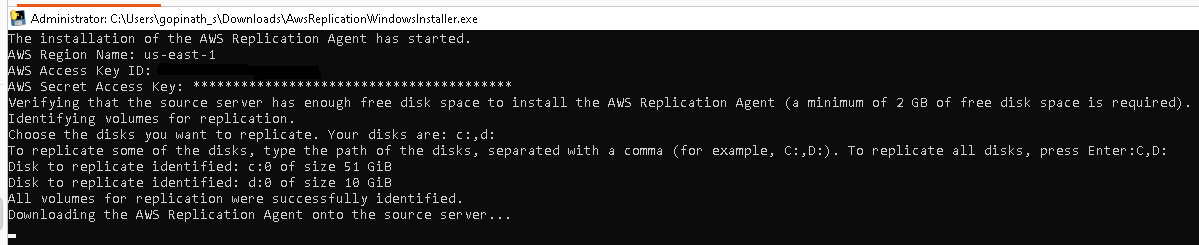
Enter the access key and secret key into the GCP Windows server. The AMS agent will ask which disks to replicate (e.g. C and D drives). For this example we just pressed enter to replicate all disks.
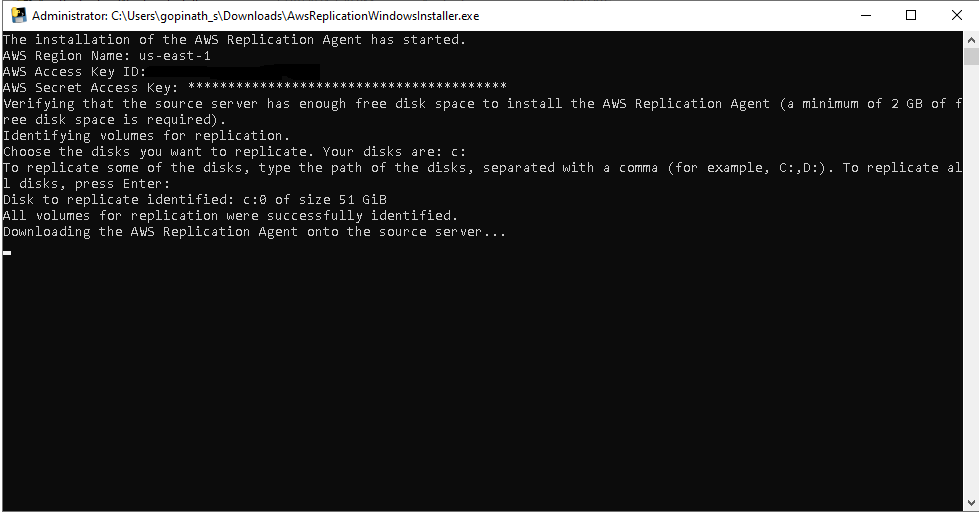
Once done the AMS agent will install and start replicating your data.
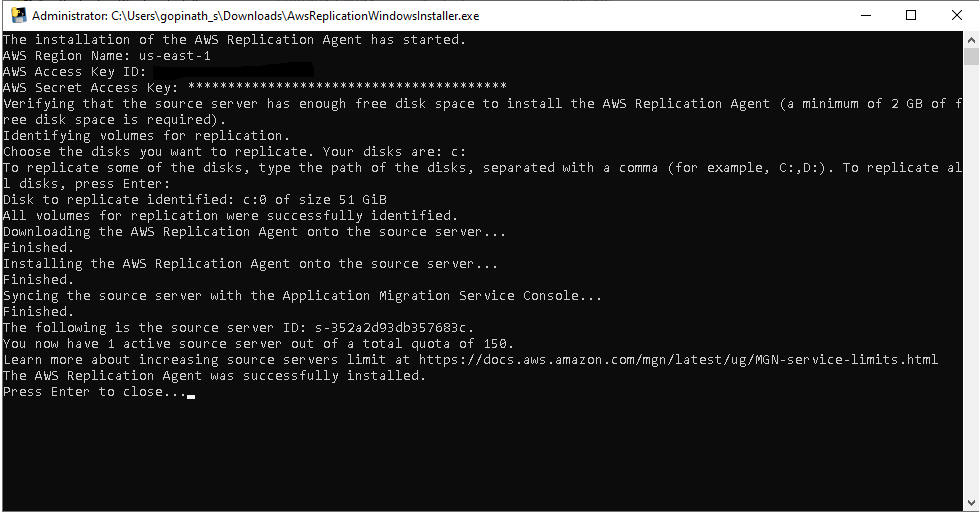
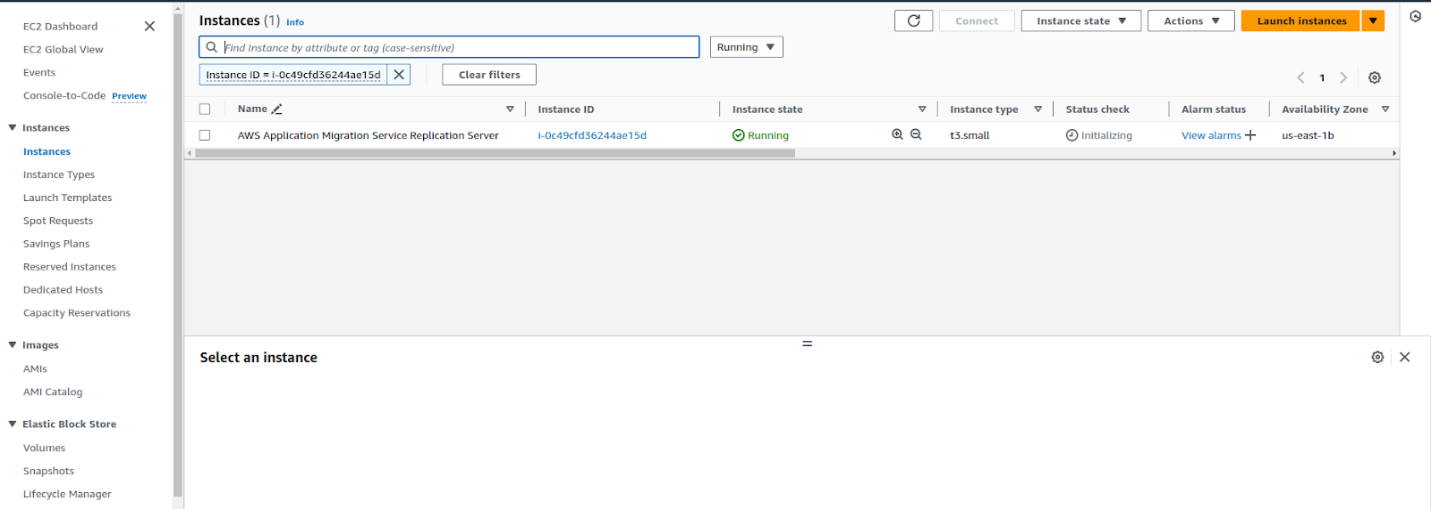
In our AWS account, one instance was created :
After installing the AMS agent on the source Windows server in GCP, a replication server was created in the AWS EC2 console. This instance was used to replicate all VM instance data from the GCP account to the AWS account.
Step 4: Monitor the Data Migration
Go to the Application Migration Service in your AWS account. In the source servers column you should see your GCP VM instance listed.


The data migration will start and you can monitor it. Depending on the size of your boot disk and the amount of data this may take some time.

It took over half an hour to migrate the data from a 51 GB boot disk on a GCP VM instance to AWS. Once completed, it was ready for the testing stage.
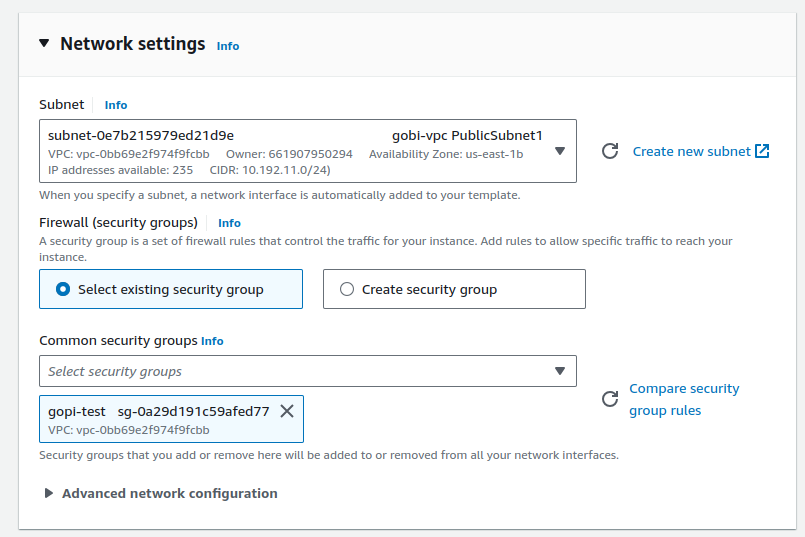
Step 5: Create a Launch Template
After the data migration is done, create a launch template for your use case. This launch template should include instance type, key pair, VPC range, subnets, etc. The new EC2 instance will be launched from this template.
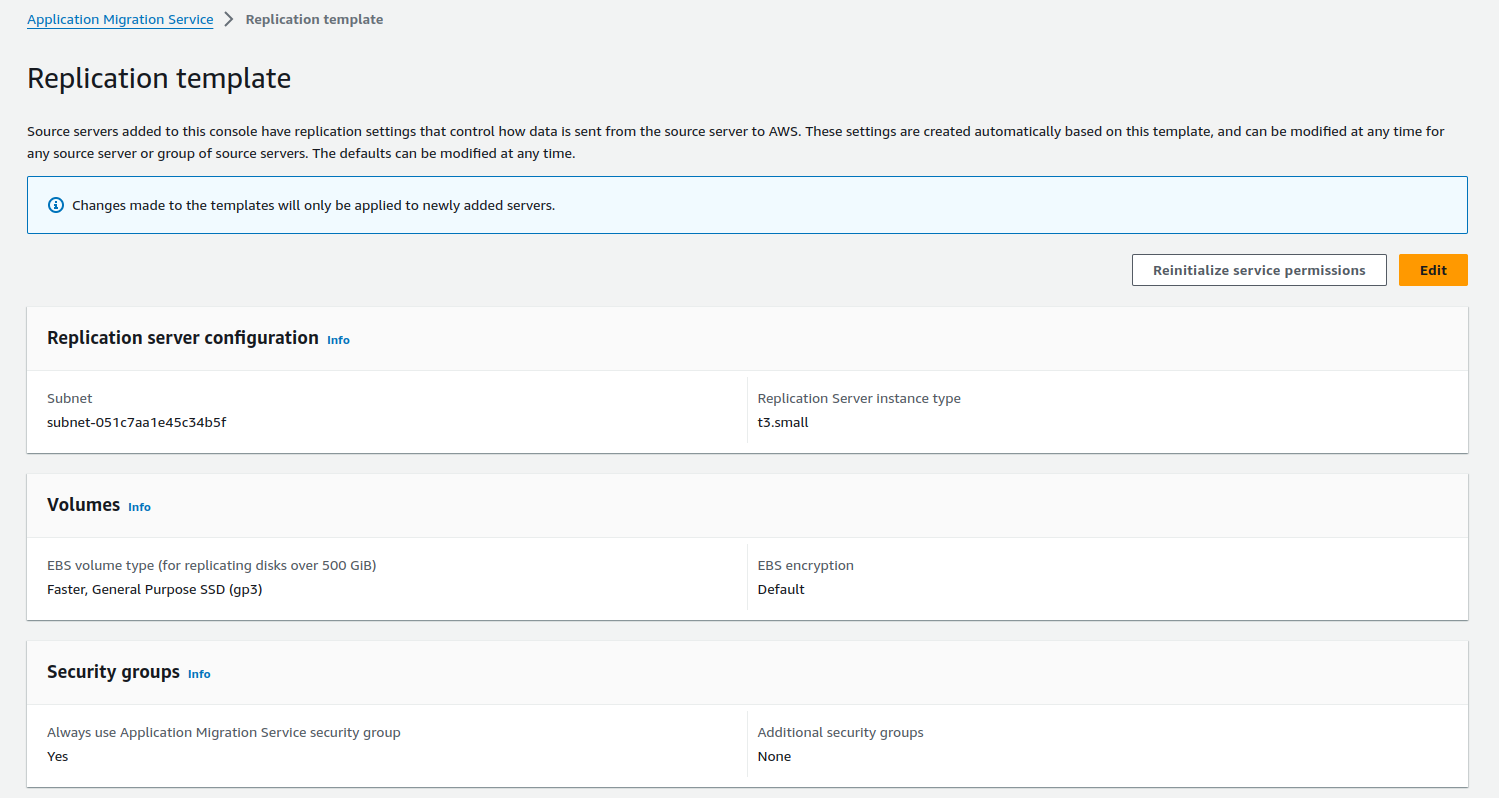
Step 6: Create a Replication Template
Similarly, create a replication template. This template will replicate your data to your new AWS environment.
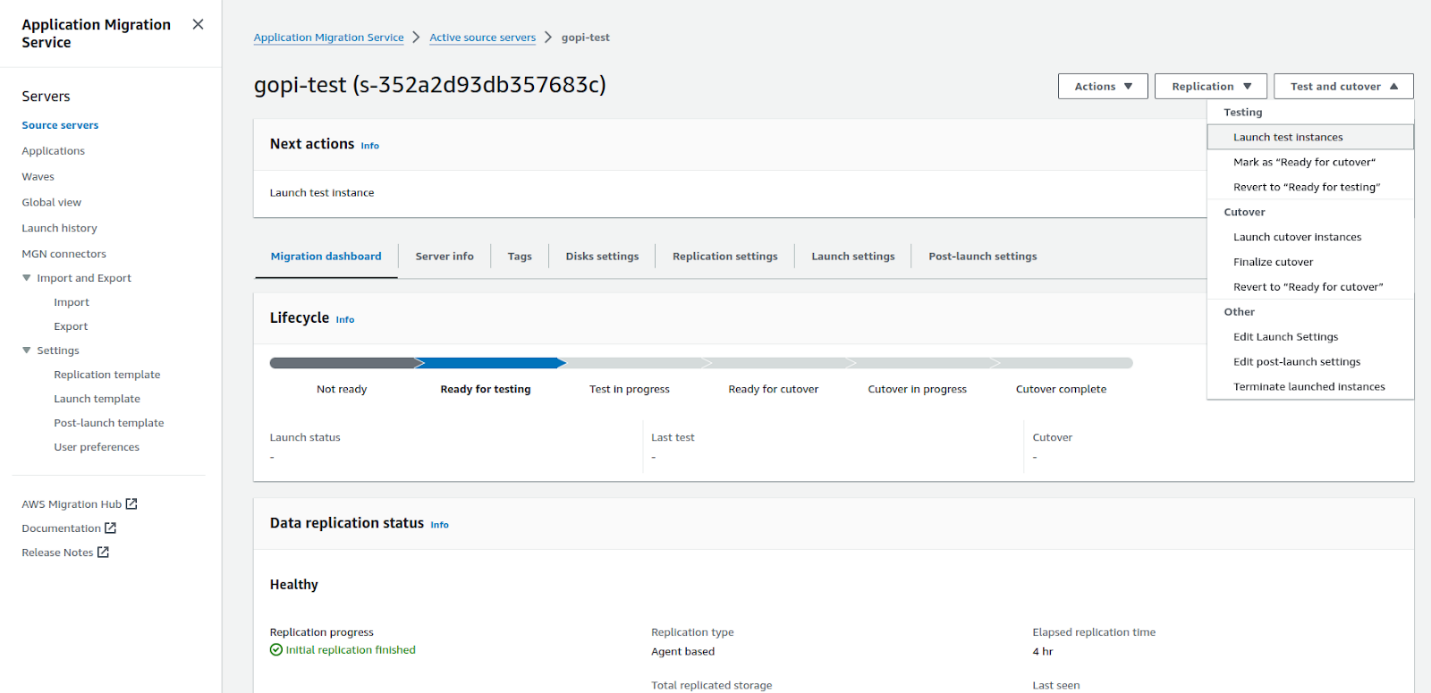
Step 7: Launch an EC2 Test Instance
Once the templates are set up, launch an EC2 test instance from the boot disk of your source GCP VM instance. Take a snapshot of your instance to ensure data integrity. The test instance should launch successfully and match your original GCP VM. This is automated, no manual migration steps.
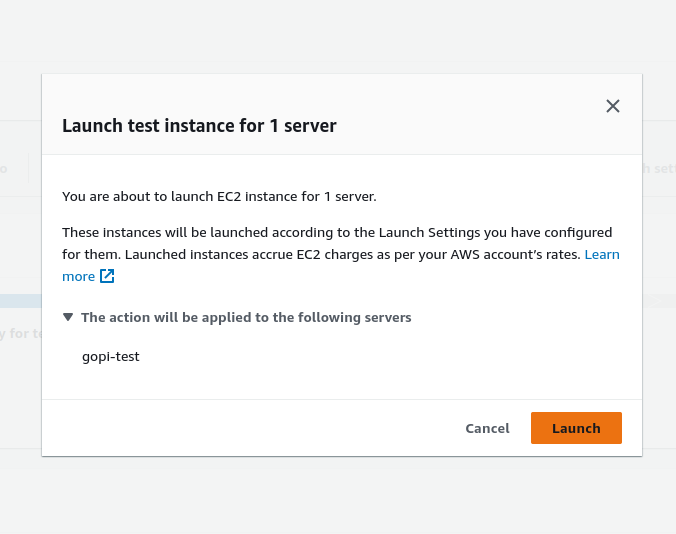
Once we launch a test EC2 instance, everything starts to happen automatically and the test EC2 instance is launched. Below is the automated process for launching the EC2 instance. See the screenshot.
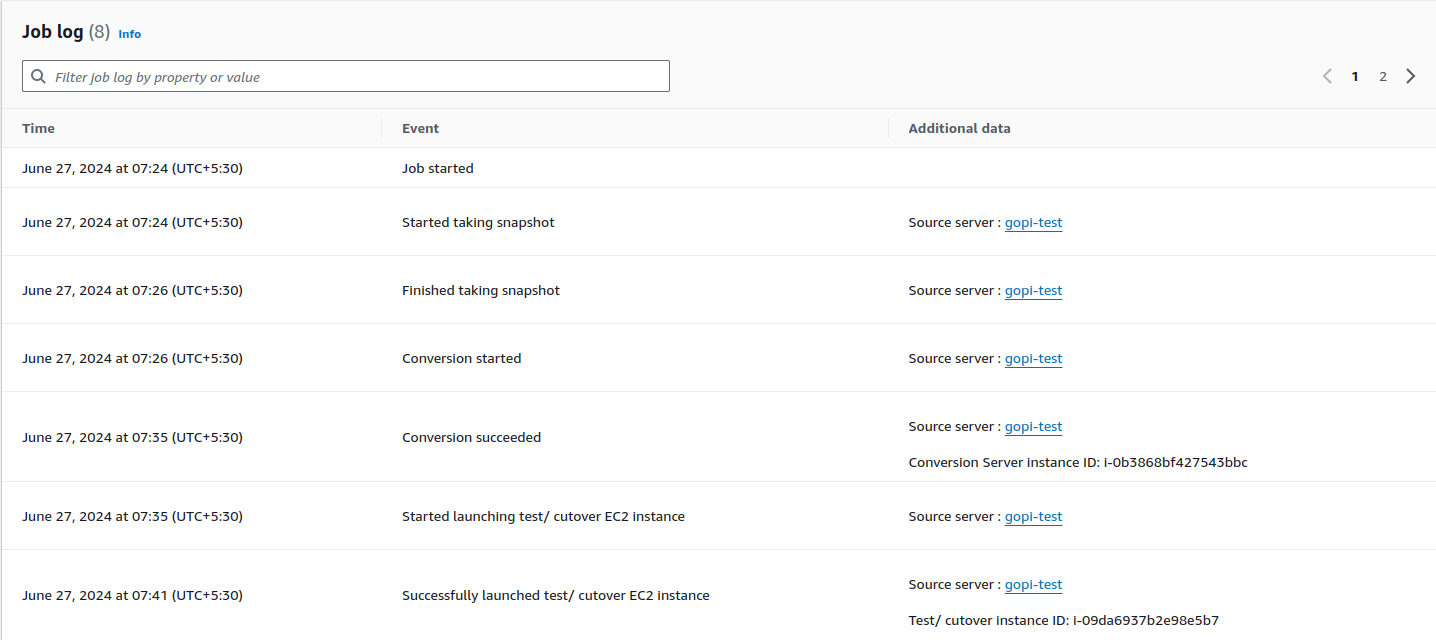
Once the above is done, data is migrated from GCP to AWS using AWS Application Migration Service replication server. You can see the test EC2 instance in the AWS EC2 console as shown below.

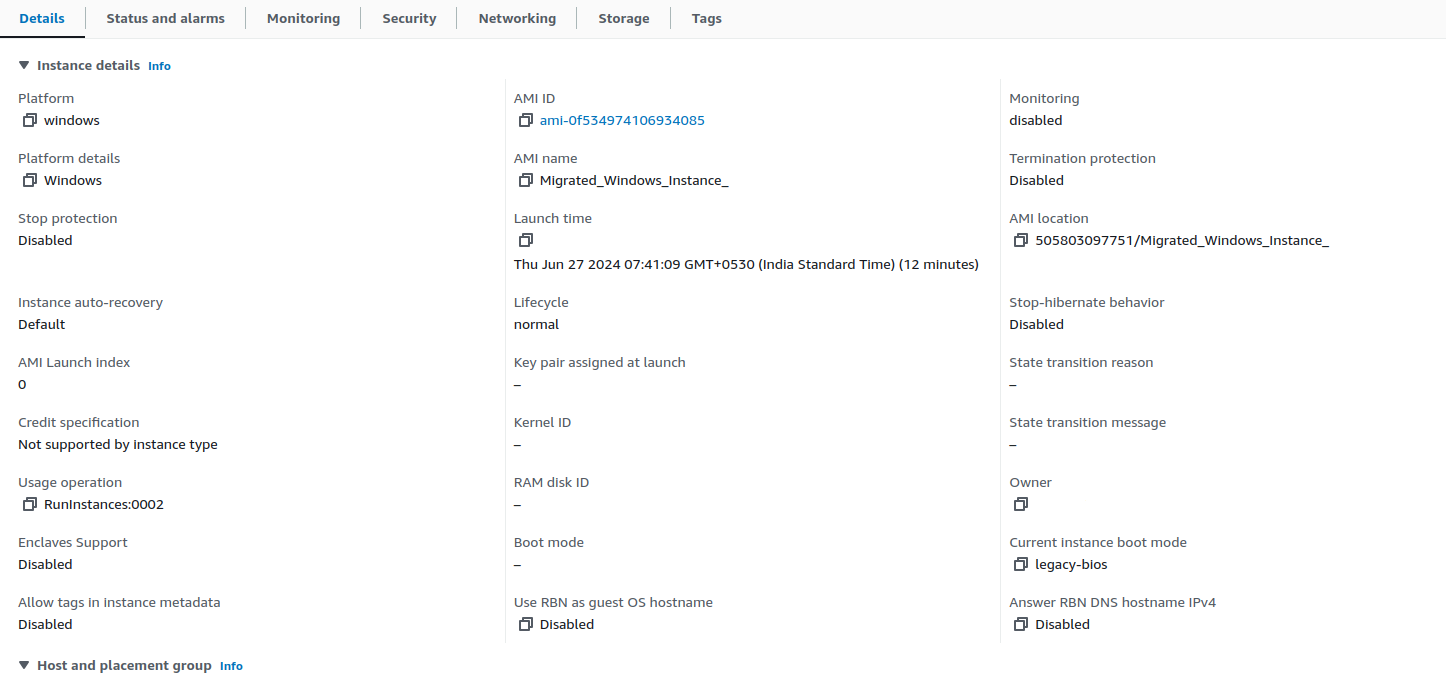
Test EC2 instance configuration for your reference:
Step 8: Final cut-over stage
Once the cutover is complete and a new EC2 instance is launched, the test EC2 instance and replication server are terminated and we are left with the new EC2 instance with our custom configuration. See the screenshot below.

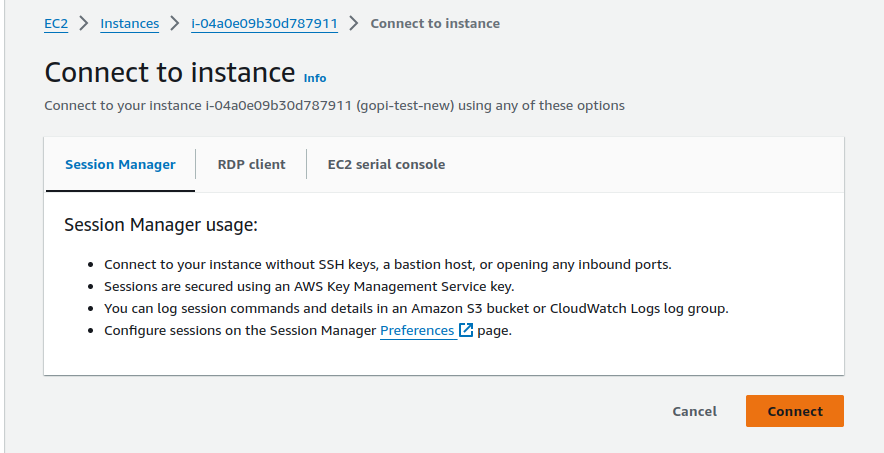
Step 9: Verify the EC2 Instance
Login to the new EC2 instance using RDP and verify all data is migrated. Verify all data is intact and accessible, check for any discrepancies. See our new EC2 instance below:

Step 10: Test Your Application
After verifying the data, test your application to see if it works as expected in the new AWS environment. We tested our sample web application and it worked.
Conclusion
Migrating a VM instance from GCP to AWS is a multi step process but with proper planning and execution it can be done smoothly. Follow this guide and your data will be migrated securely and your applications will run smoothly in the new environment.
ISO 27001:2022 Made Easy: How Ankercloud and Vanta Simplify Compliance
At Ankercloud, our commitment to information security is reflected in our ISO 27001:2022 certification. Leveraging our expertise and advanced tools, we help other organizations achieve the same certification efficiently. With Vanta, we ensure a streamlined, automated, and effective compliance journey, showcasing our dedication to the highest standards of information security.
What is ISO 27001:2022?
ISO 27001:2022 is a global standard for managing and protecting sensitive company information through an Information Security Management System (ISMS). It ensures the confidentiality, integrity, and availability of data by providing a structured approach to managing information security risks.
The ISO 27001:2022 Process (Traditional Approach)
Obtaining ISO 27001 certification requires the following crucial steps
Preparation (1-3 months)
Familiarize with the standard, define the scope, and Perform an initial gap analysis
Implementation (3-6 months)
Develop an ISMS, conduct risk assessments, Implement necessary controls, and document policies
Internal Audit (1-2 months)
Evaluate compliance with the ISMS and identify improvements
Management Review (1 month)
Review ISMS performance and align with organizational objectives
Certification Audit (1-2 months)
Engage a certification body for stage 1 (document review) and stage 2 (on-site assessment) audits
Post-Certification (Ongoing)
Continuously monitor, conduct internal audits, and perform management reviews
In total, the process can take about 6 to 12 months, depending on factors like the organization's size, complexity, and preparedness.
How Vanta Simplifies ISO 27001:2022 Compliance
Vanta, a compliance automation platform, transforms the compliance process by automating security monitoring and evidence collection, making ISO 27001:2022 compliance more manageable. Here's how:
- Automated Security Monitoring: Vanta continuously monitors your systems for security issues, ensuring you meet ISO 27001:2022 requirements without manual intervention.
- Evidence Collection: Vanta automates 90% of the evidence collection, such as access logs, security configurations, and compliance status reports.
- Compliance Management: A centralized dashboard helps manage and track compliance efforts, simplifying the process.
- Risk Assessment: Vanta identifies vulnerabilities and risks, providing effective recommendations.
- Automated Documentation: Generates and maintains required documentation for audits, reducing the manual workload.
With Vanta's automation approach, the ISO 27001:2022 certification process can be significantly expedited, allowing organizations to achieve certification in as little as 2 to 3 months. This accelerated timeline is made possible by Vanta's efficient, automated workflows and continuous monitoring, which streamline compliance tasks and reduce the time typically required for manual processes.
Benefits of Using Vanta Compliance Tools Compared to Traditional Methods
Vanta offers numerous advantages over traditional compliance methods:
- Simplified Management and Guidance: Reduces complexities and provides step-by-step guidance, lowering the administrative burden.
- Automated Detection and Proactive Assessment: Ensures timely identification and prioritization of security risks.
- Real-time Dashboards and Streamlined Audits: Provides immediate visibility into compliance status and simplifies audit preparation.
- Seamless Integration and User-Friendly Interface: Enhances workflow efficiency with seamless integration and an intuitive interface.
- Enhanced Data Protection and Trust Building: Strengthens data protection and demonstrates strong security practices to stakeholders.
- Time and Cost Savings with Continuous Monitoring: Automation reduces time and costs, while continuous monitoring ensures long-term security and compliance.
How Ankercloud Can Help Companies Achieve ISO 27001:2022 Certification Using Vanta
As ISO 27001:2022 certified lead auditors, Ankercloud enhances organizations' information security practices, ensuring compliance with legal and regulatory requirements. We equip organizations with the skills to effectively manage risks, fostering a proactive approach to data protection. Implementing ISO 27001:2022 can streamline operations, improve efficiency, and build trust with customers and stakeholders.
- Expert Guidance: Ankercloud's expertise guides companies through the ISO 27001:2022 process efficiently.
- Platform Utilization: Vanta's automation and monitoring tools streamline compliance.
- Customized Support: Tailored services meet specific company needs, ensuring comprehensive ISO 27001:2022 coverage.
- Accelerated Timeline: Vanta's automated processes and Ankercloud's expertise enable faster ISO certification.
- Continuous Improvement: Ankercloud helps maintain and improve ISMS post-certification, ensuring ongoing compliance and security.
Conclusion
Ankercloud's expertise, combined with Vanta's automation capabilities, offers a powerful solution for companies seeking ISO 27001:2022 certification. By streamlining the compliance process through automated security monitoring, evidence collection, and compliance management, Ankercloud helps companies achieve certification efficiently and effectively. Leveraging Vanta, Ankercloud ensures a smooth and cost-effective journey to certification, enhancing the overall security posture of your organization.
AWS' Generative AI Strategy: Rapid Innovation and Comprehensive Solutions
Understanding Generative AI
Generative AI is a revolutionary branch of artificial intelligence that has the capability to create new content, whether it be conversations, stories, images, videos, or music. At its core, generative AI relies on machine learning models known as foundation models (FMs). These models are trained on extensive datasets and have the capacity to perform a wide range of tasks due to their large number of parameters. This makes them distinct from traditional machine learning models, which are typically designed for specific tasks such as sentiment analysis, image classification, or trend forecasting. Foundation models offer the flexibility to be adapted for various tasks without the need for extensive labeled data and training.
Key Factors Behind the Success of Foundation Models
There are three main reasons why foundation models have been so successful:
1. Transformer Architecture: The transformer architecture is a type of neural network that is not only efficient and scalable but also capable of modeling complex dependencies between input and output data. This architecture has been pivotal in the development of powerful generative AI models.
2. In-Context Learning: This innovative training paradigm allows pre-trained models to learn new tasks with minimal instruction or examples, bypassing the need for extensive labeled data. As a result, these models can be deployed quickly and effectively in a wide range of applications.
3. Emergent Behaviors at Scale: As models grow in size and are trained on larger datasets, they begin to exhibit new capabilities that were not present in smaller models. These emergent behaviors highlight the potential of foundation models to tackle increasingly complex tasks.
Accelerating Generative AI on AWS
AWS is committed to helping customers harness the power of generative AI by addressing four key considerations for building and deploying applications at scale:
1. Ease of Development: AWS provides tools and frameworks that simplify the process of building generative AI applications. This includes offering a variety of foundation models that can be tailored to specific use cases.
2. Data Differentiation: Customizing foundation models with your own data ensures that they are tailored to your organization's unique needs. AWS ensures that this customization happens in a secure and private environment, leveraging your data as a key differentiator.
3. Productivity Enhancement: AWS offers a suite of generative AI-powered applications and services designed to enhance employee productivity and streamline workflows.
4. Performance and Cost Efficiency: AWS provides a high-performance, cost-effective infrastructure specifically designed for machine learning and generative AI workloads. With over a decade of experience in creating purpose-built silicon, AWS delivers the optimal environment for running, building, and customizing foundation models.
AWS Tools and Services for Generative AI
To support your AI journey, AWS offers a range of tools and services:
1. Amazon Bedrock: Simplifies the process of building and scaling generative AI applications using foundation models.
2. AWS Trainium and AWS Inferentia: Purpose-built accelerators designed to enhance the performance of generative AI workloads.
3. AWS HealthScribe: A HIPAA-eligible service that generates clinical notes automatically.
4. Amazon SageMaker JumpStart: A machine learning hub offering foundation models, pre-built algorithms, and ML solutions that can be deployed with ease.
5. Generative BI Capabilities in Amazon QuickSight: Enables business users to extract insights, collaborate, and visualize data using FM-powered features.
6. Amazon CodeWhisperer: An AI coding companion that helps developers build applications faster and more securely.
By leveraging these tools and services, AWS empowers organizations to accelerate their AI initiatives and unlock the full potential of generative AI.
Some examples of how Ankercloud leverages AWS Gen AI solutions
- Ankercloud has leveraged Amazon Bedrock and Amazon SageMaker which powers VisionForge which is a tool to create designs tailored to user’s vision, democratizing creative modeling for everyone. VisionForge was used by our client ‘Arrivae’ a leading interior design organization, where we helped them with a 15% improvement in interior design image recommendations, aligning with user prompts and enhancing the quality of suggested designs. Additionally, the segmentation model's accuracy improvement to 65% allowed for a 10% better personalization of specific objects, significantly enhancing the user experience and satisfaction. Read more
- Another example of using Amazon SageMaker, Ankercloud worked with ‘Minalyze’ who are the world's leading manufacturer of XRF core scanning devices and software for geological data display. We were able to create a ready to use and preconfigured Amazon Sagemaker process for Image object classification and OCR analysis Models along with ML- Ops pipeline. This helped Increase the speed and accuracy of object classification and OCR which leads to increased operational efficiency. Read more
- Ankercloud has helped Federmeister, a facade building company, address their slow quote generation process by deploying an AI and ML solution leveraging Amazon SageMaker that automatically detects, classifies, and measures facade elements from uploaded images, cutting down the processing time from two weeks to just 8 hours. The system, trained on extensive datasets, achieves about 80% accuracy in identifying facade components. This significant upgrade not only reduced manual labor but also enhanced the company's ability to handle workload fluctuations, greatly improving operational efficiency and responsiveness. Read more
Ankercloud is an Advanced Tier AWS Service Partner, which enables us to harness the power of AWS's extensive cloud infrastructure and services to help businesses transform and scale their operations efficiently. Learn more here

Saasification and Cloud Migration for vitagroup: a key player in the highly-regulated German Healthcare sector


Enhancing DDoS Protection with Extended IP Block Duration Using AWS WAF Rate-Based Rules
.png)
Smart Risk Assessment: Bitech’s AI-Driven Solution for Property Insurance

Streamlining CI/CD: A Seamless Journey from Bitbucket to Elastic Beanstalk with AWS CodePipeline


.png)
Setting Up Google Cloud Account and Migrating Critical Applications for Rakuten India
.png)
.png)


.png)
Migration to Cloud and Setting Up of Analytics along With Managed Services

gocomo Migrates Social Data Platform to AWS for Performance and Scalability with Ankercloud

Benchmarking AWS performance to run environmental simulations over Belgium


Model development for Image Object Classification and OCR analysis for mining industry


Achieving Cost Optimization, Security, and Compliance: Ankercloud's AWS CloudOps Solutions for Federmeister


Replication of On-premise Infrastructure into AWS Cloud on Docker Swarm platform

Please Type Other Keywords
The Ankercloud Team loves to listen